|
Editing a Table |
  
|
Editing a Table
|
Editing a Table |
|
Overview
You can alter the structure/properties of the table(s) you have created. This, however, implies the loss of the data you have already entered.
To Edit the Structure of a Table
Step-by-step
1. Open the "Local Database" module.
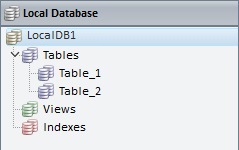
2. In the "Tables" section, right-click the table with the structure you want to edit.
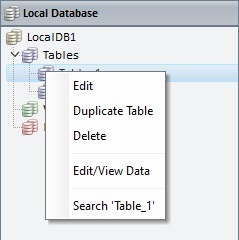
3. Click "Edit" to open the selected table's properties window.
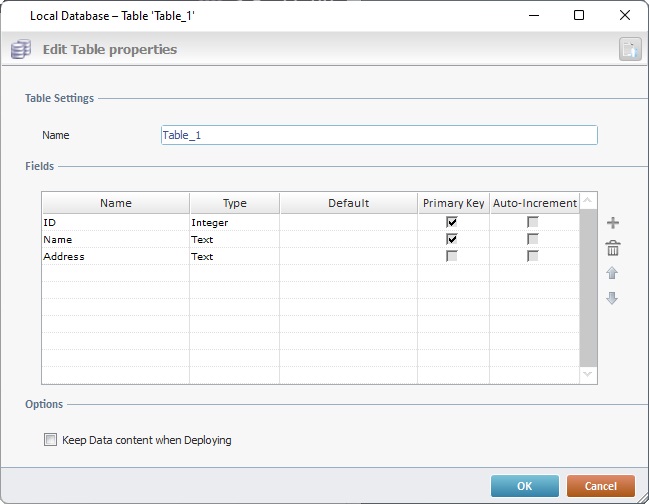
4. Edit the following fields, as required:
Table Settings |
|
Name |
Maintain or modify the table's name. |
Fields |
|
Name |
Maintain or enter a new name for the required field(s) |
Type |
Maintain or select another data type. |
Default |
Maintain, remove or enter a new default value. |
Primary Key |
Maintain the current choice OR check the required field to define it as a primary key/uncheck the required field so it no longer is a primary key.
The table should ONLY have 1 defined primary key. Be aware that if you check the "Auto-Increment" option of any other field, that field will, automatically, become a primary key.
|
Auto-Increment |
Auto-Increment ONLY applies to the value of the defined primary key field.
Maintain the current choice OR check/uncheck to enable/disable the automatic increment of the corresponding field.
|
Options |
|
Keep Data content when Deploying |
Maintain or check/uncheck the option regarding table content. Checking this option ensures that the data contained in the current table, and not just its structure, will be delivered with the project, if you upload it onto a device, use MCL-Simulator or MCL-Tracer to test/analyze the project. |
5. If required, click ![]() to add more fields or
to add more fields or ![]() to delete the selected field.
to delete the selected field.
6. If you want to, click ![]() (on the window's upper right corner) to open the "Edit/View Data" window and view/edit the data contained in the selected table.
(on the window's upper right corner) to open the "Edit/View Data" window and view/edit the data contained in the selected table.
7. Click ![]() to apply your modifications.
to apply your modifications.
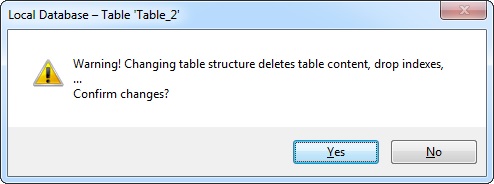
8. Confirm the editing operation.