|
Working with Data File to DB Process |
  
|
Working with Data File to DB Process
|
Working with Data File to DB Process |
|
Process Purpose
The "Data File to DB" process is used to import data from a data file (ANSI or UTF-8), into a local database table.
When you add a process, you are required to define its settings. This occurs in the process's properties window which is displayed automatically after having added the "Data File to DB" process. The properties window includes two tabs - "General" and "Advanced".
If any subsequent edition is required, double-click the process to open its properties window and enter the necessary modifications.
"General" tab
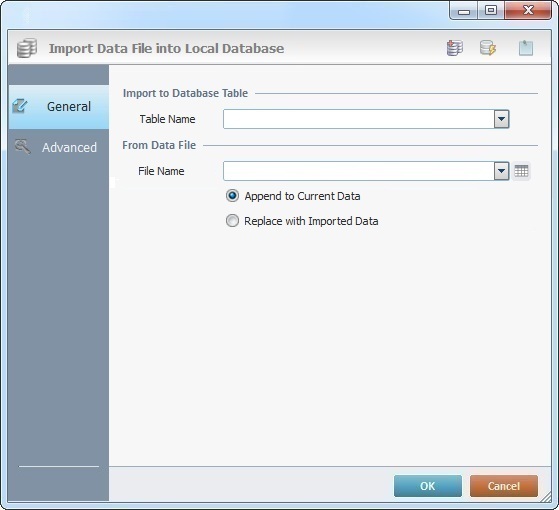
Fill in the following options:
Import to Database Table |
|
Table Name |
Select the local database table that will receive the imported records from the drop-down. |
From Data File |
|
File Name |
Define the source data file that contains the records to import. If necessary, click |
Append to Current Data |
Check this option, if the imported data is to be added to the local database table. |
Replace with Imported Data |
Check this option, if the imported data is to replace the existing data in the local database table. |
Go to the "Advanced" tab.
"Advanced" tab
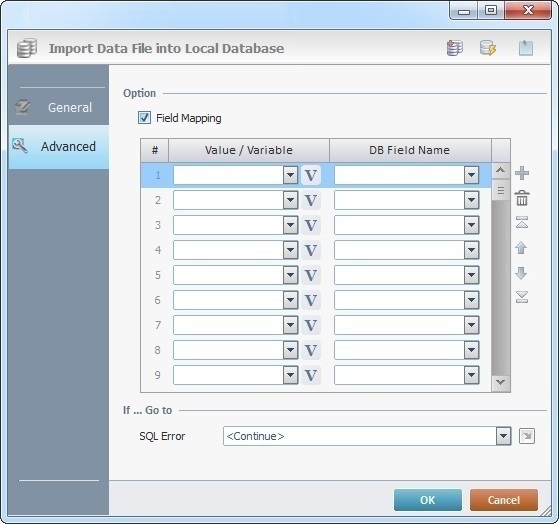
Option |
|
Field Mapping |
Check this option to enable the "Value / Variable" column. When enabled, it allows for the mapping of fields from the local file into the local database table fields. |
Value/Variable |
Select the fields of the source data file from the drop-down OR click |
DB Field Name |
Select the field(s) that will receive the imported record(s) from the drop-down. |
If ... Go to |
|
SQL Error |
Select a target location from the drop-down or the
|
Use the editing icons to the right of the table to move the rows up and down and to delete or add more rows.
Detail of a  window:

"S:Menu" is a screen included in the same program as the process.
"R:Routine_1" is a routine included in the same program as the process.
If required, use the icons on the upper right corner of the properties window:
 Click it to create a new table in a local database. See Creating a Table.
 Click it to test SQL scripts. See To Test SQL Scripts.
 Use the icon to attach any relevant notes to this process. Click it and enter your notes in the resulting text box. These notes will be displayed in the corresponding "Actions" tab or "Process" window (in the "Notes" field) and in the "Developer Report".
After filling in the required options, click  to conclude or
  to abort the operation.
The added process is displayed in the corresponding "Actions" tab or "Process" window.
 You can use relative paths to refer the file(s) you want to use in your project. See Working with Aliases.
If you want to use a label as a target destination, you can use the "Auto-Label" mechanism. This alternative to the "Set Label" process allows you to create a label in the properties window of a process - specifically, in the fields used to define target destinations (ex: the "If Error..." type fields). See To Automatically Create a Label.
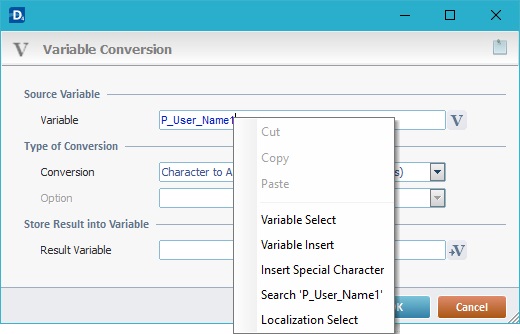
Use the right-click in MCL-Designer's input boxes to access some related options as well as the general "Cut", "Copy"; "Paste"; "Search" actions (active/inactive according to the current context).
Ex: If you right-click the "Variable" input box (included in a "Conversion's" properties window), you are provided with general editing/search actions and other more specific options such as "Variable Select" (see "Variable Select"); "Variable Insert" (see "Variable Insert"); "Insert Special Character" (see To Insert Special Characters into a Control's Text Input Field) and "Localization Select" (see Localization List).
If you right-click another input box, it may provide other possibilities.
You can also right-click drop-downs to access general or specific edition options (active/inactive according to the current context). For instance, the "Sort by Name" option will allow you to, temporarily, sort the listed items alphabetically. This is particularly helpful when searching for a specific element and the drop-down includes a very long list.
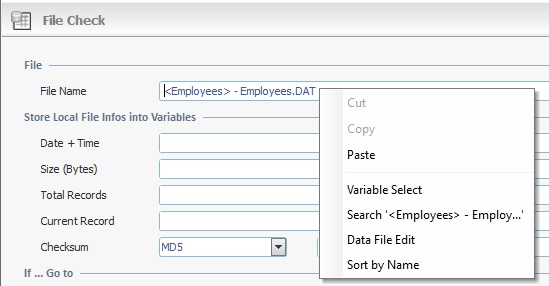
 to edit the selected data file. See
  and select a variable with that value. You can insert records with up to 80 values at once.
  When defining a screen as a target destination (