|
MCL-Designer V4 Workflow |
  
|
MCL-Designer V4 Workflow
|
MCL-Designer V4 Workflow |
|
Overview
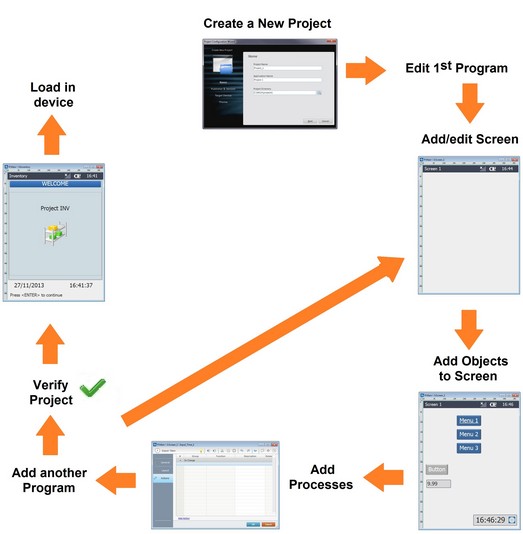
The illustration below shows a typical MCL-Designer V4's workflow, starting with new project creation, and ending with the sending of a completed project (that is to say, an application) to a device.
Step-by-Step
1. Create a new project. See Creating a New Project.
2. Edit the initial program ("Main program") which is automatically added after creating a new project.
Create all the necessary program routines and procedures in the Main program. See How to Work with Programs.
3. Edit the initial screen which is automatically generated after creating a new project.
4. Add objects to the screen (items such as text, shapes, menu buttons, etc.) and edit their style for customization. See How to Work with Screens.
5. Add processes to the screens and the objects within (processes contain the logic of the application). See How to Work with Processes.
6. Create any additional programs that are required for the application (for example, an inventory program, an audit program, etc.) and furnish them with screens, program routines, procedures and processes. (repeat steps 4 to 5). See How to Work with Programs.
7. Use MCL-Designer V4.'s "Verifier" to make sure the project does not contain any inconsistencies or errors. See Detailing the Icon Shortcut Bar.
8. Test the applications on your computer, with the help of the "Simulator" contained in MCL-Designer V4. These simulation and debugging steps are useful for highlighting logic flow and code flaws. See Simulating a Project.
9. Finally, once the project is thoroughly tested, it can be moved to the production environment by using the "Load to Device" option (located in the Menu Bar Area > Project) or the ![]() icon. The project is now ready for production use. See Detailing the Icon Shortcut Bar.
icon. The project is now ready for production use. See Detailing the Icon Shortcut Bar.
An MCL-Designer V4 Basic Architecture
The illustration below shows a basic workflow when using MCL-Designer V4:
The project is created in a workstation and, after it is finished, is loaded, via USB cable or WiFi, to the device. |
