|
Host/Aux |
  
|
Host/Aux
|
Host/Aux |
|
Overview
The "Host/Aux" tab contains project information regarding communication settings via MCL-Net V4, Web Services (that may or may not require an Authorization profile) and/or TCP/IP (Host profiles) and communication settings with external devices using Serial, Bluetooth or Socket TCP connections (Aux profiles).
These options can be edited during project development (only unpublished projects can have their settings edited).
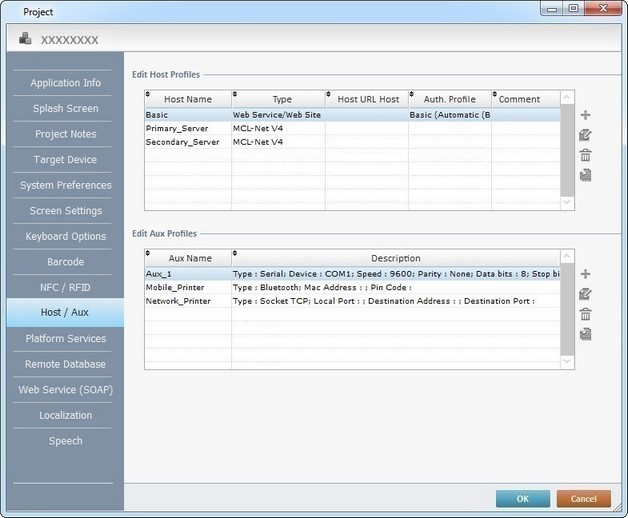
This tab includes two tables, one with the available Host profiles and another one with the Aux profiles.
Host profiles and Aux profiles can be added, deleted,edited or copied by using the ![]() buttons located to the right of the corresponding table.
buttons located to the right of the corresponding table.
Click ![]() to apply the modifications OR proceed to another tab.
to apply the modifications OR proceed to another tab.
To have more detailed information on creating and editing a Host profile, see:
The Host profiles of a "Web Service/Web Site" type may or may not require an authorization profile. For more information on Authorization Profiles, see:
To have more detailed information on creating and editing an Aux profile, see:
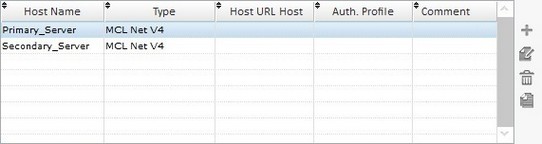
Host Profiles
The "Edit Host Profiles" table includes the default host profiles ("Primary_Server" and "Secondary_Server") and both use an MCL-Net V4 server.
![]() The communication between application and host can be synchronous or asynchronous. Consider the best type of communication for your project when creating a host profile (server type selection) because it will affect the application's workflow. Check the details/behavior of a synchronous and an asynchronous communication within the MCL environment.
The communication between application and host can be synchronous or asynchronous. Consider the best type of communication for your project when creating a host profile (server type selection) because it will affect the application's workflow. Check the details/behavior of a synchronous and an asynchronous communication within the MCL environment.
Synchronous Communication |
Asynchronous Communication |
|
Details |
•Occurs in real time •Is executed in the foreground •Is affected by a defined time out (in the host profile) |
•May or may not occur in real time •Is executed in the background •Application/host connection guaranteed by a background mechanism •The time out and/or the retries (defined in the host profile) affect the background mechanism |
Behavior |
The application workflow stops until communication between application and host is successful or a communications error is established (ex: after a time out runs out) |
The application workflow does NOT stop The data being sent/received is put "in queue" and a background mechanism takes care of the communication to the host |
Host profiles can be created in the "Host/Aux" tab of the "Project Properties" window but, also, within the processes included in the Host Services, Web Services and Remote Database process groups. See Working with Host Services Processes Group OR Working with Web Services Processes Group OR Working with Remote Database Processes Group.
Choose the most appropriate step-by-step according to your project requirements.
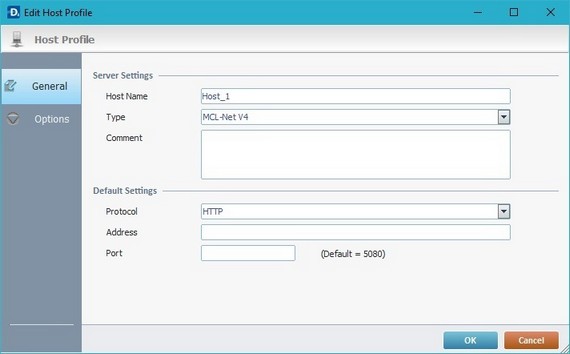
MCL-Net V4 is an MCL product. This server type is used in the default "Primary" and "Secondary" servers. Its default port is "5080".
Step-by-Step
1. Use one of the following to access the host profiles' table:
a. Open the "Project" menu (located in the Menu Bar), select the "Properties" option and open the "Host/Aux" tab. The existing host profiles are displayed in a table.
b. Click
2. Click
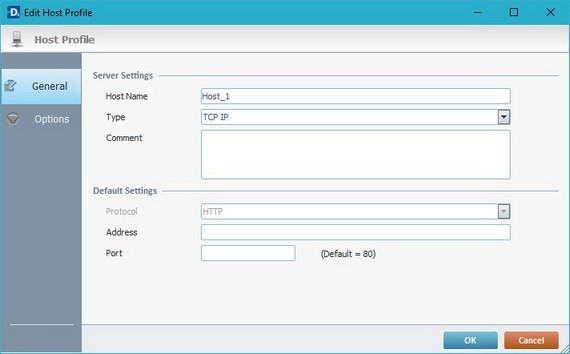
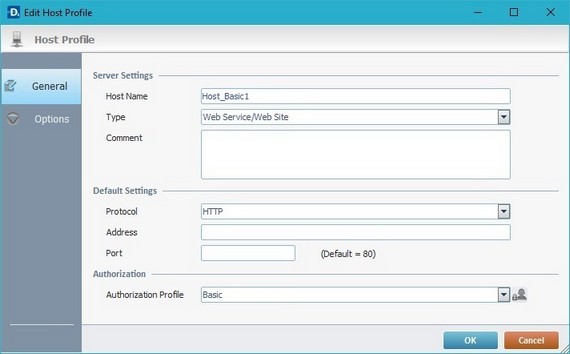
3. In the "General" tab (open by default), fill in the following options:
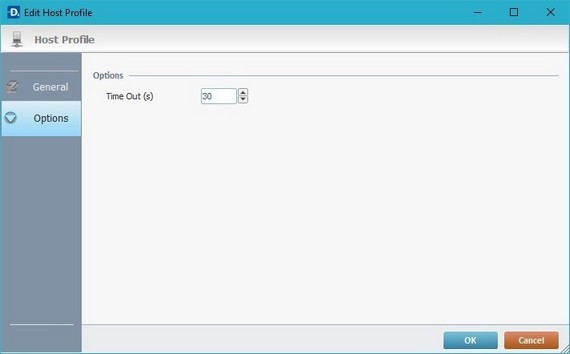
4. Open the "Options" tab.
5. Define a time out (in seconds) for the data communication to occur. See Time Out.
6. Click
|
||||||||||||||||
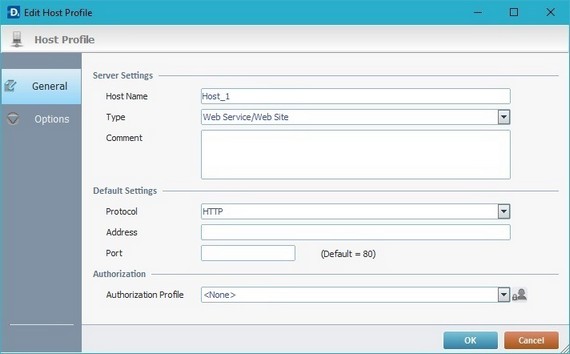
The Web Service/Web Site host type is used to call web services. Web Services related processes ONLY use "Web Service/Web Site" type Hosts. Its default port is "80".
Step-by-Step
1. Use one of the following to access the host profiles' table:
a. Open the "Project" menu (located in the Menu Bar), select the "Properties" option and open the "Host/Aux" tab. The existing host profiles are displayed in a table.
b. Click
2. Click
3. In the "General" tab (open by default), fill in the following options:
4. Open the "Options" tab.
5. Define a time out (in seconds) for the data communication to occur.See Time Out. NOT applicable, if the option is inactive.
6. Click
|
||||||||||||||||||||
The TCP IP host type uses a TCP IP socket on a specific port.
Step-by-Step
1. Use one of the following to access the host profiles' table:
a. Open the "Project" menu (located in the Menu Bar), select the "Properties" option and open the "Host/Aux" tab. The existing host profiles are displayed in a table.
b. Click
2. Click
3. In the "General" tab (open by default), fill in the following options:
4. Open the "Options" tab.
5. Define the following:
6. Click
|
||||||||||||||||||||||||||||||
Step-by-Step
1. Use one of the following to access a host profiles' table:
![]()
Consider the host profile you want to edit before choosing a or b to access a host profile table. If you open the "Host/Aux" tab, you will view all the project's host profiles. If you use a process to open a host profiles table, only the host profiles that are compatible with that process will be available.
a. Open the "Project" menu (located in the Menu Bar), select the "Properties" option and open the "Host/Aux" tab. The existing host profiles are displayed in a table.

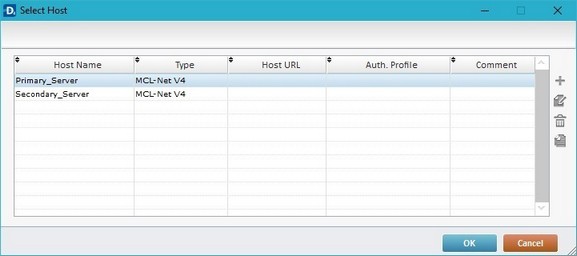
b. Click ![]() (if available) in the properties window of a host related process. This opens another table displaying the host profiles that can be used within the currently open process.
(if available) in the properties window of a host related process. This opens another table displaying the host profiles that can be used within the currently open process.

2. Select the host profile you want to edit.
3. Click ![]() (located to the right of the table) to open the corresponding properties window.
(located to the right of the table) to open the corresponding properties window.

3. Edit the required options in the tab(s).
4. Click ![]() to apply your changes.
to apply your changes.
Step-by-step
1. Use one of the following to access a host profiles' table:
![]()
Consider the host profile you want to delete before choosing a or b to access a host profile table. If you open the "Host/Aux" tab, you will view all the project's host profiles. If you use a process to open a host profiles' table, only the host profiles compatible with that process will be available.
a. Open the "Project" menu (located in the Menu Bar), select the "Properties" option and open the "Host/Aux" tab. The existing host profiles are displayed in a table.

b. Click ![]() (if available) in the properties window of a Host related process. This opens another window with a table displaying the host profiles that can be used within the currently open process.
(if available) in the properties window of a Host related process. This opens another window with a table displaying the host profiles that can be used within the currently open process.
2. Select the host profile you want to remove.
3. Click ![]() (located to the right of the table).
(located to the right of the table).
4. Click ![]() in the resulting window to confirm the deletion.
in the resulting window to confirm the deletion.
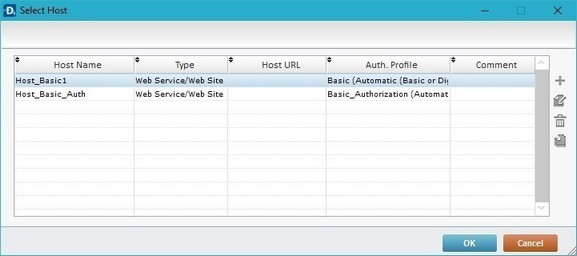
![]() When deleting a Web Service/Web Site Host profile with an Authorization Profile (visible in the "Auth. Profile" column), the Authorization Profile is not deleted.
When deleting a Web Service/Web Site Host profile with an Authorization Profile (visible in the "Auth. Profile" column), the Authorization Profile is not deleted.
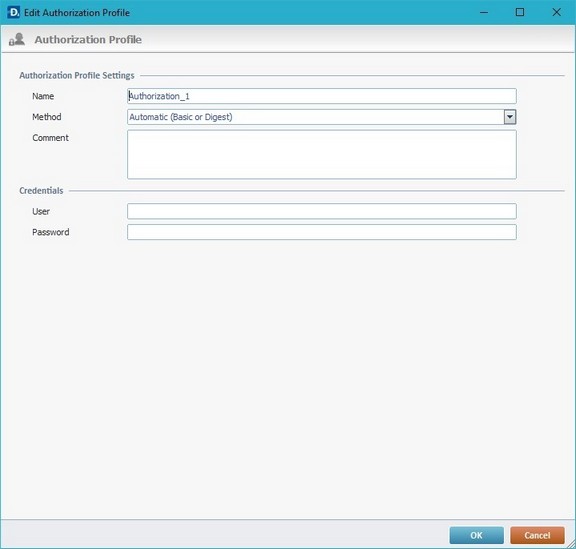
An Authorization Profile defines the type of authorization/authentication required by the host profile (connection to web services that require identification from the user (User, Password)).
Authorization Profiles are NOT an autonomous element, they are always associated to/used by a Web Service/Web Site Host Profile. They are displayed in the Host Profiles table, specifically, in the "Auth. Profile" column, and can also be accessed in the properties window of Web Services processes. See Working with Web Services Processes Group.
To Create an Authorization Profile
All the Authorization Profiles you create are of the "Automatic (Basic or Digest)" type.
Authorization Profiles are always associated to Host Profiles so, to create one you must, first, create a Web Service/Web Site Host Profile, as this is the Host Profile type that uses Authorization Profiles.
You can reach the Host Profiles table:
•via the "Host/Aux" tab (a project properties tab). It provides access to ALL the Host Profiles and associated Authorization Profile within the current project.
OR
•via a Web Services process, meaning, via its properties window. In this case, you ONLY have access to the Host Profiles (and attached Authorization Profile) that are compatible with the selected process.
Use one of the following step-by-steps to access the Host Profile table where you will create a "Web Service/Web Site" Host Profile and its Authorization Profile.
Step-by-Step
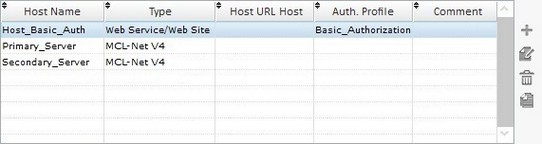
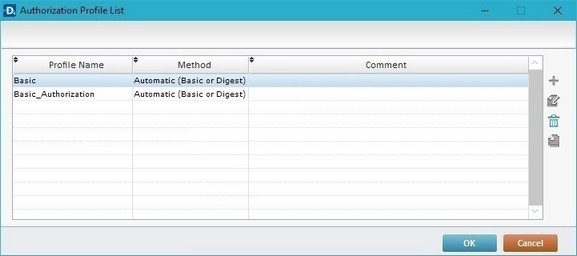
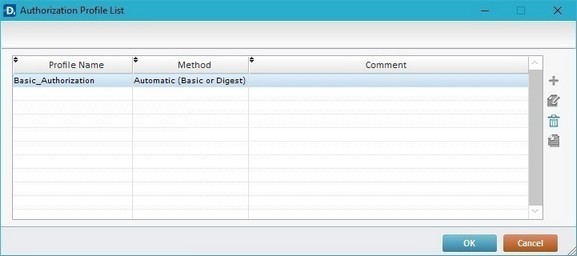
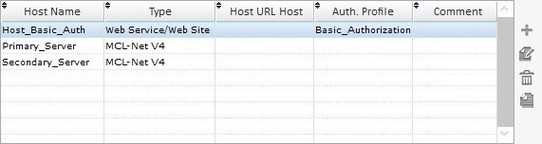
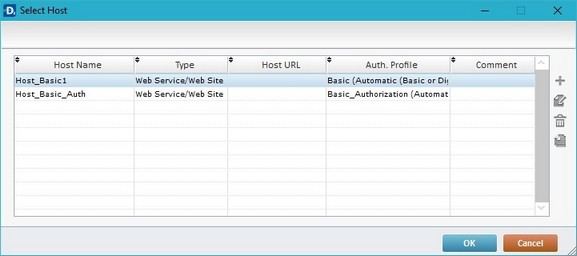
1. Access the "Project" menu (located in the Menu Bar), select the "Properties" option and open the "Host/Aux" tab. The available Authorization Profiles are displayed in the top table (related to the Host Profiles). Each Authorization Profile is attached to the Web Service/Web Site Host Profile that uses it (check the "Auth. Profile" column).
2. Click
3. In the "General" tab (open by default), fill in the following options:
4. Click
5. Click
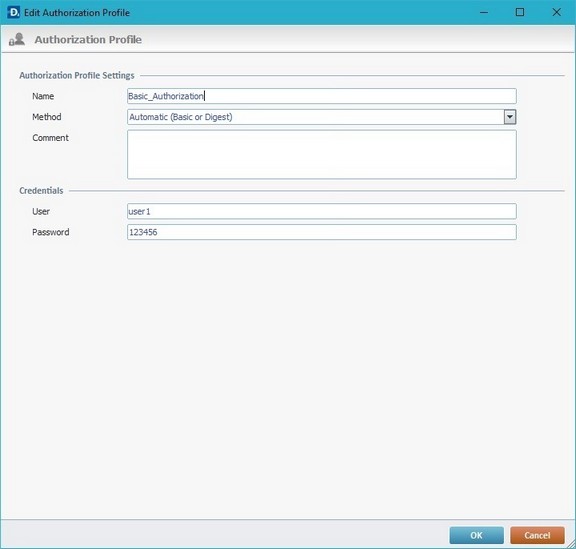
6. Fill in the following options:
7. Click
8. The profile you have created is selected so, click
9. Open the "Options" tab.
10. Define a time out (in seconds) for the data communication to occur. See Time Out.
11. Click
|
||||||||||||||||||||||||||||||
Step-by-Step
1. Click
2. Click
3. In the "General" tab (open by default), fill in the following options:
4. Click
5. Click
6. Fill in the following options:
7. Click
8. The profile you have created is selected in the Authorization Profile List so, click
9. Open the "Options" tab.
10. Define a time out (in seconds) for the data communication to occur. See Time Out.
11. Click
12. The newly created Host Profile (and related Authorization Profile) is selected so, click
|
||||||||||||||||||||||||||||||
To Edit an Authorization Profile
An Authorization Profile is always associated to a Host Profile.
There are 2 ways to access the existing Authorization Profiles:
•via the "Host/Aux" tab (a project properties tab). It provides access to all the Host Profiles and associated Authorization Profile within the current project.
•via a Web Services process, meaning, via its properties window. In this case, you ONLY have access to the Host Profiles (and attached Authorization Profile) that are compatible with the selected process.
Choose the most appropriate step-by-step to access the Authorization Profile you want to edit.
Step-by-Step
1. Open the "Project" menu (located in the Menu Bar), select the "Properties" option and open the "Host/Aux" tab. The Authorization Profile is displayed attached to the Host Profile that uses it (check the "Auth. Profile" column).
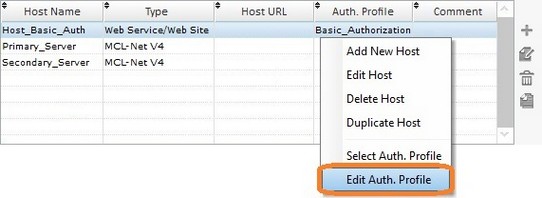
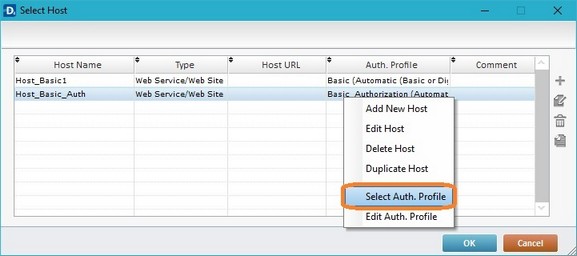
2. Right-click the "Authorization Profile" you want to edit (ex: Basic_Authorization) and select the "Edit Auth. Profile" option.
3. This opens the selected Authorization Profile's properties window.
4. Edit the required options.
5. Click
6. Keep clicking
|
Step-by-Step
1. Click
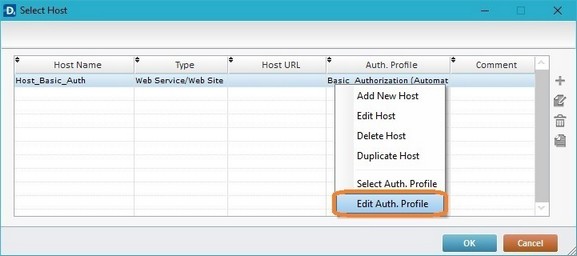
2. Right-click the "Authorization Profile" you want to edit (ex: Basic_Authorization) and select the "Edit Auth. Profile" option.
3. This opens the selected Authorization Profile's properties window.
4. Edit the required options.
5. Click
6. Click
|
To Delete an Authorization Profile
To delete an Authorization Profile you must first access the Host Profile it is associated to.
Use the "Host/Aux" tab (a project properties tab displaying all the Host Profiles and associated Authorization Profiles created within the current project) OR open the properties window of a Web Services process to access a table with Host Profiles (and related Authorization Profiles) that are compatible with that process.
Choose the most suitable step-by-step to access the Authorization Profile you want to delete.
Step-by-Step
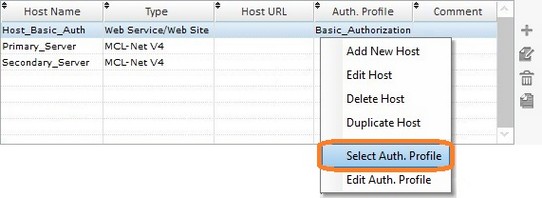
1. Open the "Project" menu (located in the Menu Bar), select the "Properties" option and open the "Host/Aux" tab. The existing authorization profiles are displayed in a table (see the "Auth. Profile" column).
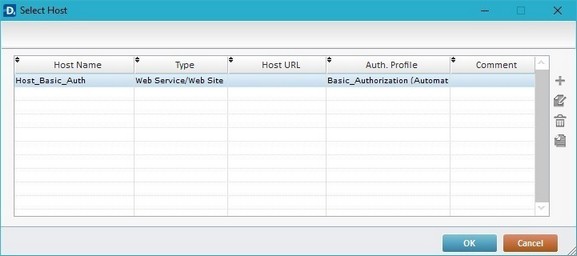
2. Right-click the "Authorization Profile" you want to delete (ex: Basic_Authorization) and select the "Select Auth. Profile" option.
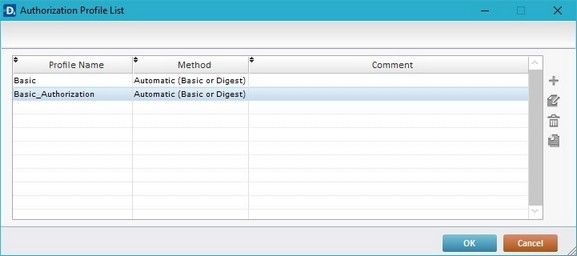
3. This opens a window with the available Authorization Profiles.
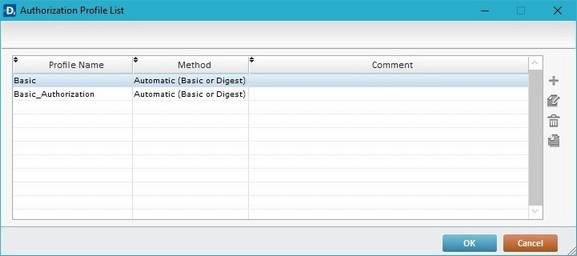
4. Select the "Authorization Profile" you want to delete (ex: Basic).
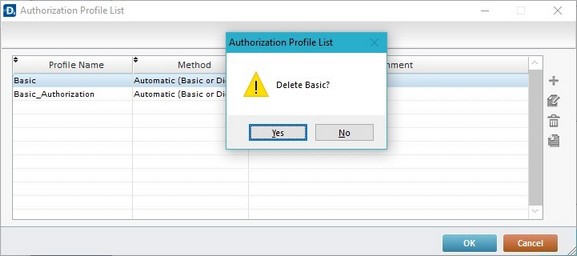
5. Click
6. Click
|
Step-by-Step
1. Click
2. Right-click a row with a Host Profile/"Authorization Profile" and select the "Select Auth. Profile" option.
This opens the "Authorization Profile List" window with the available Authorization Profiles.
4. Select the "Authorization Profile" you want to delete (ex: Basic).
5. Click
6. Click
|
Aux Profiles
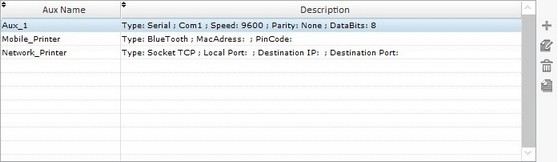
The "Edit Aux Profiles" table displays the connection profiles of peripheral devices, such as a weight scale, mobile printers, etc., which can use bluetooth, serial or socket IP communication protocols.
All the Aux profiles displayed in this tab are made available to the Print/Aux related processes. See Working with Print/Aux Processes Group.
Step-by-Step
1. Use one of the following to open the table with the existing Aux profiles:
a. Open the "Host/Aux" tab of the current project's properties window (Project menu ,in the Menu Bar>Properties option>Host/Aux tab tab).
b. Click ![]() , when available (in the properties window of the "Print/Aux" processes).
, when available (in the properties window of the "Print/Aux" processes).
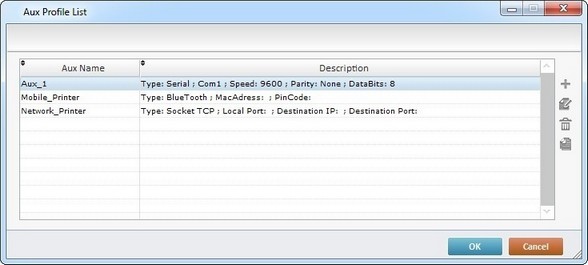
2. Click ![]() (located to the right of the table).
(located to the right of the table).
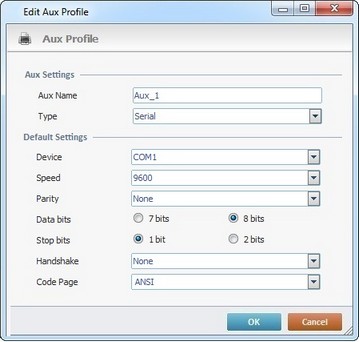
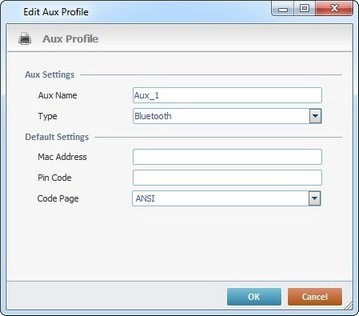
3. In the resulting window, enter a name for the aux profile in the "Aux Name" field.
A profile name is a logical name given by the developer and used to easily identify a profile for later use.
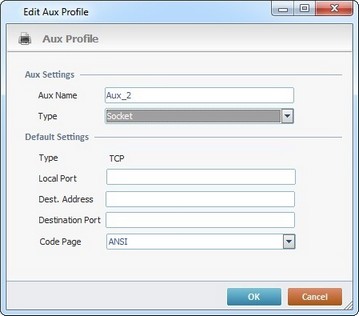
4. Select the communication type ("Serial", "Bluetooth" or Socket") from the drop-down list.
![]()
"Serial" type profiles are NOT supported when used in Android devices.
5. Depending on the selected communication type in the previous option, fill in the active tab with the desired configuration:
|
Serial printer |
|
Device |
Define the Com Device Communication Port ("Com 1" -> "Com 8"). |
|
Speed |
Define the communication speed (1200, 2400, 4800, 9600, 19200, 38400, 57600 or 115200). |
|
Parity |
Select a "Parity" (None, Even or Odd). |
|
Data Bits |
Define the "Data Bits" by checking "7 bits" or "8 bits". |
|
Stop Bits |
Define the "Stop Bits" by checking "1 bits" or "2 bits". |
|
Handshake |
Select a "Handshake" (None, RTS/CTS or Xon/Xoff). |
|
Code Page |
Select the best suited code page from the drop-down. |
|
|
Bluetooth printer |
|
Mac Address |
Enter the device's "Mac Address". |
|
Pin Code |
Enter the device's "Pin Code". |
|
Code Page |
Select the best suited code page from the drop-down. |
|
|
|
|
|
|
|
|
|
|
|
Socket printer |
|
Type |
Select a type of communication connection. |
|
Local Port |
As an option, enter the mobile device's local port. |
|
Dest. Address |
Enter the the Printer/Aux Device's IP address. |
|
Destination Port |
Enter the Printer/Aux Device's port. |
|
Code Page |
Select the best suited code page from the drop-down. |
|
|
|
|
6. Click ![]() to apply your choices.
to apply your choices.
Step-by-Step
1. Use one of the following to open the table with the existing Aux profiles:
a. Open the "Host/Aux" tab of the current project's properties window (Project menu ,in the Menu Bar>Properties option>Host/Aux tab).
b. Click ![]() , when available (in the properties window of the "Print/Aux" processes).
, when available (in the properties window of the "Print/Aux" processes).
2. Access the aux profile you want to edit. Double-click the intended Aux profile OR select it and click ![]() .
.
3. Maintain or edit the available options in the "Serial", "Bluetooth" or "Socket" tab (the active tab depends on the aux type you have previously selected).
4. Click ![]() to apply your modifications or
to apply your modifications or ![]() to abort.
to abort.
Step-by-Step
1. Use one of the following to open the table with the existing Aux profiles:
a. Open the "Host/Aux" tab of the current project's properties window (Project menu ,in the Menu Bar>Properties option>Host/Aux tab).
b. Click ![]() , when available (in the properties window of the "Print/Aux" processes).
, when available (in the properties window of the "Print/Aux" processes).
2. Select the host profile you want to remove.
3. Click ![]() (located to the left of the table).
(located to the left of the table).
4. Click ![]() in the resulting window to confirm the deletion.
in the resulting window to confirm the deletion.