|
Working with Set Value Process |
  
|
Working with Set Value Process
|
Working with Set Value Process |
|
Process Purpose
Each object has a temporary memory space in which the value of the object is stored. This value can be something that the device operator has keyed in but did not validate (no <Enter> or <OK> was pressed, at that point).
The Set Value process is used to write a value in that specific memory space. Keep in mind that setting the value of an object does not affect the variable(s) associated to the object. To do that, the object needs to be validated by the device operator.
This process can only be used to set value on objects which are in the same screen as the process.
When you add a process, you are required to define its settings. This occurs in the process's properties window which is displayed automatically after having added the Set Value process.
If any subsequent edition is required, double-click the process to open its properties window and enter the necessary modifications.
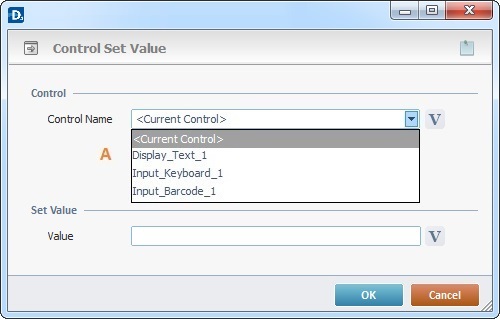
Fill in the options below. The options available in the "Control Name" box (A) depend on the objects displayed on the screen that includes the process.
Control |
|
Control Name |
Select the object to be controlled from the drop-down list or click |
Set Value |
|
Value |
Enter the value or click |
If required, use the icon on the upper right corner of the object's properties window:
![]() Use the icon to attach any relevant notes to this process. Click it and enter your notes in the resulting text box. These notes will be displayed in the corresponding "Actions" tab or "Process" window (in the "Notes" field) and in the "Developer Report".
Use the icon to attach any relevant notes to this process. Click it and enter your notes in the resulting text box. These notes will be displayed in the corresponding "Actions" tab or "Process" window (in the "Notes" field) and in the "Developer Report".
After filling in the required options, click ![]() to conclude or
to conclude or ![]() to abort the operation.
to abort the operation.
The added process is displayed in the corresponding "Actions" tab or "Process" window.
The Set Value process is used with the purpose of manipulating the state/settings of an object, at program level (without device operator manipulation/validation).
The following table displays the values that can be set in each object.
Set Value process |
|
Display Text |
Allows you to replace the Display Text object's text. Use a text and/or a numeric value. This value will be highlighted in the object. |
Display Header |
Allows you to replace the Display Header object's text. Use a text and/or a numeric value. This value will be highlighted in the object. |
Display Line |
N/A |
Display Shape |
N/A |
Input Keyboard |
Allows you to assign a value (text or numeric) to the Input keyboard object. This value will be highlighted in the object. |
Input Barcode |
Allows you to assign a value (text or numeric) to the Input Barcode object. This value will be highlighted in the object. |
Input Date |
Allows you to assign a value with a date format to the Input Date object. This value will be highlighted in the object. Ex: Input_Date_1(Value)=20-10-2015 |
Input Time |
Allows you to assign a value with a time format (HH:MM:SS ) to the Input Time object. This value will be highlighted in the object. Ex: Input_Time_1(Value)=10:30:15 |
Input Spin |
Allows you to assign a numeric value to the Input Spin object. This value will be highlighted in the object. |
Combo Box |
Allows you to highlight a position in the Combo Box object. The value you enter will depend on the object's data source: Text/Variables -Use one of the values of the "Value to Display" option (in the object's General tab). Data File - Use one of the values contained in the selected file's fields (option "Field to Display" in the General tab). Local Database - Use one of the values contained in the selected table's fields (option "Field to Display" in the General tab). |
Input List |
Allows you to highlight a position in the Input List object. Use the number of the position. Ex: "Input_List_1(Value)=2" means the second item will be highlighted. |
Input Cash |
Allows you to assign a numeric value to the Input Cash object. This value will be highlighted in the object. |
Button |
Allows you to replace the Button object's text. Use a text and/or numeric value. This value will be highlighted in the object. |
Softkey |
Allows you to replace the Softkey object's text. Use a text and/or numeric value. This value will be highlighted in the object. |
Menu Button |
Allows you to highlight a position in the Menu Button object. Use the number of the position. Ex: "Menu_Button_1(Value)=3" means the third menu will be highlighted. |
Menu Text |
Allows you to highlight a position in the Menu Text object. Use the number of the position. Ex: "Menu_Text_1(Value)=3" means the third menu will be highlighted. |
Signature Capture |
N/A |
Display Image |
N/A |
CheckBox |
Allows you to establish the CheckBox object's state (Checked or Unchecked). Use the object's "Checked Value" and/or "Unchecked Value". |
Radio Button |
Allows you to highlight a position in the Radio Button object. Use the number of the position. Ex: "Radio_Button_1(Value)=2" means the second item will be selected. |
Gauge |
Allows you to assign a numeric value (between 0 and 100) to the Gauge object. This value will be highlighted in the object. |
Slider |
Allows you to assign a numeric value to the Slider object. This value will be highlighted in the object. |
File Browse |
Allows you to highlight a position in the File Browse object. Use the number of the position. Ex: "File_Browse_1(Value)=2" means the second row will be highlighted. |
Advanced List Box |
Allows you to highlight a position in the Advanced List Box object. Use the number of the position. Ex: "Advanced_List__Box_1(Value)=2" means the second row will be highlighted. |
Grid |
Allows you to highlight a position in the Grid object. Use the position value. Ex: "Grid_1(Value)=2" means the second row will be highlighted. |
![]()
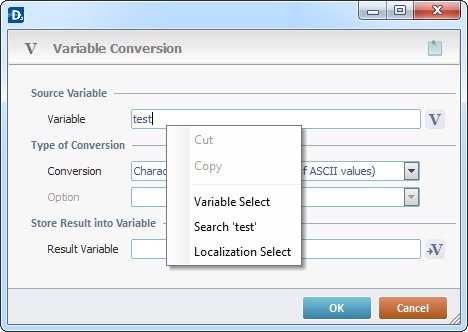
Use the right click in MCL-Designer's input boxes to access certain features regarding the input box's option as well as general actions such as "Copy"; "Paste"; "Search".
Ex: If you right-click the "Variable" input box (included in a "Conversion's" properties window), you are provided with the "Search..."and "Variable Select" options.
If you right-click another input box, it will provide other possibilities.