|
App Desktop |
  
|
App Desktop
|
App Desktop |
|
Overview
App Desktop is an MCL interface in your device that provides the operator with current information in its toolbar (device's name, current time, current type of connection, etc.) and access to uploaded MCL applications. It also includes a menu with several options. See App Desktop Menu Options.
This application is installed along with either MCL-Client or MCL-Agent + MCL-Runtime (depending on your choice of installed MCL product).
To make full use of App Desktop in an Android environment, define it as the default home application.
Since App Desktop interacts with the device's operating system (Windows Mobile/Windows CE or Android), the available menu options can vary depending on the device's model, OS/OS version and/or installed MCL product (MCL-Client or MCL-Agent + MCL-Runtime).
![]()
MCL Technologies has developed a login application that allows for a customized access and view of the App Desktop. This is an optional feature (currently available via your MCL-Mobility Platform account) that, when installed, affects App Desktop use.
This login application handles the operator's identification via the corresponding operator profile. This means that App Desktop will adapt itself to the logged in operator in terms of application access rights/limitations (ex: App Desktop will only display the application shortcut icons that the logged in operator is allowed to access).
Prior to login in via the MCL login application, there are no available application shortcut icons.
There is a speech (MCL-Voice Operator Login) and a non-speech (MCL Operator Login) version of the login application. If you install/use the speech version, you can perform a login using speech but you will NOT be able to launch the applications available in App Desktop with speech commands. The App Desktop itself does NOT include speech attributes.
Refer to the MCL-Mobility Platform User Guide for more information on the MCL Operator Login application.
![]()
MCL-Client supports "PIN", "Pattern" and "Password" as secured lock screen options for Android devices. Lock options such as "None" and "Slide" (or similarly insecure lock screen options) are not supported.
![]()
When an MCL application is not running in the front, the target device's OS can decide to shut it down to free resources. As a result, when the operator leaves the MCL environment/enters the device's OS and, then, decides to return to the MCL application, the application may NOT resume its flow/state .
We recommend enabling the Kiosk Mode (see To Enable Kiosk Mode) in the target device(s) and adding the necessary shortcuts to MCL's App Desktop or even adding the necessary processes within the MCL application (ex: If you want the operator to have access to a specific external application and the target device is an Android device, use the Start Android Activity process to call that external application).
App Desktop
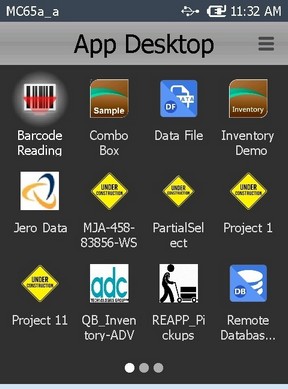
This is an example of a general view of the App Desktop in your device:
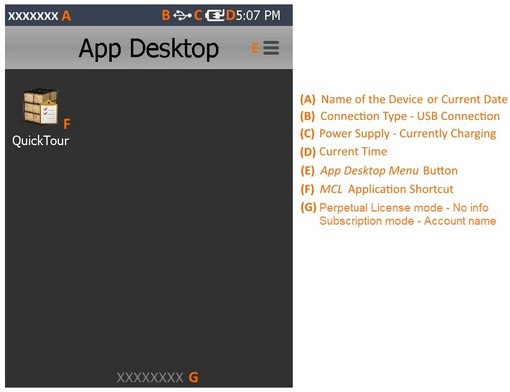
A This information (device's name or date) is automatically retrieved from the device. The name of the device is the default information. To view the current date, the operator must click the name of the device. To return to the viewing of the device's name, click the date.
B This example refers to a device that is currently using a USB cable to connect to a PC. Depending on the current connection and connection status, you may view different icons. See App Desktop Toolbar Icons below.
C This example refers to a device that is currently charging (either via cradle or direct cable). Depending on the current power supply, you may view other icons. See App Desktop Toolbar Icons below.
D This information (current time) is automatically retrieved from the device (from its regional settings).
E This button allows access to several options. The available options depend on device model, OS/OS version and installed MCL product (MCL-Client or MCL-Agent + MCL-Runtime).
F An example of an MCL application shortcut ("QuickTour"). Each deployed/uploaded MCL application is represented in App Desktop via a shortcut to be used by the operator to open the corresponding application.
G This information depends on the MCL software installed: If the device has an MCL-Client license installed (device in Perpetual License mode), there is no info available. If the device has MCL-Agent+MCL-Runtime installed (device in Subscription Mode), that space will display the name of the MCL-Mobility Platform account the device is associated to. This example refers to an App Desktop screen of a device paired with an MCL-Mobility Platform account.
App Desktop Toolbar Icons
Below are icons that can be displayed in the App Desktop toolbar.
Connection Type Icons |
|
|
4G/LTE Communication is available. |
|
3G Communication is available. |
|
GPRS Communication is available. |
|
Edge Communication is available. |
|
Wireless Communication is available. |
|
Wireless Communication is NOT available. |
|
Connection via USB to Windows Mobile Device Center. |
|
Ethernet communication is available. |
Power Supply Icons |
|
|
Device is charging. |
|
Device is on battery. |
Navigation Icons |
|
|
Device is connected to GPS satellite(s). |
|
Device is NOT connected to GPS satellite(s). |
Speech Icons (States) |
|
|
No current speech input. (Only available for speech projects.) |
|
Receiving speech input. (Only available for speech projects.) |
|
Speech input recognized/accepted. (Only available for speech projects.) |
|
Input speech not recognized/rejected. (Only available for speech projects.) |
|
There is a Recognizer error which can be caused by invalid grammar. (Only available for speech projects.) |
Other Icons |
|
|
Device is being remotely accessed to view its screen in real time and/or control the device. |
The ![]() ,
, ![]() and
and ![]() connection type icons provide further information when clicked:
connection type icons provide further information when clicked:
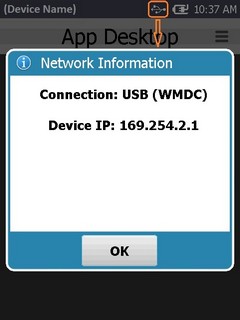
•If the device is connected via USB, the App Desktop toolbar displays the ![]() icon.
icon.
To view the corresponding network information, click ![]() .
.
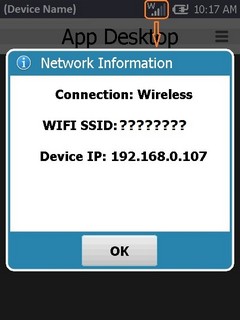
•If the device is connected via Wifi, the App Desktop toolbar displays the ![]() icon.
icon.
To view the corresponding network information, click ![]() .
.
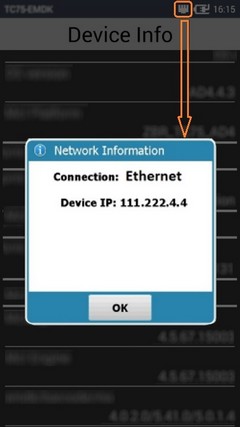
•If the device is connected via Ethernet, the App Desktop toolbar displays the ![]() icon.
icon.
To view the corresponding network information, click ![]() .
.
The speech icon ![]() is only available for speech applications. If you click it (whatever the state), you access a window with speech related options:
is only available for speech applications. If you click it (whatever the state), you access a window with speech related options:
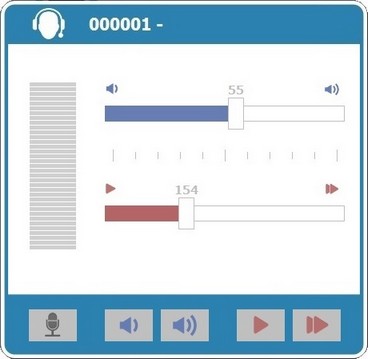
This window displays the following options:
|
Use these buttons to lower or increase the volume of the speech output (what you hear). As an alternative, use the corresponding slider (identified with the same icons) to change the volume levels. Whenever you edit the volume, you hear a speech prompt illustrating that change. |
|
Use these buttons to lower or increase the speed of the speech output (what you hear). As an alternative, use the corresponding slider (identified with the same icons) to change the speed levels. Whenever you edit the speed, you hear a speech prompt illustrating that change. |
|
Use this button to perform a calibration. See Calibration. |
To close this window, click outside it.
App Desktop Navigation
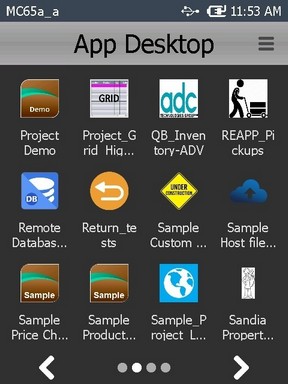
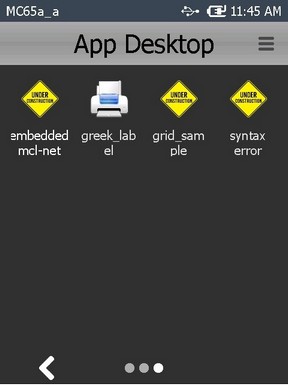
When there are a lot of application shortcut icons included in App Desktop, you can scroll down/up the display area to view/access all of them. The viewing of several dots (Ex: ![]() means there are 3 displays with shortcut icons available) placed at the bottom/top of the display area indicates that there are more shortcut icons than those in view.
means there are 3 displays with shortcut icons available) placed at the bottom/top of the display area indicates that there are more shortcut icons than those in view.
Depending on your device model you can navigate from display to display in two different ways:
Using the direction key
Use the direction key "down" to move the focus down until you see the direction keys (![]() ,
, ![]() ) and then use the "left" and "right" directions to navigate.
) and then use the "left" and "right" directions to navigate.
Using the numeric keys
If you key in "2" you navigate to the 2nd display, If you key in "8" and you only have 3 displays available (![]() ) you navigate to the 3rd and last display.
) you navigate to the 3rd and last display.
Using the touch screen
Click the areas (marked in orange in this example ![]() ) before and after the dots to navigate.
) before and after the dots to navigate.
Navigation Display Examples
|
|
|
|
You are in the 1st icon shortcut screen (out of 3 because we can see The navigation keys (
|
You are in the 2nd icon shortcut screen (out of 4 because we can see The navigation keys ( |
You are in the 1st icon shortcut screen (out of 3 because we can see |
You are in the 3rd icon shortcut screen (out of 3 because we can see |
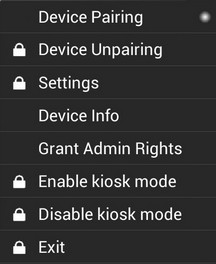
App Desktop provides you with a menu of options. To access it, click ![]() (located on the screen's upper right corner) or
(located on the screen's upper right corner) or ![]() (a SW or HW button only available in Android devices).
(a SW or HW button only available in Android devices).
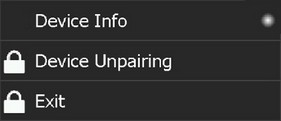
The image below does NOT depict an actual App Desktop menu, it is a constructed image with the most likely options, regardless of device model, OS (Windows Mobile/Windows CE or Android), OS version or MCL product (MCL-Client or MCL-Agent + MCL-Runtime) installed in the device. Also, some of these options are NOT simultaneously displayed (ex: the "Enable kiosk mode" and the "Disable kiosk mode" options do NOT appear in the same menu. The display of one option or the other depends on whether you have the Kiosk Mode enabled or disabled. It is the same with the "Device Pairing" and "Device Unpairing"options. They are not available at the same time.).
|
Device Pairing |
ONLY available if the device has MCL-Agent installed and is NOT "paired", meaning, NOT connected to your MCL-Mobility Platform account. For more detailed information on the "pairing" procedure, refer to the MCL-Mobility Platform User Guide. |
Device Unpairing |
ONLY available if the device has MCL-Agent installed and IS "paired"/associated to your MCL-Mobility Platform account. For more detailed information on the "unpairing" procedure, refer to the MCL-Mobility Platform User Guide. |
|
Settings |
ONLY available for Android devices. It allows you to access the device's settings. See To Access an Android Device's Settings. |
|
Device Info |
This option is used to view device info. See To Get the Device Info. |
|
Grant Admin Rights |
ONLY available for Android devices with MCL-Agent installed (Subscription). This option is displayed if the MCL product you have installed (MCL-Agent) in your Android device is NOT a device administrator.
|
|
Enable kiosk mode |
Only available for Android devices. The option is displayed when the Kiosk Mode is NOT active. The Kiosk Mode restricts the user's OS access rights. This will result in fewer available options in the App Desktop menu. See To Enable Kiosk Mode. |
|
Disable kiosk mode |
ONLY available for Android devices with the Kiosk Mode enabled. See To Disable Kiosk Mode. |
|
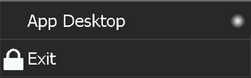
Exit |
This option is used to exit App Desktop and proceed to the device's OS environment. See To Exit App Desktop. |
![]()
As an alternative to the use of the device's touchscreen, you can use the keyboard (ex: direction keys, tab key) to navigate the App Desktop's options. The option marked with a ![]() represents the option on focus.
represents the option on focus.
Whenever the ![]() icon is displayed next to a menu option, it means that you must enter a numeric pin code to proceed with the selected task. You can opt for the use of a default pin code or a customized pin code:
icon is displayed next to a menu option, it means that you must enter a numeric pin code to proceed with the selected task. You can opt for the use of a default pin code or a customized pin code:
•Default Pin Code Protection Feature - App Desktop includes a default protection feature which requires a PIN code (a random numeric password, that changes periodically,managed by App Desktop). For more detailed information on how to calculate the PIN code, register/log in to our MCL Support Center and access MCL's Knowledge Base ("How to Calculate the App Desktop Default PIN Code").
•Customized Pin Code Protection - The default pin code protection feature can be overridden with the use of an .ini file with specific commands that enable a PIN code of your choosing or remove the need for a PIN code entirely. For more detailed information, register/log in to our MCL Support Center and access MCL's Knowledge Base ("How to Define the App Desktop PIN Code").
Example
This image refers to the available App Desktop Menu options of a Windows Mobile device with MCL-Agent (and MCL-Runtime) which is connected (paired) to your MCL-Mobility Platform account.
The intended action is to "unpair" the device (disconnect the device from your account).
Step-by-step
1. Click ![]() .
.
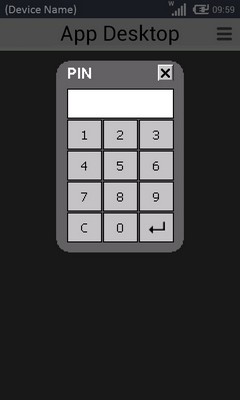
2. Enter the PIN code (numeric value) with the help of the virtual keyboard. (The keyboard's layout depends on the device's model and OS/OS version.)
![]() For this particular virtual keyboard:
For this particular virtual keyboard:
Click ![]() to validate the entered pin and proceed.
to validate the entered pin and proceed.
Use ![]() to close the virtual keyboard and cancel the selected operation.
to close the virtual keyboard and cancel the selected operation.
Once the entered pin is validated, the "unpairing" is done.
![]() As soon as the PIN code is confirmed, there is a validity period of a few minutes, during which you can access protected options. Once that time frame is over, when you select a protected option you will have to insert the PIN code again.
As soon as the PIN code is confirmed, there is a validity period of a few minutes, during which you can access protected options. Once that time frame is over, when you select a protected option you will have to insert the PIN code again.
To Access an Android Device's Settings
The ![]() option provides access to a specific area of the Android device's OS- the
option provides access to a specific area of the Android device's OS- the ![]() .
.
Step-by-step
1. In the App Desktop menu, click ![]() .
.
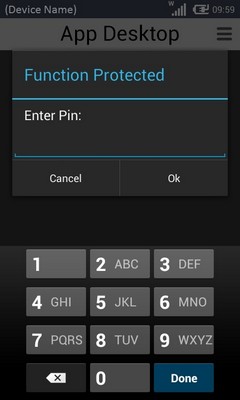
2. Enter the PIN code with the help of the virtual keyboard. (The keyboard's layout depends on the device's OS and model.) See App Desktop Protection.
![]()
In the case of this virtual keyboard, use ![]() to close it, if necessary.
to close it, if necessary.
3. Click ![]() .
.
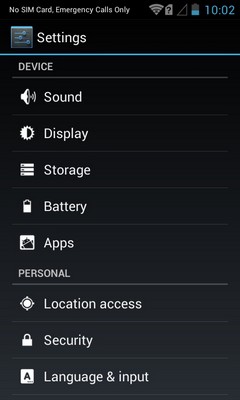
4. The "Settings" area is open. Check/edit the intended settings.
5. Once you are done, press ![]() (Android's <Back> button) to return to the App Desktop.
(Android's <Back> button) to return to the App Desktop.
The ![]() option allows you to view information on the device (SN, name, model, installed SW versions, etc.).
option allows you to view information on the device (SN, name, model, installed SW versions, etc.).
The displayed information is NOT editable and may vary depending on the OS/Os version and/or installed MCL product.
Step-by-step
1. In the App Desktop menu, click ![]() .
.
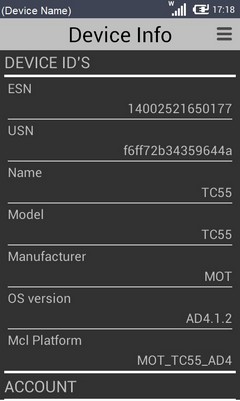
2. The screen displays information on the device. View the device info.
3. Depending on the device's OS, use one of the following to return to the App Desktop:
a. For an Android device, press ![]() (Android's <Back> button) in your device.
(Android's <Back> button) in your device.
b. For a Windows Mobile device, use the App Desktop Menu:
i. Click ![]() (located on the screen's upper right corner).
(located on the screen's upper right corner).
ii. Click ![]() .
.
For Android devices that have MCL-Client installed (License), the "Grant Admin Rights" option is NOT available. However, if your project requires the activation of special features in the device such as Kiosk Mode activation, reboot execution and/or Date and Time setup in the MCL application, please contact MCL-Support (log/register to MCL Support Center).
When dealing with Android devices that have MCL-Agent installed, this MCL product MUST have administrator privileges. This will enable your Android device to manage some background device settings (ex: Date and Time settings, silent install of MCL-Agent and MCL-Runtime new versions, kiosk mode, etc.).
If the MCL product was not granted administrator rights after the pairing process, proceed as follows:
Step-by-step
1. Use one of the following to open the Device Administrators area (a specific security setting area):
a. In the App Desktop, click ![]() (upper right corner) OR
(upper right corner) OR ![]() (a SW or HW button only available in Android devices) to open the App Desktop menu and, then,
(a SW or HW button only available in Android devices) to open the App Desktop menu and, then, ![]() .
.
OR
b. Exit App Desktop (see To Exit App Desktop), open Settings, then, Security and, finally, Device Administrators.
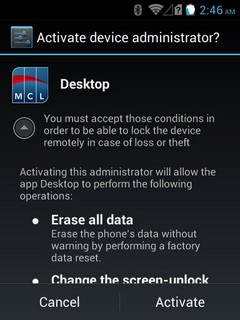
2. In the resulting screen, click ![]() .
.
If you used option a. to proceed to the "Device Administrators" setting, once you click ![]() , you will be returned to App Desktop.
, you will be returned to App Desktop.
If you exited App Desktop (option b.), you must use ![]() (Android's <Back> button) to leave the "Settings" area and, then, relaunch App Desktop.
(Android's <Back> button) to leave the "Settings" area and, then, relaunch App Desktop.
The ![]() option activates the "kiosk mode".
option activates the "kiosk mode".
The "kiosk mode" is used to limit the user's access to the Operating System. As a result of the "kiosk mode" activation, the App Desktop menu will have fewer options than usual (ex: The App Desktop menu will NOT have the ![]() option).
option).
![]()
The Kiosk Mode menu option is based on the Kiosk Mode implementation done by each manufacturer. Some implementations require an external application to be installed to allow the Kiosk Mode. For example, Zebra provides the "Enterprise Home Screen" application in their devices and Samsung has developed "Knox" for the same purpose.
Step-by-step
1. In the App Desktop menu, click ![]() .
.
2. Enter the required PIN code with the help of the virtual keyboard (the keyboard's layout can vary according to device model or OS/OS version). See App Desktop Protection.
3. Click ![]() .
.
Depending on the manufacturer's kiosk mode implementation, the device reboots and launches the manufacturer's application (ex: Enterprise Home Screen).
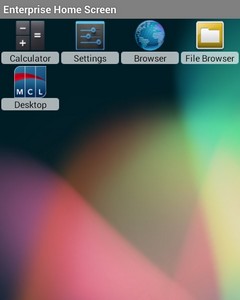
In this case, the user was given access to App Desktop, the "Calculator" app and some OS features (Settings, Internet and File Browser).
4. Click ![]() to launch App Desktop.
to launch App Desktop.
![]() To make full use of the Kiosk Mode, we recommend you define App Desktop as the device's default home application.
To make full use of the Kiosk Mode, we recommend you define App Desktop as the device's default home application.
Since the purpose for the Kiosk Mode is to limit user access, some of the usual options may not be available in the App Desktop menu. That is the case with the ![]() option.
option.
The ![]() option deactivates the Kiosk Mode. This option is only available in the App Desktop menu, if the Kiosk Mode is active.
option deactivates the Kiosk Mode. This option is only available in the App Desktop menu, if the Kiosk Mode is active.
Step-by-step
1. In the App Desktop menu, click ![]() .
.
2. Enter the required PIN code with the help of the virtual keyboard (the keyboard's layout can vary according to device model or OS/OS version). See App Desktop Protection.
3. Click ![]() and return to App Desktop.
and return to App Desktop.
![]()
If the operating system calls for it, agree to the requested reboot. The OS status bar will only be accessible after the reboot.
The ![]() option allows you to exit App Desktop. It is a pin code protected function.
option allows you to exit App Desktop. It is a pin code protected function.
This option is NOT available in the App Desktop menu, if you enable the "kiosk mode". See To Enable the Kiosk Mode.
Step-by-step
1. In the App Desktop menu, click ![]() .
.
2. Enter the PIN code with the help of the virtual keyboard (the keyboard's layout can vary according to device model or OS/OS version). See App Desktop Protection.
3. Click ![]() .
.