|
Working with the Variable Processes Group |
  
|
Working with the Variable Processes Group
|
Working with the Variable Processes Group |
|
Process Purpose
The Variable group of processes allows for multiple operations that involve variables.
The results of these operations ("Insert"; "Extract"; "Assign"; etc.) are stored in variables.
![]() A variable is a memory area in the device where data is stored temporarily. The content of a variable is an UNICODE character string that can be displayed on the device's screen, at any moment.
A variable is a memory area in the device where data is stored temporarily. The content of a variable is an UNICODE character string that can be displayed on the device's screen, at any moment.
Variable Types
There are three different main groups of variables that can be used in a project:
The User Defined Variables are used to store data. They are created by the programmer to suit the needs of the application being developed. They include:
•Global Variables
A Global Variable is defined in one program and can be used in any of the other programs or new projects. The contents can be retrieved, updated or modified by the other programs. (examples of variable codes: A0, A1, A2, A3, A4, A5, A6, A7, A8, A9, B0, B1, B2…)
•Program Variables
A Program Variable is defined in one program and cannot be used in any of the other programs. The contents can be retrieved, updated or modified only in the current program. (examples of variable codes: 0A, 1A, 2A, 3A, 4A, 5A, 6A, 7A, 8A, 9A, 0B, 1B, 2B…)
•Local Variables
Local Variables are used in events associated to controls (ex: a "Change" event). There are specific local variables associated to specific control events. The only exception is the "RFID" event. Even though this is a screen event, you can use local variables. These local variables provide information regarding the execution of the event.
Ex: Consider a "Variable Assign" process that you have added to a "Change" event within a "File Browse" control. When assigning the appropriate variables, you will have access to specific pre-existing local variables such as "L_Record_Number" (which provides you with the number of the selected record).
System Variables
The System Variables are not defined by the user. They contain system information that can be used by the programs in the application. System variables contain information such as current date & time, selected record number in a file browse control, battery level, program name and version. System variables are grouped in “Audio”; “Camera”, “Date”, “Device”, “GPS”, “Imager”, "RFID"; “Network”; "App_Info", “System”, "Timer", "Operator", "Navigation", "Voice", "Special" and "NFC" variables.
![]() Some of the system variables that concern the "Operator" (X_USR_CUST1/X_USR_CUST2/X_USR_CUST3/X_USR_CUST4/X_USR_CUST5) are mapped with values that are defined/customized within the MCL-Mobility Platform (in the operator's profile).
Some of the system variables that concern the "Operator" (X_USR_CUST1/X_USR_CUST2/X_USR_CUST3/X_USR_CUST4/X_USR_CUST5) are mapped with values that are defined/customized within the MCL-Mobility Platform (in the operator's profile).
Refer to the MCL-Mobility Platform User Guide for more information on Info Tab in the "Operator Details" page.
![]()
The “Device” related system variables can only return valid information if it is provided by the target device.
Ex: If a target device does NOT provide information on battery life, the corresponding system variable will NOT return battery life info to the application.
•App Params Variables
The App Param Variables are read only variables that reference application parameters included in a parameters file.
These variables are used to contain parameter values that are relevant to the current project.
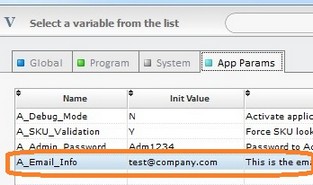
They are created/available in the "Variable Select", specifically, the "App Params" tab.
The variable name starts automatically with an "A_" to identify its scope, followed by the name of the parameter you require.
Once an "app params" variable is created, a parameters file is generated with that information.
This specific file is generated/refreshed when content is added to the "App Params" tab.
By default, the file is named "project.par" and it is located in the current project's "Data" folder. If necessary, you can rename the file.
The params file will be used to feed the MCL application with the intended values, meaning, it will be possible to retrieve this file from the project directory (after project completion), work it outside the MCL environment (edit the file with external applications such as Wordpad or Notepad, for instance) and deploy it to the device to provide different app parameter values to the MCL application through the App Param Variables - whenever the MCL application requires an application parameter, it will check the current parameters file (located in the device - <APPS>App name\res) and use the values it finds.
Parameters File Structure
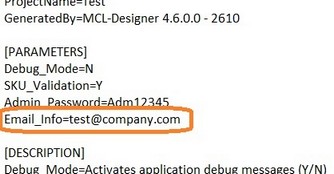
This file MUST contain 3 sections - INFO; PARAMETERS and DESCRIPTION.
If you want to, you can also add a PERSONAL section.
The name of the parameters file currently in use is stored into the system variable "X_APP_PARAM_FILE".
Mandatory Sections
Section: INFO
This section contains general information about the project.
MCL-Designer automatically generates the following information: "Type", "Format", "Name", "Version", "Date", "Author", "Company", "Contact_Info", "ProjectName" and "GeneratedBy".
Section: PARAMETERS
This section contains all the parameters and their values.
In case of an external edition (the editing of this section after file export), you can update parameter values but NOT add/remove parameters or edit parameter names.
Section: DESCRIPTION
This section contains each parameter's description.
[INFO] Type=PAR Format=1 Name=Test Version=01.00 Date=20170707154009 Author=MCL Company=MCL Contact_Info= ProjectName=Test GeneratedBy=MCL-Designer 4.6.0.0 - 2610
[PARAMETERS] Debug_Mode=N SKU_Validation=Y Admin_Password=Adm12345 Email_Info=test@company.com
[DESCRIPTION] Debug_Mode=Activates application debug messages (Y/N) SKU_Validation=Forces SKU lookup validation (Y/N) Admin_Password=The password to access the Admin Menu Email_Info=The email address to use for information
[PERSONAL SECTION] #This is my personal section #I can store any kind of information here. MyEmailAddress=my.address@company.com |
•Typical Application Parameters Use
During Project Development
1. Add the intended app parameter variables in the "App Params" tab (located in every "Variable Select" window - use the ![]() /
/![]() buttons, whenever available, to call it).
buttons, whenever available, to call it).
The "Name" field is mandatory. The "Value" and "Description" fields can be filled in at this point or later on (in the parameters file, after export).
2. A parameters file named "project.par" is generated and stored in the project's "Data" folder.
![]()
We recommend you save the project every time you add/edit the "App Params" tab to ensure that the params file is up to date.
Roll Out/Production Environment
3. The parameters file is retrieved from the project's "Data" folder and edited accordingly, meaning, the default/initial values are set for each parameter as necessary.
![]()
The name of a parameter CANNOT be edited, ONLY its corresponding value.
![]()
It is NOT possible to add new parameters to the file after the project is developed/published - the MCL application will NOT recognize the new parameters because there are NO corresponding app params variables to be fed that information within the application.
4. The parameters file is deployed to the device ("<Apps>App name\res") - this can be done manually or via MCL-Mobility Platform (create a configuration and add the parameters file as an application resource in the "Applications" tab - refer to the MCL-Mobility Platform User Guide). The file will feed the app param variables being used within the MCL application.
5. This file can be deployed whenever the values of the existing parameters need changing, for instance, if you need to change contact information. Simply edit the parameters file and deploy it (manually or via a configuration created/managed within MCL-Mobility Platform).
If required after export, you can use more than one parameters file - for instance, have several versions with different values, divide the original parameters file into two or more, etc..
Make sure the original structure (sections) is maintained, only use the original parameters and rename the several parameters files as required.
In order to ensure the use of a particular parameters file during MCL application workflow, use the "Set App Param File" process - this process will define which parameters file will feed the app params variables in the application.
1. The "A_Email_Info" app param variable is added to the "App Params" tab. |
2. The parameters file is updated to contain the corresponding "Email_Info" parameter. |
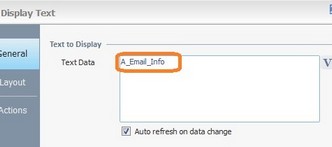
The "A_Email_Info" variable is referenced in a "Display Text" control. |
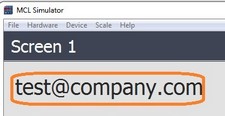
The application displays the content of the app params variable/the parameter's value. |
|
|
|
|
PURPOSE: The project included one parameters file and the corresponding application was deployed to the intended devices. Afterward, it became necessary to change the values of that parameters file.
1. Retrieve the intended parameters file. Use one of the following: •Copy it from a device that has the application installed (it is located in "<Apps>App name\res"). •Copy it from the corresponding project’s directory (specifically, the “Data” folder).
2. Use an external edition application (ex: “Notepad”) to edit/save the new values of the existing application parameters.
3. Deploy the modified parameters file back into the intended device(s). Do it manually ( copy it into "<Apps>App name\res") or use a configuration created within your MCL-Mobility Platform account. Refer to the MCL-Mobility Platform User Guide for more information on configurations. |
PURPOSE: The project requires different values for the same application parameters throughout its execution so, this will require having 2 parameters files (same parameters with different values) with alternate use throughout the workflow.
1. Create the necessary app params variables in the “App Params” tab (in the Variable Select window).
2. The corresponding “project.par” file is generated and stored in the project’s directory, in the “Data” folder.
3. Use the “Set App Param File” process whenever you want to set a different parameters file than the default one (in this case, you can alternate between “project.par” and the one to be created later on and called “Param_File2.par”). See Working with Set App Param File Process.
4. Once the project is fully developed, generate and/or publish the project and deploy it to the target devices.
5. Create the second parameters file: a. Retrieve the original parameters file. b. Rename it “Param_File2.par". c. Use an external edition application (ex: “Notepad”) to edit the parameter values as required.
6. Deploy the file “Param_File2.par” to the device manually or via MCL-Mobility Platform to the “res” folder ("<Apps>App name\res"). |
1. In your MCL-Mobility Platform account, specifically in the Site that the target devices belong to, open the “Configurations” module.
2. Create a configuration – follow the corresponding wizard and when you get to step 3/”Applications” tab, add the intended parameters file as an application resource. Refer to the MCL-Mobility Platform User Guide for more information on configurations.
3. In the “Deployments” module, create the deployment with the newly created configuration. Refer to the MCL-Mobility Platform User Guide for more information on deployments.
4. Once the configuration is deployed/installed in the target device(s), the application’s execution will consider the deployed parameters file – the file will be stored in "<Apps>App name\res". |
Variable Usage
A program can contain Global, Local, Program or System variables.
A Global Procedure only allows for Local, Program or System variables.
Local Procedures use Global, Local or Program variables.
Regarding Routines (Routine, Routine In and Routine Out), they only allow for Global or Program variables.
All variables can, at any given time, be manipulated by the program to:
• Modify their content.
• Store data in a data file record.
• Send data to the host computer.
• Display data on the screen.
The ![]() and
and ![]() icons appear throughout the project. Clicking them provides access to a variables window with a list of variables (distributed over "Global"; "Program"; "Local" and "System" tabs). The availability of the tabs scope depends on the context. As mentioned above, not all variables are available for all programming contexts. In this window you can create new variables, and select the required one for the current process.
icons appear throughout the project. Clicking them provides access to a variables window with a list of variables (distributed over "Global"; "Program"; "Local" and "System" tabs). The availability of the tabs scope depends on the context. As mentioned above, not all variables are available for all programming contexts. In this window you can create new variables, and select the required one for the current process.
When clicking the ![]() icon, in a properties window, you are selecting the variable that will feed data to the process (the process will read data from this variable).
icon, in a properties window, you are selecting the variable that will feed data to the process (the process will read data from this variable).
When clicking the ![]() icon, in a properties window, you are selecting the variable that will receive data after the process is run (the process will write data on this variable).
icon, in a properties window, you are selecting the variable that will receive data after the process is run (the process will write data on this variable).
Detail of Variable Select windows
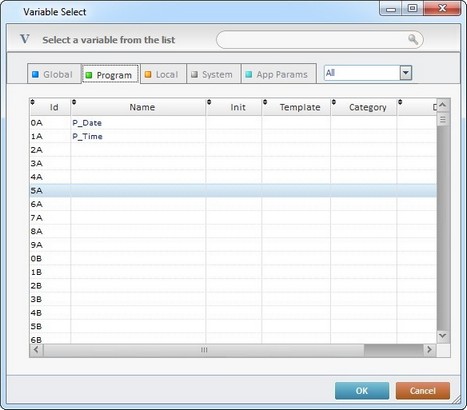
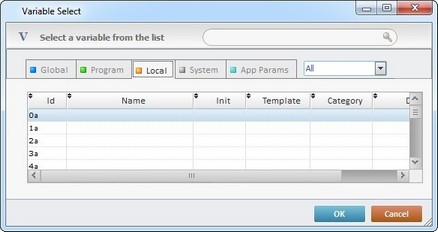
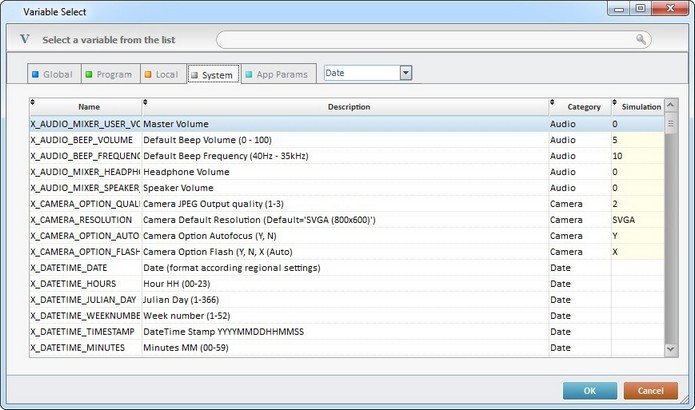
Standard Variable Select window |
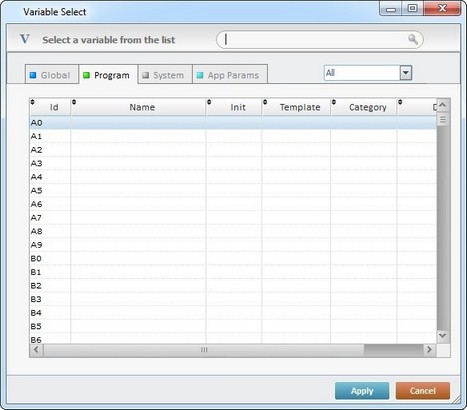
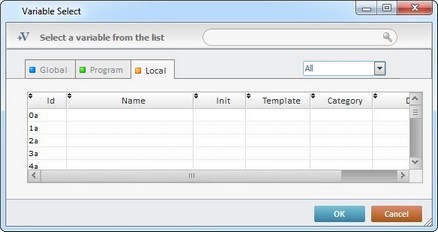
Floating Variable Select window |
|
|
A "Variable Select" window displays the available variables within a project (default local/system variables and the ones you create). The variables are grouped according to type ("Global", "Program", "Local" and "System"), each type with the corresponding scope tab.
There are two available "Variable Select" window types:
•Standard Variable Select window - This window is called with the use of the ![]() and/or
and/or ![]() icons (see To Select/Create a Variable) or if selecting the "Variable Select" and "Variable Insert" options of an input field's right-click menu. The content of this window depends on the active field associated to the clicked icon and the icon itself. It is a blocking window, meaning, it does NOT allow you to proceed until you close it.
icons (see To Select/Create a Variable) or if selecting the "Variable Select" and "Variable Insert" options of an input field's right-click menu. The content of this window depends on the active field associated to the clicked icon and the icon itself. It is a blocking window, meaning, it does NOT allow you to proceed until you close it.
Ex: The "Standard Variable Select" window, which is called with the ![]() icon, will never include the "System" scope tab. This icon refers to variables that receive data and "system" variables only provide system information, they do not receive data.
icon, will never include the "System" scope tab. This icon refers to variables that receive data and "system" variables only provide system information, they do not receive data.
•Floating Variable Select window - This window is called when you press <F3> in your PC and when you open the "Project" menu (in the "Menu Bar") and select "Variables".
This window does NOT block the use of other open windows in the work area. Its content is dynamic, meaning, it displays the variables/scope tabs that relate to the currently active context (ex: a program, a screen, a process, etc.).
Ex: If you press <F3> when a screen is selected, the Floating Variable Select window displays the "Global" and "Program" scope tabs with the available variables for that screen. If the focus is on the "Actions" tab of a control, the window displays four scope tabs - "Global", "Program", "Local" and "System".)
This window allows you to drag a variable into the intended option (that is variable compatible) within a control, a process, etc..
Click each scope tab to open a table and view the corresponding variables and/or create more variables of that type.
Each scope tab table includes the following columns:
Id |
NOT editable. Represents the variable's identification. |
Name |
Displays the existing variables. Use this column to create the necessary variables and/or to edit an existing variable. See To Select/Create a Variable. |
Init |
If required, add initial values to your variable(s): a. Select the row with the intended variable. b. Click the corresponding "Init" field to set it to "edit" mode. c. Enter the value. d. Click outside the edited field to set it back to "view" mode. |
Template |
Use this column to create a visual representation of a variable. Whenever a variable is displayed on the screen (within a control), instead of three asterisks (***), the control will display the template you entered. To add a template: a. Select the row with the intended variable. b. Click the corresponding "Template" field to set it to "edit" mode. c. Enter the template for the variable. d.Click outside the edited field to set it back to "view" mode.
|
Category |
Organize your variables into categories you create: a. Select the row with the intended variable. b. Click the corresponding "Category" field to set it to "edit" mode. c. Enter the category for the variable. d.Click outside the edited field to set it back to "view" mode.
Once they are created, the new categories will be available in the filter drop-down. |
Description |
If necessary, add information regarding each variable: a. Select the row with the variable you want to describe. b. Click the corresponding "Description" field to set it to "edit" mode. c. Enter the information. d. Click outside the edited field to set it back to "view" mode. |
![]() If the "Variable Select" window is open in the "System" tab, there is one more column in display - the column "Simulation".
If the "Variable Select" window is open in the "System" tab, there is one more column in display - the column "Simulation".
It is possible to attribute values to certain system variables for simulation purposes, meaning, the entered values will only be used within MCL-Simulator. The "Simulation" column's rows that are editable have a yellow background and are in "Edit mode". Simply enter the intended value in the corresponding row.
If required, you can control the viewed information.
•Use the "search box" to search for values in the "Name", "Category" and "Description" columns:
a. Enter the information in ![]() . The results are automatically displayed below.
. The results are automatically displayed below.
b. To resume an unfiltered view, delete the information from the "search box".
•Use the drop-down (below the "search box") to filter the variables by category. A category created in the "Program" scope tab will only be available in the drop-down of that "Program" scope tab.
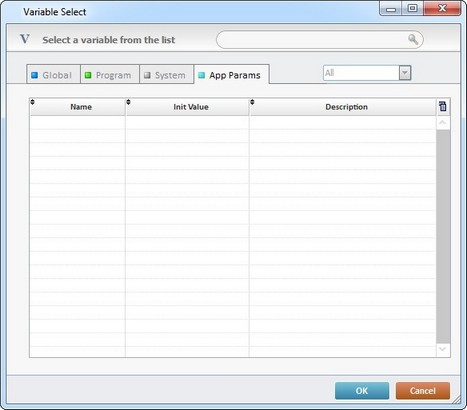
This tab is used for the "App Params" variables - they store application parameters. See Application Parameters.
It includes the following columns:
Name |
Displays the variables that represent application parameters - the App Params variables. To add one, click an empty "Name" field to set it to "edit mode" and enter the intended name. If, during project development, it requires editing, click the intended field and when it is in "edit mode" change it accordingly. |
Init value |
Contains the corresponding variable's initial value, if one has been defined by the developer during project development. This value can be set/edited later on, after the project is concluded, specifically, in the exported parameters file that contains the application parameters referred by the App Params variables. However, if you want to set a value at this point, proceed as follows: a. Select the row with the intended "Init" field. b. Click the "Init" field to set it to "edit" mode. c. Enter the required value. d. Click outside the edited field to set it back to "view" mode. |
Description |
Contains information on the corresponding application parameter. To add/edit notes on the corresponding App Params variable: a. Select the row with the intended "Description" field. b. Click the "Description" field to set it to "edit" mode. c. Enter/edit the intended information. d. Click outside the edited field to set it back to "view" mode. |
![]()
As an alternative, use the right-click menu available in this tab. See Right-click Menu of the App Params Tab below.
![]()
We recommend you save the project after each "App Params" tab edition to ensure that the corresponding parameters file is up-to-date.
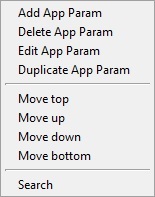
Right-click Menu of the App Params tab
If you right-click a row in the "App Params" tab, you access the following options.
|
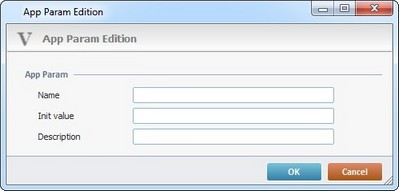
Add App Param |
Use this option to add a new App Params variable to the current tab. Clicking this option opens the following App Param Edition window:
|
||
Delete App Param |
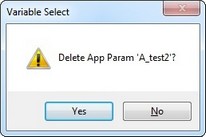
Click this option to delete the selected variable:
a. Click the variable you want to delete.
b. Confirm the operation. |
|||
Edit App Param |
Use this option to open the "App Param Edition" window and edit the selected variable, specifically the "Name", Init value" and/or the "Description" field.
We recommend you save the project after each "App Params" tab edition to ensure that the corresponding parameters file is up-to-date. |
|||
Duplicate App Param |
Use this option to duplicate the selected variable. |
|||
Move top |
Use these options to move the selected variable's current position within the tab. |
|||
Move up |
||||
Move down |
||||
Move bottom |
||||
Search |
Click this option to open a "search" window and search for the intended element. See Detail of Search. |
After calling a "Standard Variable Select" or a "Floating Variable Select" window, proceed as follows:
|
|
To select a variable, for whatever purpose:
a. Click the appropriate scope tab ("Global", "Program", "Local" or "System") to display its content.
b. Select a variable among the list available by clicking it.
To create a new variable:
a. Click the appropriate scope tab ("Global", "Program", "Local") and open it.
b. Select a row and, then, click the "Name" field to set it to "edit" mode.
c. Enter the variable name.
d. Click outside that field to set it to "view" mode.
To edit a variable:
a. Click the appropriate scope tab ("Global", "Program" or "Local") and open it.
b. Double-click the field you want to edit to set it to "edit" mode.
c. Enter the necessary changes.
d. Click outside the edited field to set it back to "view" mode.
Click ![]() to close the "Standard Variable Select" or "Floating Variable Select" window.
to close the "Standard Variable Select" or "Floating Variable Select" window.
![]() When creating/entering the name of a variable, take its purpose into consideration. It will help to identify its content, especially if there are a lot of variables. For instance, if the variable is designed to store the names of operators, define it as "P_User_Name".
When creating/entering the name of a variable, take its purpose into consideration. It will help to identify its content, especially if there are a lot of variables. For instance, if the variable is designed to store the names of operators, define it as "P_User_Name".
![]() The name of a variable obeys a specific syntax that immediately defines the scope. It, automatically, starts with a P_(if it is a "Program" variable), an L_(if it is a "Local" variable) or a G_(if it relates to a "Global" variable"). Spaces are replaced by an underscore.
The name of a variable obeys a specific syntax that immediately defines the scope. It, automatically, starts with a P_(if it is a "Program" variable), an L_(if it is a "Local" variable) or a G_(if it relates to a "Global" variable"). Spaces are replaced by an underscore.
Right-click Menu on Variables
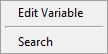
If you right-click a row in any of these variable tabs (Global, Program, Local or System), you access the following options:
|
Edit Variable |
Use this option to edit the selected variable settings (Ex: variable "2A"). Clicking this option opens the Variable Edition window:
|
||
Search |
Click this option to open a "search" window and search for the intended element. See Detail of Search. |
To Apply a Variable
Use one of the following methods to apply the intended variable.
![]() Variable availability will depend on the opened "Variable Select" window:
Variable availability will depend on the opened "Variable Select" window:
•A standard "Variable Select" window only displays the tabs/variables that are compatible with the active field that will receive the selected variable. Ex: If you click a field's ![]() , this window will NOT include the "System" tab because the active field must define a variable to write in and the variables of the "System" scope are READ ONLY.
, this window will NOT include the "System" tab because the active field must define a variable to write in and the variables of the "System" scope are READ ONLY.
The window has an ![]() button to apply the variable that was selected. It is a blocking window, meaning, it does NOT allow you to proceed until you close it.
button to apply the variable that was selected. It is a blocking window, meaning, it does NOT allow you to proceed until you close it.
•A floating "Variable Select" window displays the variables that are compatible with the current context, the variables can be written in or read.
The window has an ![]() button to apply the variable that was selected.
button to apply the variable that was selected.
•![]() /
/ ![]() Buttons (Standard "Variable Select" window)
Buttons (Standard "Variable Select" window)
a. Click the ![]() or
or ![]() button (depending on what is available) of the intended field to open a Standard "Variable Select" window;
button (depending on what is available) of the intended field to open a Standard "Variable Select" window;
b. Double-click the intended variable OR select it and, then, click ![]() .
.
•Right-click "Variable Select" Option (Standard "Variable Select" window)
a. Right-click the intended field to access a menu;
b. Select the "Variable Select" option which opens the standard "Variable Select" window;
c. Click the intended variable to select it and click ![]() OR double-click the variable you want.
OR double-click the variable you want.
The previously selected field is filled in with the selected variable.
•Double Click (Floating "Variable Select" window)
a. Click <F3> to open a floating "Variable Select" window;
b. Select the target field (making it an active field);
c. Back in the floating "Variable Select" window, open the required scope tab;
d. Double-click the intended variable.
The variable is applied to the previously selected field.
•Drag-and-Drop (Floating "Variable Select" window)
a. Open the floating "Variable Select" window with <F3>;
b. Open the required scope tab.
c. Drag the intended variable into the target field.
![]() For the drag-and-drop to work, always drop the selected variable into a field that accepts variables (a field with a yellow background or associated to a
For the drag-and-drop to work, always drop the selected variable into a field that accepts variables (a field with a yellow background or associated to a ![]() or
or ![]() icon).
icon).
•The ![]() Button (Floating "Variable Select" window)
Button (Floating "Variable Select" window)
a. Open a floating "Variable Select" window.
b. Select the target field (making it an active field).
c. In the floating "Variable Select" window, open the required scope tab.
d. Click the intended variable to select it and click ![]() .
.
The variable is applied to the previously selected field.
![]()
Bear in mind that the previously described methods replace whatever data/value that was already filled in in the target/active field.
If you want to add a variable/variables to a field's existing data/value, you MUST use the "Variable Insert" option available in the field's right-click menu. This option is ONLY available for specific fields, namely, fields that allow text and variables).
See Right-click "Variable Insert" Option (Standard "Variable Select" window) below.
•Right-click "Variable Insert" Option (Standard "Variable Select" window)
![]()
When available, this option is used to add a variable to data already inserted in the target field. Ex: Text + Variable - "Welcome P_User_Name".
See To Combine Text and Variables into a Control's Text Input Fields.
a. Right-click the intended compatible field to access a menu;
b. Select the "Variable Insert" option which opens the standard "Variable Select" window;
c. Click the required variable to select it and click ![]() OR double-click the variable you want.
OR double-click the variable you want.
The selected variable has been added to the existing data/value of the target field.
![]() If the active target field does NOT accept variables, the field's background color will be red and you will NOT be able to drop the selected variable into the field.
If the active target field does NOT accept variables, the field's background color will be red and you will NOT be able to drop the selected variable into the field.
If the active field allows variables, the field's background color will be yellow.
![]() A Floating Variable Select window cannot be called during the adding of a process because the corresponding properties window is a blocking window. To overcome this, open the Floating Variable Select window before adding a new process. If the Floating Variable Select window is already open, you will be able to use it to view/create or add variables to the process properties window
A Floating Variable Select window cannot be called during the adding of a process because the corresponding properties window is a blocking window. To overcome this, open the Floating Variable Select window before adding a new process. If the Floating Variable Select window is already open, you will be able to use it to view/create or add variables to the process properties window
![]()
If a Floating Variable Select window is open, in the background, and you click ![]() or
or ![]() (in a process or control's properties window,for instance) the Floating Variable Select window is selected/comes into focus.
(in a process or control's properties window,for instance) the Floating Variable Select window is selected/comes into focus.
The Variable group is divided into:
----- Variable Operations |
-----Format |
----- Edit |
-----Search |
-----Load/Save |