|
Creating a Program |
  
|
Creating a Program
|
Creating a Program |
|
Overview
After creating the project's settings (see Setting up the Project), create the program/programs required to generate an application.
The following steps illustrate the creation of a simple program used to register a user name and write it in a file.
![]() Remember that this is an event-driven programming application and requires the developer to implement actions (processes) that can occur within, before or after a program, a screen or an object. This is displayed in the following example, when the "Input Keyboard" object is used to receive data and a "Button" object is used to write in a file.
Remember that this is an event-driven programming application and requires the developer to implement actions (processes) that can occur within, before or after a program, a screen or an object. This is displayed in the following example, when the "Input Keyboard" object is used to receive data and a "Button" object is used to write in a file.
Step-by-step
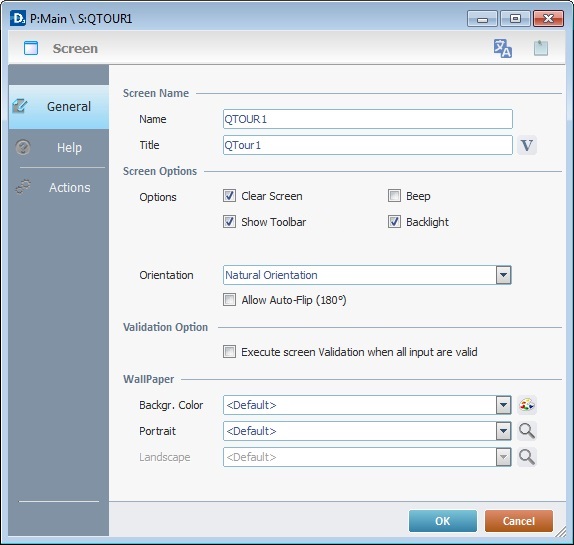
1. Following the project's set up, open the "Programs" module and right-click the screen represented in the tree view. In the resulting menu, select "Properties". This opens a "properties" window that provides access to the screen settings.
In the "General" tab, rename the screen.
EX: Replace the default screen name - "Screen 1" - for "Qtour1" and maintain the default options as displayed below.
2. To apply these choices, click ![]() .
.
3. Start to add objects. Go to the “Control” tab and drag the desired object onto the screen. Either drag it from the "Control" tab OR the "Preview Section". See Adding Objects to a Screen.
EX: Click the “Display Text” object and drag-and-drop it on the "QTOUR1" screen."
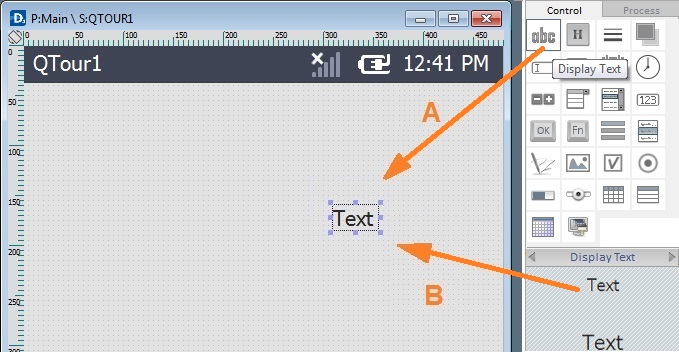
A - Addition of a “Display Text” object from the “Control” tab with drag and drop.
B - Addition of a “Display Text” object from the Preview Section with drag and drop.
![]()
This "Display Text" object was selected to display a text on the screen of the device.
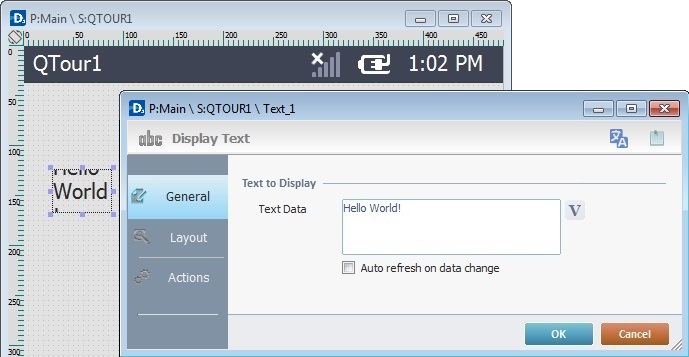
4. To configure the "Display Text" object's properties, right-click the intended object and select " 'Display Text' Properties" to open a "properties" window OR double-click the required object to open that same "properties" window.
Next, fill in the "General" tab.
EX: To display the desired text on the object, replace the “Text_1” on the “Text Data” box with “Hello World!”
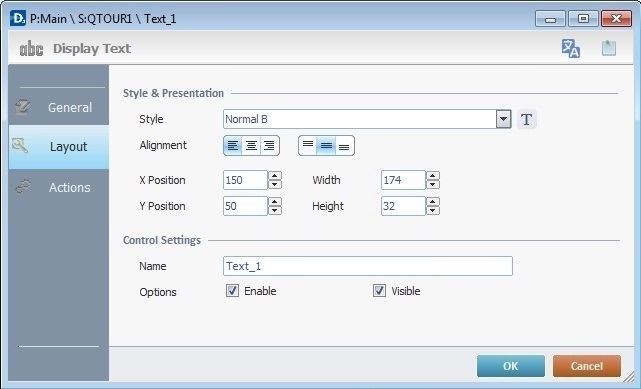
5. Select the "Layout" tab and fill in the dialog box.
EX: Fill in with the following values presented in the illustration:
6. To apply these choices, click ![]() .
.
7. To add a second object to the "QTour1" screen, go to the “Control” tab and drag the desired object to the screen.
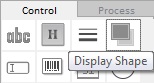
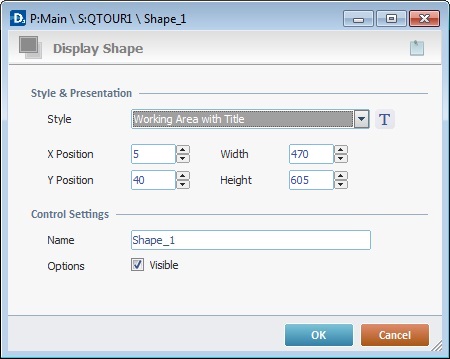
EX: Click the “Display Shape” object and drag-and-drop it onto the "QTOUR1" screen."
![]()
This "Display Shape" object was chosen to create a visual effect on the screen of the device.
8. Configure the object's properties. Double-click the recently added object to open a "properties" window and fill in the required values.
EX: To configure the "Display Shape" object's properties, right-click the object and select "Display Shape Properties" OR double-click it.
Fill in with the following values presented in the illustration:
9. To apply these choices, click ![]() .
.
10. To add a third object to the "QTour1" screen, go to the “Control” Tab and drag the desired object to the screen.
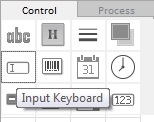
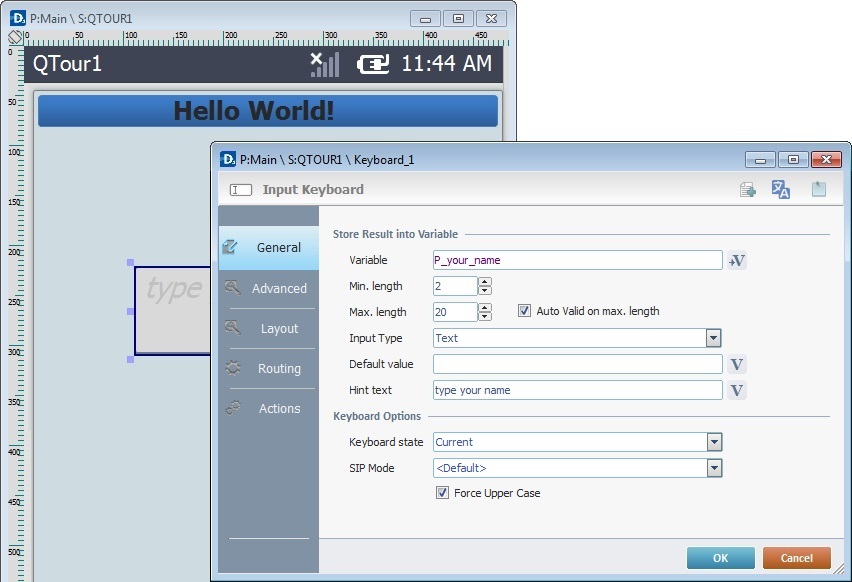
EX: Click the “Input Keyboard” object and drag-and-drop it onto the "QTOUR1"screen.
![]()
The "Input Keyboard" object was chosen because the information input must be done via keyboard of a device or a virtual keyboard (SIP).
11. Configure the newly added object's properties. Double-click the object to open a "properties" window and fill in the required values.
EX: Double-click the "Input Keyboard" object OR right-click the “Input Keyboard” object and select “Keyboard Properties” to open its "properties" window.
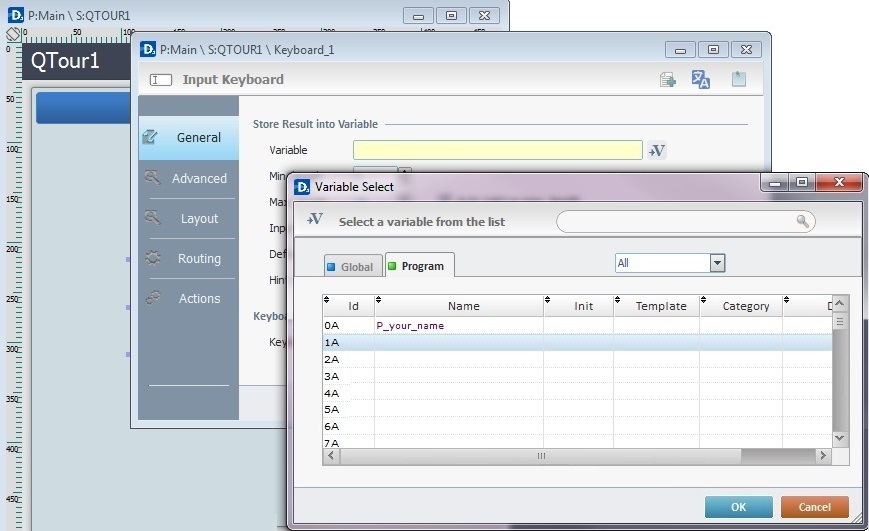
12. Select the "General" tab. Click ![]() to open a"Standard Variable Select" window and create a "Program" variable that will receive data. See Working with the Variable Processes Group.
to open a"Standard Variable Select" window and create a "Program" variable that will receive data. See Working with the Variable Processes Group.
EX: Since this variable will contain user names, the "0A"variable will be called "P_your_name".
13. To apply the newly created variable, click ![]() .
.
14. Continue to attribute values to the "Input Keyboard" object in the "General" tab.
EX: Fill in with the following values presented in the illustration below:
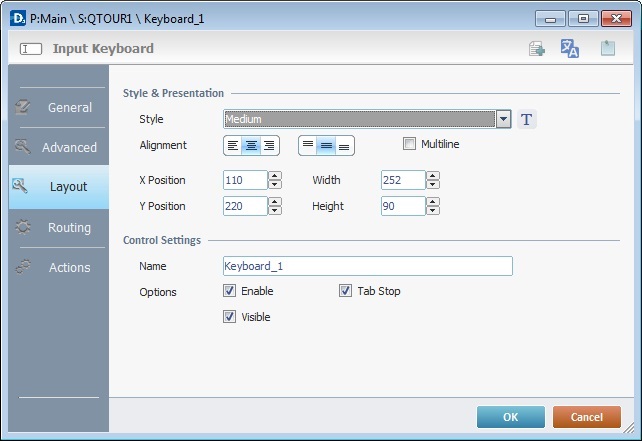
15. Select the "Layout" tab and fill in the dialog box.
EX: Fill in with the following values displayed in the illustration below:
16. Select the "Actions" tab. Define the object's behavior with the help of processes that will be added in this tab.
EX: To execute the next action (proceeding to the next screen), the chosen process is "Go to".
To add this process, go to the "Process" tab and select ![]() . Select the "Go to" process from the "Process" tab's lower section and drag-and-drop it on the first available row of the "Actions" tab (C).
. Select the "Go to" process from the "Process" tab's lower section and drag-and-drop it on the first available row of the "Actions" tab (C).
This procedure opens a dialog box so you can specify the next execution step from the options available. In this case, "<Next Screen>".

17. To apply the "Next Screen" option, click ![]() .
.
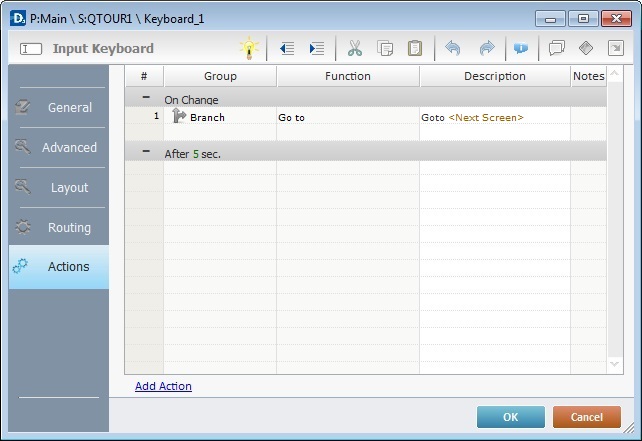
18. To apply the added process, click ![]() in the "Actions" tab.
in the "Actions" tab.
![]() Another way to add a process is by clicking
Another way to add a process is by clicking ![]() OR by right-clicking any row and selecting
OR by right-clicking any row and selecting ![]() in the resulting right-click menu. See Adding Processes to a Screen or an Object.
in the resulting right-click menu. See Adding Processes to a Screen or an Object.
19. To add a fourth object to the "QTOUR1" screen, go to the “Control” tab and drag the desired object onto the screen.
EX: Click the “Display Text” object and drag-and-drop it onto the "QTOUR1" screen (step 3).
20. To configure the new object's properties, right-click the selected object and select "... Properties" OR double-click the newly added object to open the "properties" window.
In the "General" tab, fill in the required values.
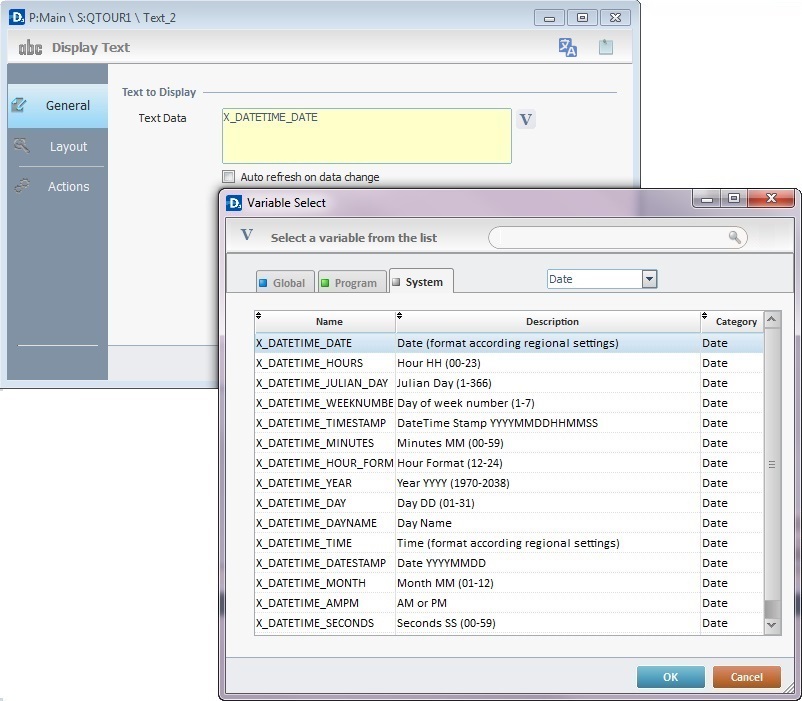
EX: In the "General" tab, fill in the "Text Data" box. Since the example requires the display of date information, click ![]() and select a "System" variable, in this case, "X_DATETIME_DATE".
and select a "System" variable, in this case, "X_DATETIME_DATE".
21. To apply the system variable, click ![]() in the "Standard Variable Select" window.
in the "Standard Variable Select" window.
22. Click the "Layout" tab and insert the required values.
EX: Fill in with the following values presented in the illustration below:
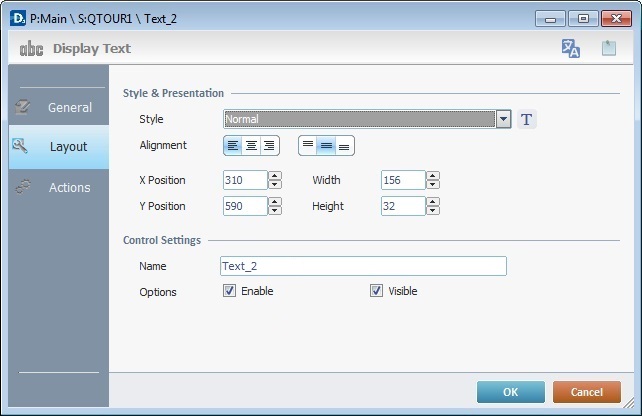
23. To apply these choices, click ![]() in the "Layout" tab.
in the "Layout" tab.
24. Go to the “Control” tab and add a fifth object to the "QTOUR1" screen by dragging another object to the screen.
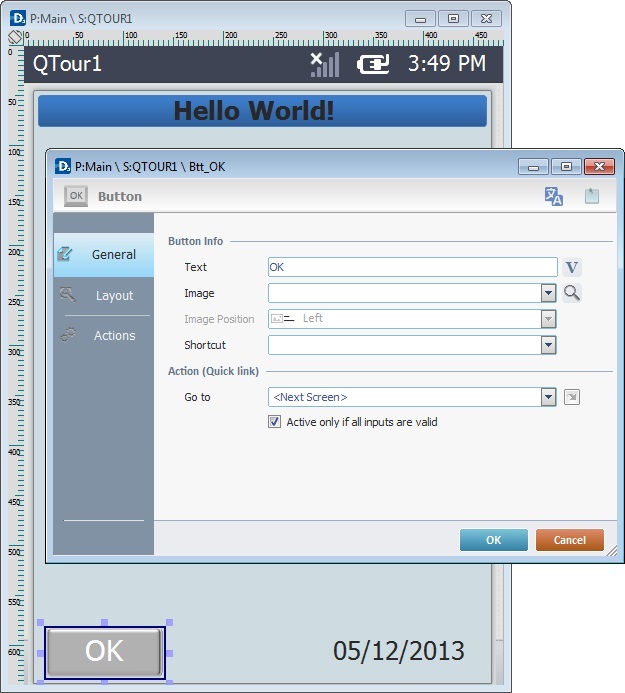
EX: Click the “Button” object and drag-and-drop it onto the "QTOUR1" screen.
25. To configure the recently added object's properties, right-click it and select "... Properties" to open a "properties" window OR double-click the required object to open that same "properties" window.
Next, fill in the "General" tab as required by the project.
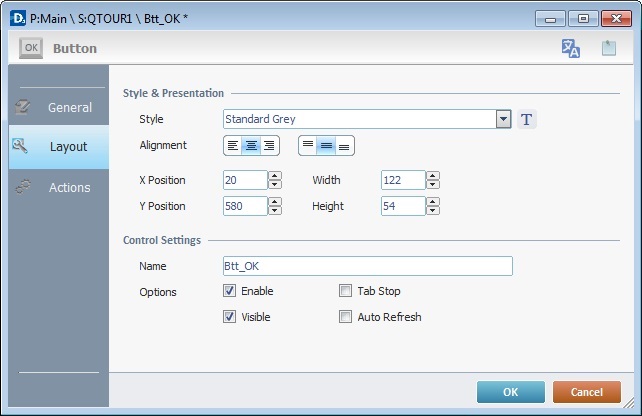
EX: To display the desired text on the "Button" object, enter "OK" in the “Text” box and select the "Next Screen" in the "Go To" box, as shown in the illustration below:
![]()
The "Button" object was chosen to present an alternative way to move to the next screen after a data input.
26. In the "Layout" tab, select from the available options and insert the required values.
EX: Fill in with the following options/values:
27. To apply the options made, click ![]() .
.
28. Add a new screen by right-clicking the screen representation in the tree view and selecting the "Add Screen" option in the resulting menu. See Creating and Editing a Screen.
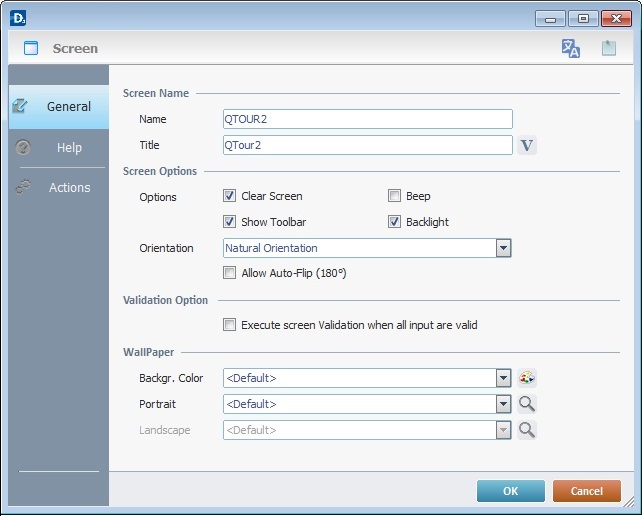
29. In the "General" tab, rename the screen as "QTOUR2" in the "Name" box (repeat step 1) and maintain the choices presented in the illustration below:
30. To apply, click ![]() .
.
31. To add an object to the "QTOUR2" screen, go to the “Control” tab and drag the desired object onto the screen.
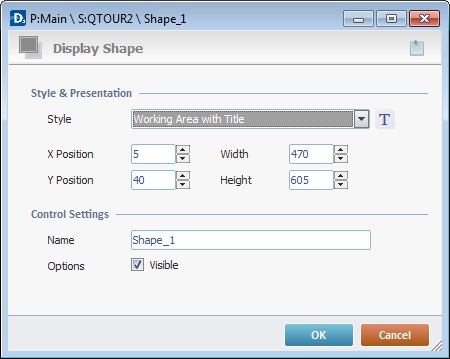
EX: Click the “Shape” object and drag-and-drop it onto the "QTOUR2" screen (step 6).
32. Configure the object's properties. Double-click the recently added object to open a "properties" window and fill in the required values.
EX: To configure the "Display Shape" object's properties, right-click the object and select "Display Shape Properties" OR double-click it.
Fill in with the following values presented in the illustration (step 8):
33. To apply these choices, click ![]() .
.
34. Go to the “Control” tab to add a second object to the "QTOUR2" screen and drag the required object onto the screen.
EX: Click the “Display Text” object and drag-and-drop it onto the "QTOUR2" screen (step 3).
35. Configure the newly added object's properties by double-clicking it to open the "properties" window.
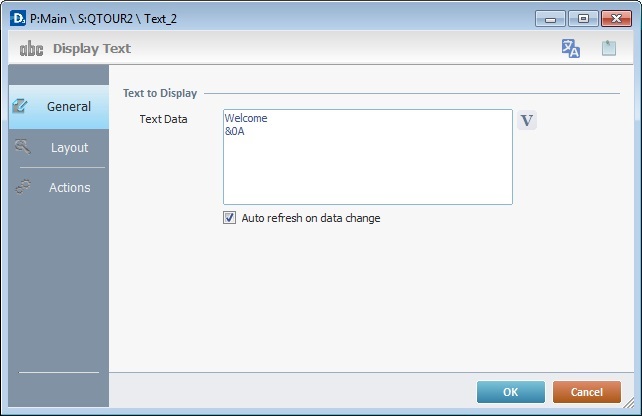
EX: In the "Text Data" box, enter "Welcome[enter]&0A". This way, the word "Welcome" will be displayed along with the data from the "0A" variable.
![]()
The "0A" variable relates to a program variable (called "P_your_name") which was previously created in step 12 to store user names.
36. Select the "Layout" tab and fill in the dialog box.
EX: Fill in with the following values displayed in the illustration below:
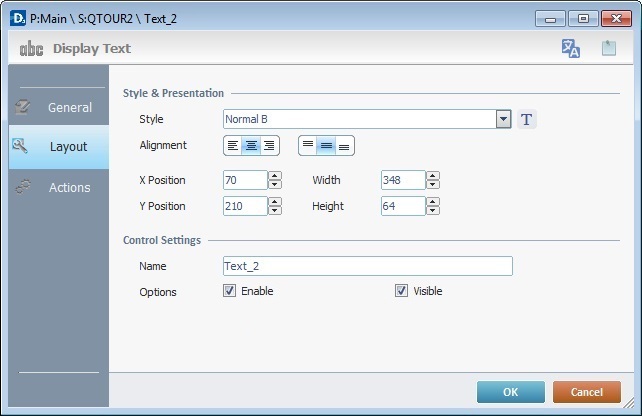
37. To apply these options, click ![]() in the "Layout" tab .
in the "Layout" tab .
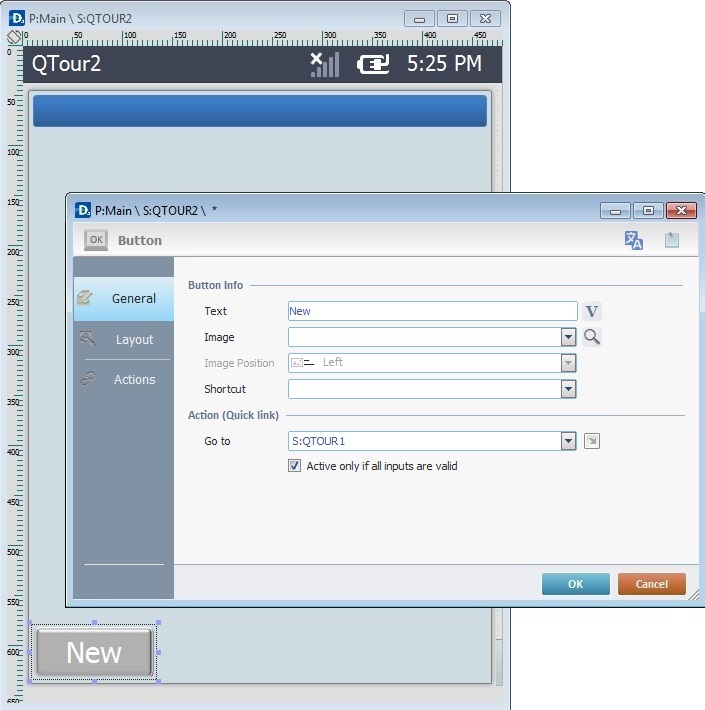
38. Go to the “Control” Tab and drag a third object onto the "QTOUR2" screen.
EX: Click the “Button” object and drag-and-drop it onto the "QTOUR2"screen.
39. Configure the recently added object's properties.
Right-click that object and select "... Properties" OR double-click it to open the "properties" window. Next, fill in the "General" tab.
EX: To display the desired text on the "Button" object, enter "New" in the “Text” box and select the destination in the "Go To" box, as shown in the illustration below:
40. In the "Layout" tab, select from the available options and insert the required values.
EX: Fill in with the following options/values presented in the illustration below:
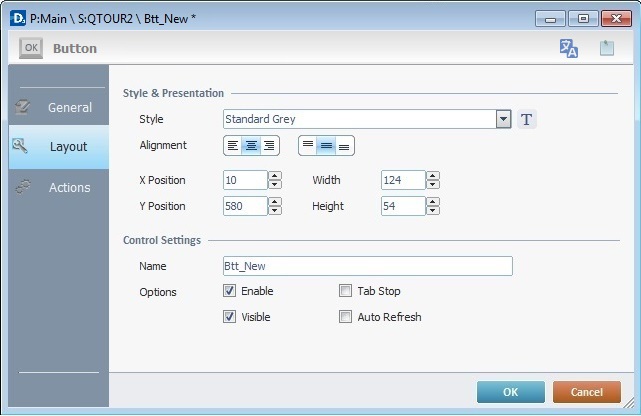
41. To apply these choices, click ![]() in the "Layout" tab.
in the "Layout" tab.
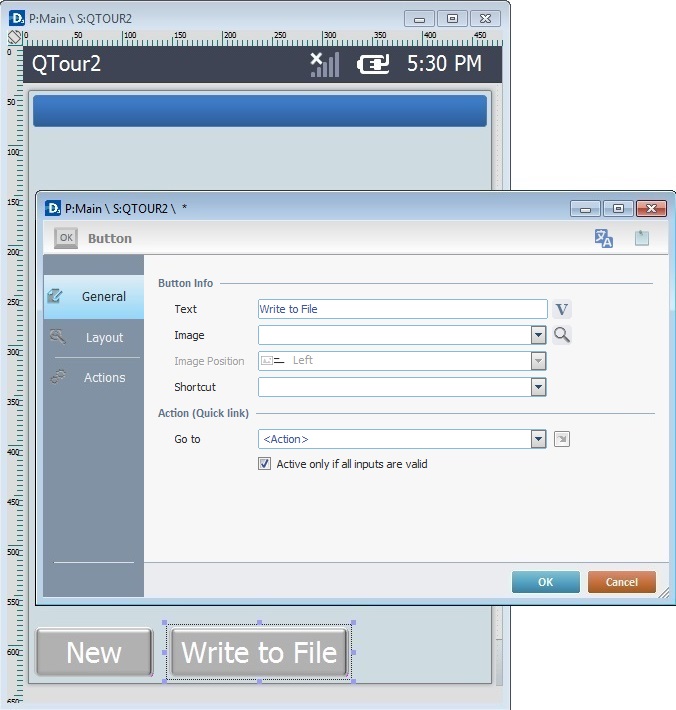
42. Go to the “Control” Tab and drag a fourth object onto the "QTOUR2" screen.
EX: Click the “Button” object and drag-and-drop it onto the "QTOUR2"screen.
43. Configure the newly added object's properties.
Double-click the new object and open the "properties" window. Next, fill in the "General" tab.
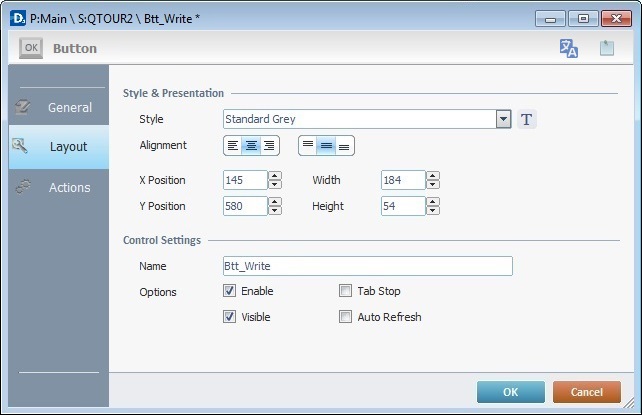
EX: Define the text that will appear in the object by writing "Write to File" in the "Text" box and maintain the options that appear in the illustration below:
44. Click the "Layout" tab and insert the required values.
EX: Fill in with the following options/values as shown in the illustration below:
45. Go to the "Actions" tab to add processes. To do so, go to the "Process" tab, select a process group and drag the desired process from the lower section to an empty row in the "Actions" tab.
EX: To add the "Write Record" process to the "Actions" tab, go to the "Process" tab and select ![]() .
.
Select the "Write Record" process from the "Process" tab's lower section and drag-and-drop (D) it on the first available row in the "Actions" tab. This opens a "File Write"window.
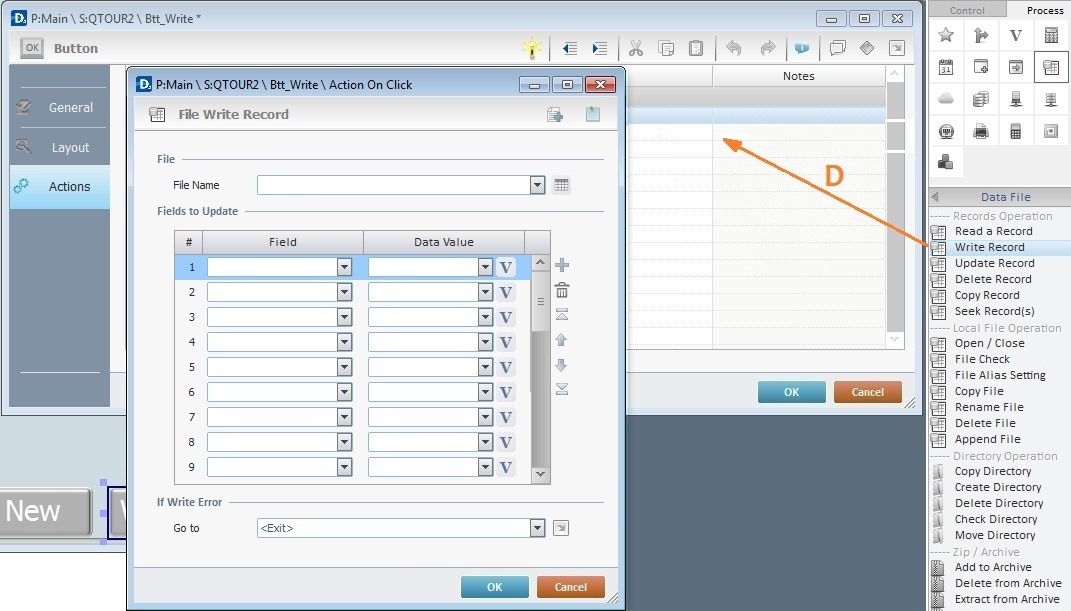
![]()
The "Write Records" process was chosen to write input data in a file. It always requires the creation of a file.
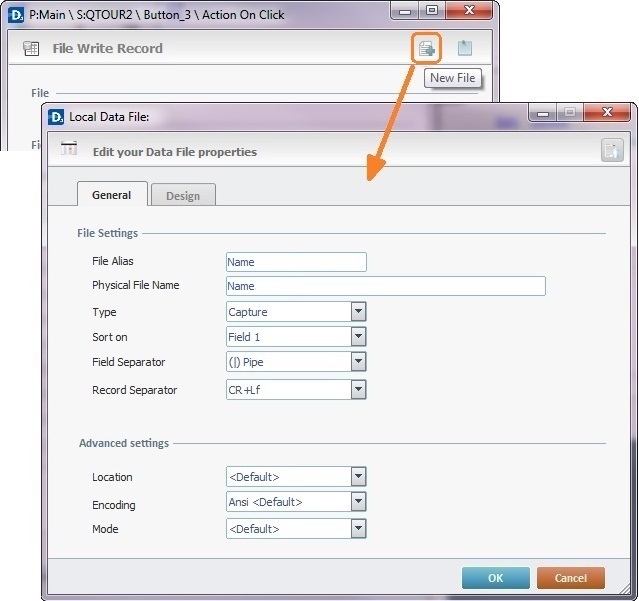
46. In the "File Write" window, create a file to receive the data input.
Click ![]() (located on the upper right corner of the "File Write Record" window).
(located on the upper right corner of the "File Write Record" window).
In the "General" tab, fill in the name of the new file, select the file type, select the field to sort and maintain the other default settings.
EX: Fill in the following values as displayed in the illustration below:
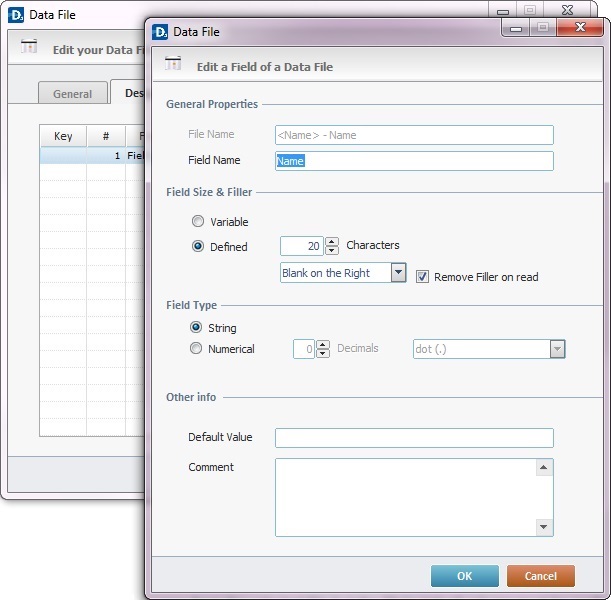
47. Select the "Design" tab to access a table. Double-click the selected row of that table to open the "Edit a Field of a Data File" and edit the available options.
EX: Fill in with the following values displayed in the illustration below:
48. To apply the choices defined in this window, click ![]() .
.
49. Click ![]() in the "Design" tab to apply the choices concerning the recently created file.
in the "Design" tab to apply the choices concerning the recently created file.
50. Back in the "File Write Record" window, select the file that has just been created. The "Field" column will automatically display all the field names from the selected file but the "Data Value" column must be configured by clicking ![]() and selecting a "Program" variable.
and selecting a "Program" variable.
EX: Select the "0A-P_your_name" variable, as displayed in the illustration below:
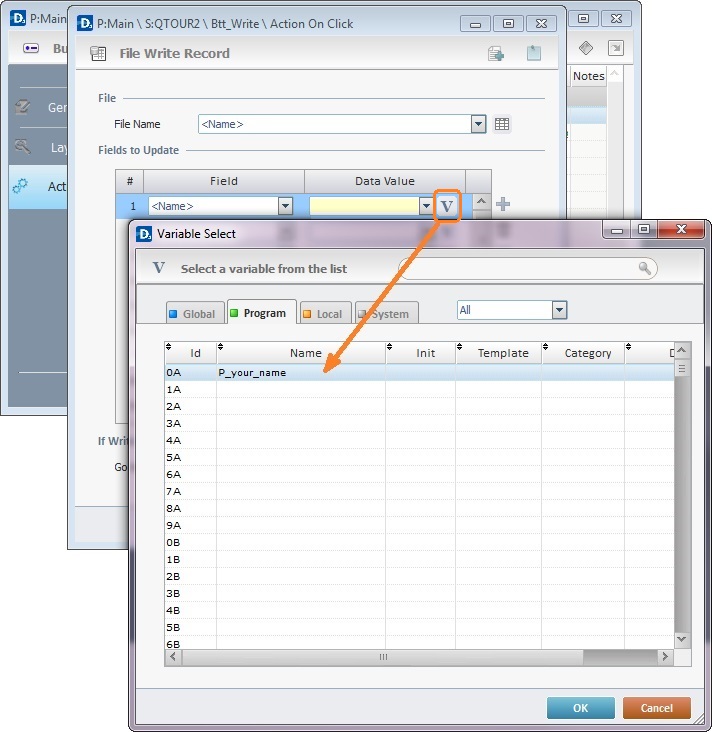
51. To apply the choice of variable, click ![]() in the "Standard Variable Select" window.
in the "Standard Variable Select" window.
52. Click ![]() , again, in the "File Write Record" window.
, again, in the "File Write Record" window.
53. Back in the "Actions" tab, add another process by going to the "Process" tab, clicking a process group and dragging the desired process from the lower section and dropping it on the row of the "Actions" list (E).
EX: Select ![]() (located in the "Process" tab) and drag the "Message Box" process from the lower section to an empty row in the "Actions" tab.
(located in the "Process" tab) and drag the "Message Box" process from the lower section to an empty row in the "Actions" tab.
This opens a "Display Message" window.
Fill in with the following options displayed in the illustration below:
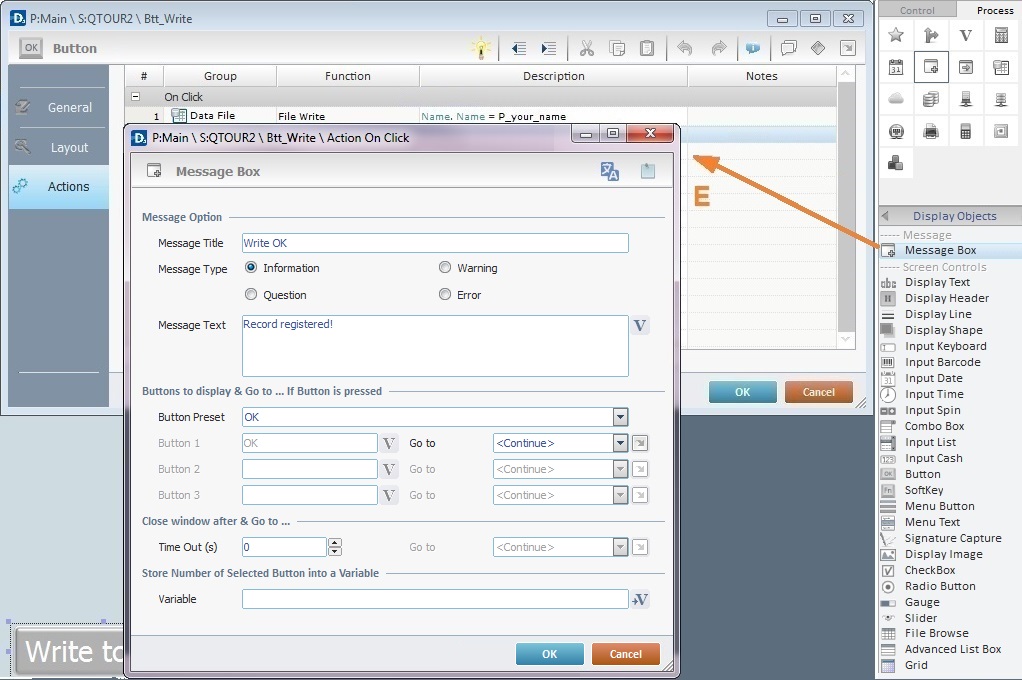
![]()
The "Message Box" process was chosen to present a dialog box to emphasize the "Write Records" process.
54. To apply the options defined for the message box, click ![]() .
.
Back in the "Actions" tab, it should look like this:
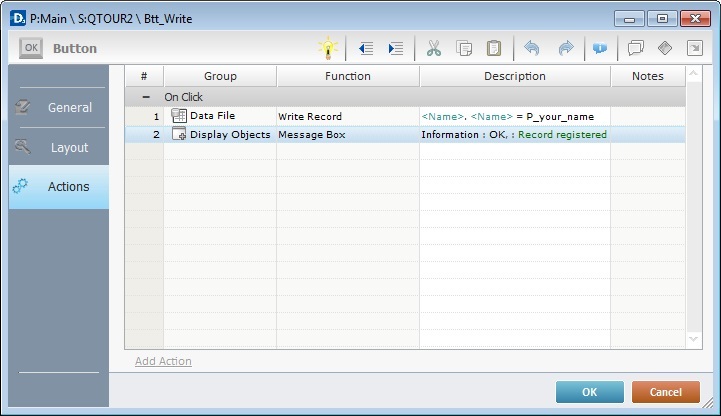
55. To apply the added processes, click ![]() in the "Actions" tab.
in the "Actions" tab.
56. Go to the “Control” Tab and drag a fifth object onto the "QTOUR2" screen.
EX: Click the “Button” object and drag-and-drop it onto the "QTOUR2"screen.
57. Configure the newly added object's properties.
Double-click the new object and open the "properties" window. Next, fill in the "General" tab.
EX: Define the text that will appear in the object by writing "Exit" in the "Text" box and maintain the options that appear in the illustration below:
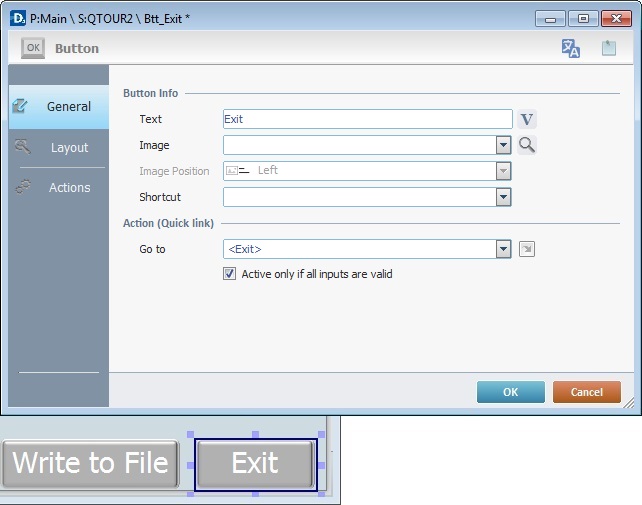
58. Go to the "Layout" tab and fill in the required values.
EX: Fill in with the following values displayed in the illustration below:

59. Go to the "Actions" tab to add processes. To do so, go to the "Process" tab, select a process group and drag the desired process from the lower section to the "Actions" tab.
EX: To add the "Go to" process to the "Actions" tab, go to the "Process" tab and select ![]() .
.
Select the "Go to" process from the "Process" tab's lower section and drag-and-drop it on the first available row of the "Actions" tab.
This procedure opens another dialog box where you can specify the point of arrival when the button is pressed. In other words, when the device operator presses this "Exit Button" on the device, he exits the program.
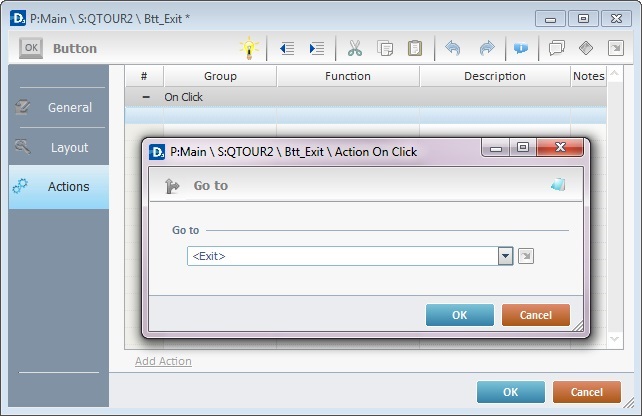
60. To apply the choice regarding the "Go To" process, click ![]() .
.
61. Click ![]() in the "Actions" tab to complete the addition of processes to the object.
in the "Actions" tab to complete the addition of processes to the object.
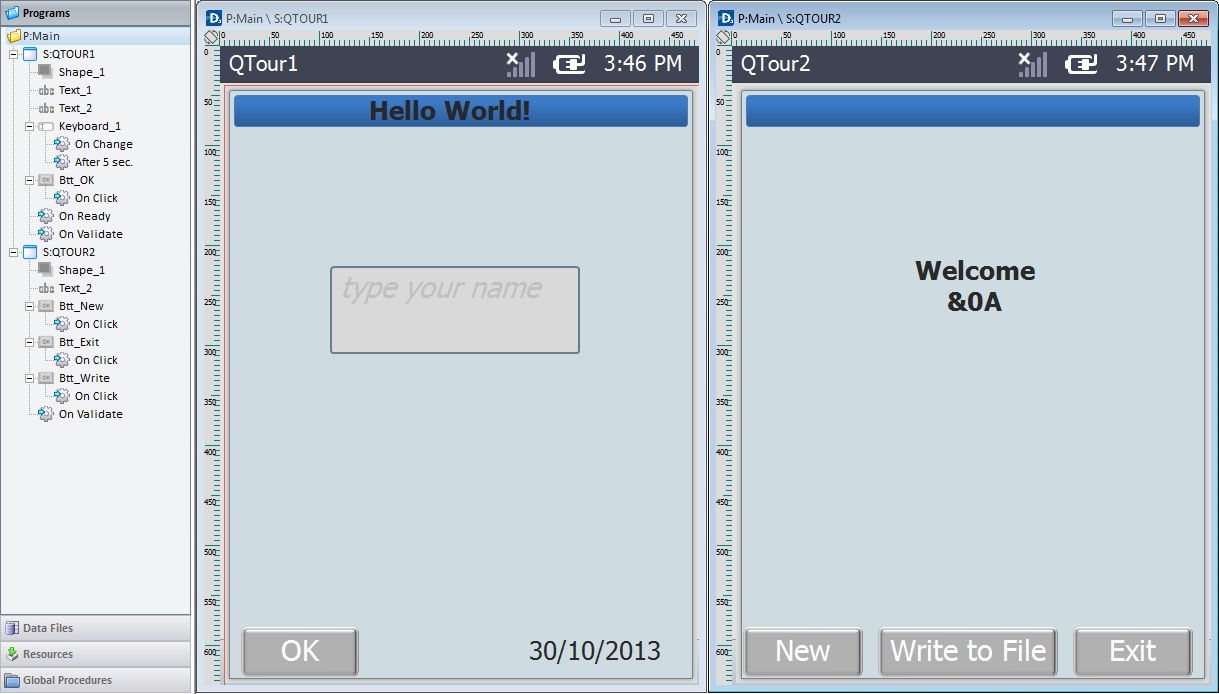
62. This concludes the development of this basic application.
Below is the final result of the two screens created:
A few tips to help with the creation of a project:
![]() To help with project organization/planning, name every program, screen and object in accordance with their appearance or purpose. This helps tree view identification.
To help with project organization/planning, name every program, screen and object in accordance with their appearance or purpose. This helps tree view identification.
![]() Use the mouse to re-dimension an object.
Use the mouse to re-dimension an object.

![]() Use the tools in the Icon Shortcut Bar to align objects (either in relation to other objects or within the screen).
Use the tools in the Icon Shortcut Bar to align objects (either in relation to other objects or within the screen).
