|
Working with the Variable Processes Group |
  
|
Working with the Variable Processes Group
|
Working with the Variable Processes Group |
|
Process Purpose
The Variable group of processes allows for multiple operations that involve variables.
The results of these operations ("Insert"; "Extract"; "Assign"; etc.) are stored in variables.
![]() A variable is a memory area in the device where data is stored temporarily. The content of a variable is an UNICODE character string that can be displayed on the device's screen, at any moment.
A variable is a memory area in the device where data is stored temporarily. The content of a variable is an UNICODE character string that can be displayed on the device's screen, at any moment.
Variable Types
There are two different main groups of variables that can be used in a project:
The User Defined Variables are used to store data. They are created by the programmer to suit the needs of the application being developed. They include:
•Global Variables
A Global Variable is defined in one program and can be used in any of the other programs or new projects. The contents can be retrieved, updated or modified by the other programs. (examples of variable codes: A0, A1, A2, A3, A4, A5, A6, A7, A8, A9, B0, B1, B2…)
•Program Variables
A Program Variable is defined in one program and cannot be used in any of the other programs. The contents can be retrieved, updated or modified only in the current program. (examples of variable codes: 0A, 1A, 2A, 3A, 4A, 5A, 6A, 7A, 8A, 9A, 0B, 1B, 2B…)
•Local Variables
Local Variables are used in events associated to objects such as an "On Change" event. There are specific local variables associated to specific object events. The only exception is the "On RFID Tag Read" event. Even though this is a screen event, you can use local variables. These local variables provide information regarding the execution of the event.
Ex: Consider a "Variable Assign" process that you have added to an "On Change" event within a "File Browse" object. When assigning the appropriate variables, you will have access to specific pre-existing local variables such as "L_Record_Number" (which provides you with the number of the selected record).
System Variables
The System Variables are not defined by the user. They contain system information that can be used by the programs in the application. System variables contain information such as current date & time, selected record number in a file browse object, battery level, program name and version. System variables are grouped in “Audio”; “Camera”, “Date”, “Device”, “GPS”, “Imager”, "RFID"; “Network”; "App_Info", “System”, "Timer", and "Operator" variables.
![]() Some of the system variables that concern the "Operator" (X_USR_CUST1/X_USR_CUST2/X_USR_CUST3/X_USR_CUST4/X_USR_CUST5) are mapped with values that are defined/customized within the MCL-Mobility Platform (in the operator's profile). Refer to the MCL-Mobility Platform User Guide for more information on Info Tab in the Operator Details page.
Some of the system variables that concern the "Operator" (X_USR_CUST1/X_USR_CUST2/X_USR_CUST3/X_USR_CUST4/X_USR_CUST5) are mapped with values that are defined/customized within the MCL-Mobility Platform (in the operator's profile). Refer to the MCL-Mobility Platform User Guide for more information on Info Tab in the Operator Details page.
A program can contain Global, Local, Program or System variables.
A Global Procedure only allows for Local, Program or System variables.
Local Procedures use Global, Local or Program variables.
Regarding Routines (Routine and Routine In), they only allow for Global or Program variables.
All variables can, at any given time, be manipulated by the program to:
• Modify their content.
• Store data in a data file record.
• Send data to the host computer.
• Display data on the screen.
The ![]() and
and ![]() icons appear throughout the project. Clicking them provides access to a variables window with a list of variables (distributed over "Global"; "Program"; "Local" and "System" tabs). The availability of the tabs scope depends on the context. As mentioned above, not all variables are available for all programming contexts. In this window you can create new variables, and select the required one for the current process.
icons appear throughout the project. Clicking them provides access to a variables window with a list of variables (distributed over "Global"; "Program"; "Local" and "System" tabs). The availability of the tabs scope depends on the context. As mentioned above, not all variables are available for all programming contexts. In this window you can create new variables, and select the required one for the current process.
When clicking the ![]() icon, in a properties window, you are selecting the variable that will feed data to the process (the process will read data from this variable).
icon, in a properties window, you are selecting the variable that will feed data to the process (the process will read data from this variable).
When clicking the ![]() icon, in a properties window, you are selecting the variable that will receive data after the process is run (the process will write data on this variable).
icon, in a properties window, you are selecting the variable that will receive data after the process is run (the process will write data on this variable).
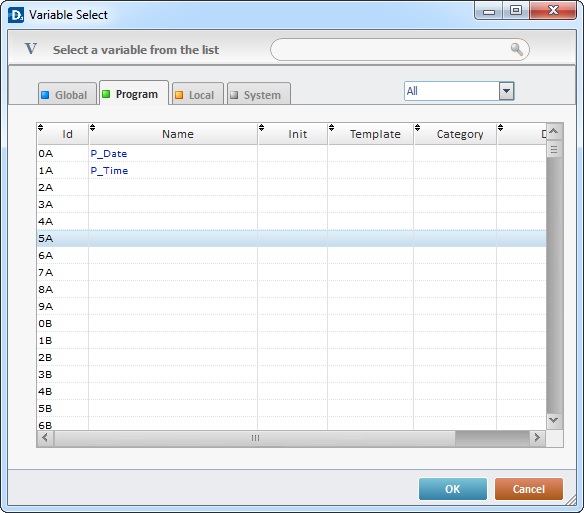
Detail of Variable Select windows
Standard Variable Select window |
Floating Variable Select window |
|
|
A "Variable Select" window displays the available variables within a project (default local/system variables and the ones you create). The variables are grouped according to type ("Global", "Program", "Local" and "System"), each type with the corresponding scope tab.
There are two available "Variable Select" window types:
•Standard Variable Select window - This window is called with the use of the ![]() and/or
and/or ![]() icons (see To Select/Create a Variable). The content of this window depends on the active field associated to the clicked icon and the icon itself.
icons (see To Select/Create a Variable). The content of this window depends on the active field associated to the clicked icon and the icon itself.
Ex: The "Standard Variable Select" window, which is called with the ![]() icon, will never include the "System" scope tab. This icon refers to variables that receive data and "system" variables only provide system information, they do not receive data.
icon, will never include the "System" scope tab. This icon refers to variables that receive data and "system" variables only provide system information, they do not receive data.
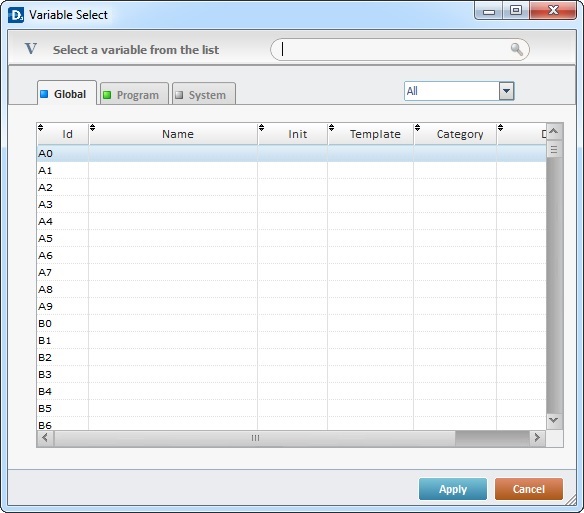
•Floating Variable Select window - This window is called when you press <F3> in your PC and when you open the "Project" menu (in the "Menu Bar") and select "Variables".
The content of this window is dynamic, meaning, it displays the variables/scope tabs that relate to the currently active context (ex: a program, a screen, a process, etc.).
Ex: If you press <F3> when a screen is selected, the Floating Variable Select window displays the "Global" and "Program" scope tabs with the available variables for that screen. If the focus is on the "Actions" tab of an object, the window displays four scope tabs - "Global", "Program", "Local" and "System".)
Click each scope tab to open a table and view the corresponding variables and/or create more variables of that type.
Each scope tab table includes the following columns:
Id |
NOT editable. Represents the variable's identification. |
Name |
Displays the existing variables. Use this column to create the necessary variables and/or to edit an existing variable. See To Select/Create a Variable. |
Init |
If required, add initial values to your variable(s): a. Select the row with the intended variable. b. Click the corresponding "Init" field to set it to "edit" mode. c. Enter the value. d. Click outside the edited field to set it back to "view" mode. |
Template |
Use this column to create a visual representation of a variable. Whenever a variable is displayed on the screen (within an object), instead of three asterisks (***), the object will display the template you entered. To add a template: a. Select the row with the intended variable. b. Click the corresponding "Template" field to set it to "edit" mode. c. Enter the template for the variable. d.Click outside the edited field to set it back to "view" mode.
|
Category |
Organize your variables into categories you create: a. Select the row with the intended variable. b. Click the corresponding "Category" field to set it to "edit" mode. c. Enter the category for the variable. d.Click outside the edited field to set it back to "view" mode.
Once they are created, the new categories will be available in the filter drop-down. |
Description |
If necessary, add information regarding each variable: a. Select the row with the variable you want to describe. b. Click the corresponding "Description" field to set it to "edit" mode. c. Enter the information. d. Click outside the edited field to set it back to "view" mode. |
If required, you can control the viewed information.
•Use the "search box" to search for values in the "Name", "Category" and "Description" columns:
a. Enter the information in ![]() . The results are automatically displayed below.
. The results are automatically displayed below.
b. To resume an unfiltered view, delete the information from the "search box".
•Use the drop-down (below the "search box") to filter the variables by category. A category created in the "Program" scope tab will only be available in the drop-down of that "Program" scope tab.
To Select/Create a Variable
After calling a "Standard Variable Select" or a "Floating Variable Select" window, proceed as follows:
|
|
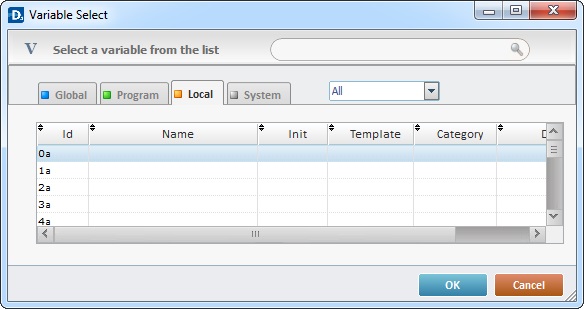
To select a variable, for whatever purpose:
a. Click the appropriate scope tab ("Global", "Program", "Local" or "System") to display its content.
b. Select a variable among the list available by clicking it.
To create a new variable:
a. Click the appropriate scope tab ("Global", "Program", "Local") and open it.
b. Select a row and, then, click the "Name" field to set it to "edit" mode.
c. Enter the variable name.
d. Click outside that field to set it to "view" mode.
To edit a variable:
a. Click the appropriate scope tab ("Global", "Program" or "Local") and open it.
b. Double-click the field you want to edit to set it to "edit" mode.
c. Enter the necessary changes.
d. Click outside the edited field to set it back to "view" mode.
Click ![]() to close the "Standard Variable Select" or "Floating Variable Select" window.
to close the "Standard Variable Select" or "Floating Variable Select" window.
![]() When creating/entering the name of a variable, take its purpose into consideration. It will help to identify its content, especially if there are a lot of variables. For instance, if the variable is designed to store the names of device operators, define it as "P_User_Name".
When creating/entering the name of a variable, take its purpose into consideration. It will help to identify its content, especially if there are a lot of variables. For instance, if the variable is designed to store the names of device operators, define it as "P_User_Name".
![]() The name of a variable obeys a specific syntax that immediately defines the scope. It, automatically, starts with a P_(if it is a "Program" variable), an L_(if it is a "Local" variable) or a G_(if it relates to a "Global" variable"). Spaces are replaced by an underscore.
The name of a variable obeys a specific syntax that immediately defines the scope. It, automatically, starts with a P_(if it is a "Program" variable), an L_(if it is a "Local" variable) or a G_(if it relates to a "Global" variable"). Spaces are replaced by an underscore.
To Apply a Variable
Depending on the used "Variable Select" window, the way you apply variables is different:
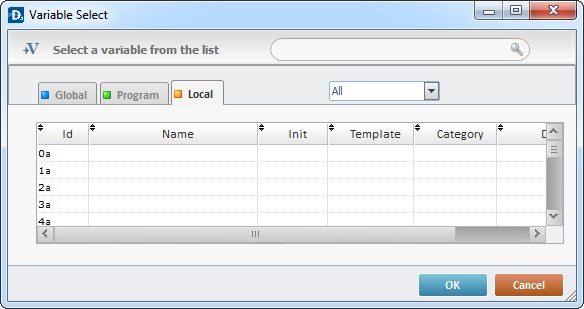
In a Standard Variable Select window
To apply an available variable to the active field (associated to a ![]() or
or ![]() ), double-click the intended variable OR select it and, then, click
), double-click the intended variable OR select it and, then, click ![]() .
.
In a Floating Variable Select window
•Use drag-and-drop to add a variable to a field:
a. Open the Floating Variable Select window.
b. Open the required scope tab.
c. Drag the intended variable into the target field.
For the drag-and-drop operation to work, always drop the selected variable into a field that accepts variables (a field with a yellow background or associated to a ![]() or
or ![]() icon).
icon).
•Use a double-click to add a variable to an active field:
a. Open a Floating Variable Select window.
b. Select the target field (making it an active field).
c. In the Floating Variable Select window, open the required scope tab.
d. Double-click the intended variable.
The variable is applied to the previously selected field.
•Use the ![]() button.
button.
a. Open a Floating Variable Select window.
b. Select the target field (making it an active field).
c. In the Floating Variable Select window, open the required scope tab.
d. Click the intended variable to select it.
e. Click ![]() .
.
The variable is applied to the previously selected field.
![]() If the active target field does NOT accept variables, the field's background color will be red and you will NOT be able to drop the selected variable into the field.
If the active target field does NOT accept variables, the field's background color will be red and you will NOT be able to drop the selected variable into the field.
If the active field allows variables, the field's background color will be yellow.
![]() A Floating Variable Select window cannot be called during the adding of a process because the corresponding properties window is a blocking window. To overcome this, open the Floating Variable Select window before adding a new process. If the Floating Variable Select window is already open, you will be able to use it to view/create or add variables to the process properties window
A Floating Variable Select window cannot be called during the adding of a process because the corresponding properties window is a blocking window. To overcome this, open the Floating Variable Select window before adding a new process. If the Floating Variable Select window is already open, you will be able to use it to view/create or add variables to the process properties window
![]()
If a Floating Variable Select window is open, in the background, and you click ![]() or
or ![]() (in a process or object's properties window,for instance) the Floating Variable Select window is selected/comes into focus.
(in a process or object's properties window,for instance) the Floating Variable Select window is selected/comes into focus.
The Variable group is divided into:
----- Operation |
-----Format |
----- Edit |
-----Search |