|
Detailing the Menu Bar |
  
|
Detailing the Menu Bar
|
Detailing the Menu Bar |
|
Overview
The Menu Bar consists of several command groups that allow for direct operations regarding the settings and the edition of the project. This chapter deals with each group of commands individually.
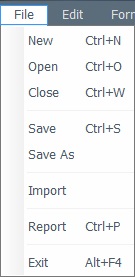
File menu
|
File menu |
|
New |
Is used to create a new project. See Creating a New Project. |
|
Open |
Is used to open previously created projects from the default project's folder. The location of the default project's folder can be modified in the "Designer Setup" option, accessed via the Tools menu. See Detail of MCL-Designer Setup and also Detail of Open. |
|
Close |
Is used to close the current project. If the project has unsaved data, a new window opens offering the possibility to save the changes (OK), close the project without saving the changes (No) or maintaining the project open (Cancel). |
|
Save |
Is used to save the current project in the previously defined project's folder. Operationally speaking: •the first time you save a project, it creates an .mprj file located in the project's directory and saves the project sources. •whenever you "save" a project it updates the .mprj file with the changes you have made and saves the project sources.
Using the "Save" option does NOT create or update a PDK file - that can ONLY be done via the "Generate" option. |
|
Save as |
Is used to save the current project with a new name or information - in other words, it creates a new project. In the resulting window, fill in the available options. See Detail of Save as.
The "Save as" option does NOT create or update an existing PDK file, it only creates an .mprj file and sources for the new project. If you want to generate a PDK file for the new project you must use the "Generate" option. |
|
Import |
Is used to import a project (.mprj file) into the folder you have selected as the "Project Directory" in the "MCL-Designer Setup" option (See Directories Tab). If the project was created with an older MCL-Designer version, you are provided with these options:
This feature is available if: •you are working with an MCL-Designer version that is higher than 4.4.3-1300, for projects created within MCL-Designer 4.4.3-1300 and higher. •you did not previously check the •you check the "Show 'Open with previous...' message after MCL-Designer updates" option located in the "Designer Settings" window. See Detail of MCL-Designer Setup.
|
|
Report |
Is used to create an account of a project's details such as all the specifications and screen shots. A report can be customized to include only the details specified in the "Report Settings" window. See Detail on Report. |
|
Exit |
Is used to exit MCL-Designer V4. |
|
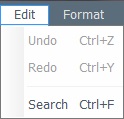
Edit menu
|
Edit menu |
|
Undo |
Is used to cancel the last action. |
|
Redo |
Is used to cancel the last “Undo” action. |
|
Search |
Is used to execute a general search in the project. See Detail of Search below. |
|
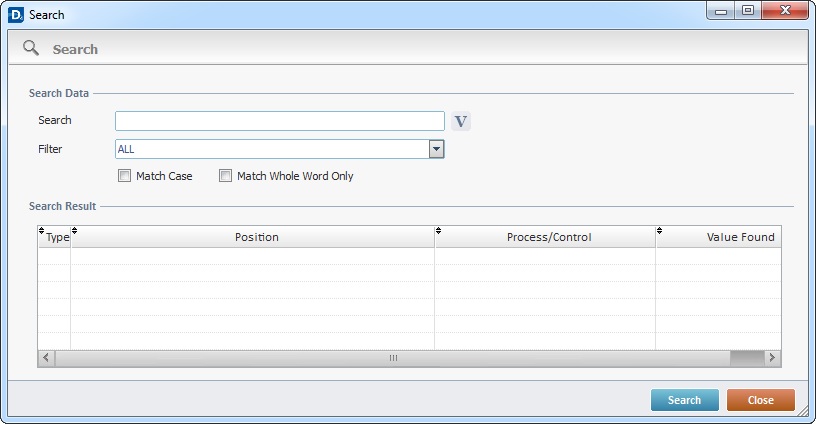
Of all these options, fill in the most appropriate ones to your search:
Search Data |
|
Search |
Enter the value to search or select it from within a variable by clicking |
Filter |
Use this option to limit the search field: All - Select this option to search for all the places where the string is found. Text - Select this option to search for all the places where the string is found as text. GOTO/Label - Select this option to search for the designated string in "Go to"/"Go to End of Action/Routine" processes or labels. Datafile - Select this option to search for the designated string in data file aliases being used by the project. Variable - Select this option to search for the designated string in variable names. The search result will return the locations where the searched variable is used. Variable (Var. write only) - Select this option to search for the designated string in variable names. The search result will return the locations where the searched variable is written. Com (Host/Aux/ODBC) - Select this option to search for the designated string in elements dealing with communication (Host / Aux / ODBC names). Barcode/RFID Profile - Select this option to search for the designated string in scanner/RFID profile names used in the project. Localization Tag - Select this option to search for the designated string within localization tags being used in the project. |
Match Case |
Check this option to take the designated string's uppercase and lowercase characters into account. |
Match Whole Word Only |
Check this option to enable an exact string search. |
After filling in the required options, click If you double-click a result, the corresponding "Actions" and properties window open. |
|
Type column |
Displays the field or control where the designated string is found (ex: |
Position column |
Displays the location of the designated string. |
Process/Control column |
Displays the name of the process /control of the found string. |
Value Found column |
Displays the values found that match the designated string within the field/element it was found in. |
![]()
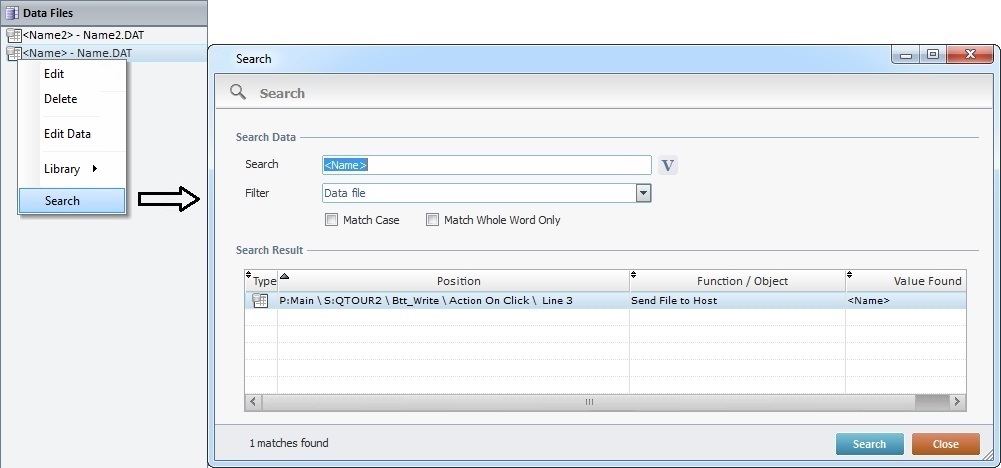
It is possible to run a direct/automatic search for a data file alias:
a. In the "Data Files" module, right-click the data file alias you want to search for (<test_DB> test_DB.DAT).
b. In the resulting right-click menu, select "Search".
The "Search" window opens with the search results (all the places where the data file alias is used).
![]() This option does not search for specific data within the data file. To do so, open the data file, click
This option does not search for specific data within the data file. To do so, open the data file, click ![]() , then,
, then, ![]() and enter the specific data. See Search Data in an Opened Data File.
and enter the specific data. See Search Data in an Opened Data File.
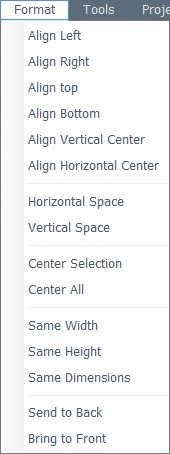
Format menu
![]()
The rule for all control format commands is that the last selected control acts as a format template.
|
Format menu |
|
Align Left |
Is used to align all selected controls with the utmost left control. |
|
Align Right |
Is used to align all selected controls with the utmost right control. |
|
Align Top |
Is used to align all selected controls with the utmost top control. |
|
Align Bottom |
Is used to align all selected controls with the utmost bottom control. |
|
Align Vertical Center |
Is used to align all selected controls vertically with the last selected control. |
|
Align Horizontal Center |
Is used to align all selected controls horizontally with the last selected control. |
|
Horizontal Space |
Is used to, evenly, align all selected controls horizontally. Select, at least, 3 or more controls. |
|
Vertical Space |
Is used to, evenly, space all selected controls vertically. Select, at least, 3 or more controls. |
|
Center Selection |
Is used to center all selected controls in relation to the screen. |
|
Center All |
Is used to center all controls in relation to the screen. |
|
Same Width |
Is used to shape all selected controls with the same width as the last selected control. |
|
Same Height |
Is used to shape all selected controls with the same height as the last selected control. |
|
Same Dimensions |
Is used to shape all selected controls with the same dimensions as the last selected control. |
|
Send to Back |
Is used to send the selected control behind the other controls.
As an alternative, you can manage the control overlap order in the tree view (by drag-and-dropping the intended control(s) within the tree view). See Overlap Order of the Controls within a Screen. |
|
Bring to Front |
Is used to bring the selected control in front of other controls.
As an alternative, you can manage the control overlap order in the tree view (by drag-and-dropping the intended control(s) within the tree view). See Overlap Order of the Controls within a Screen. |
|
Tools menu
|
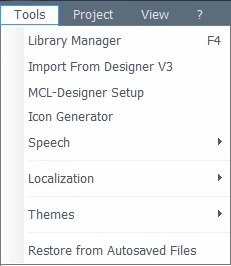
Tools menu |
|
Library Manager |
Is used to import data files, global procedures, programs, screens and routines from a library. See Import from Library. |
|
Import From Designer V3 |
Is used to import projects developed in MCL-Designer V3. See Import MCL-Designer V3 Projects. |
|
MCL-Designer Setup |
Is used to configure certain settings of MCL-Designer V4. See Detail of MCL-Designer Setup. |
|
Icon Generator |
Is used to access the "Icon Generator" tool and create icons that will represent the application. See Detail of an Icon Generator window. |
|
Speech |
Is used to access the "Language Resources Manager" and the "Prompt List" options. |
|
Localization |
Provides access to a menu with further options regarding Localization. See Detail of Localization Options. |
|
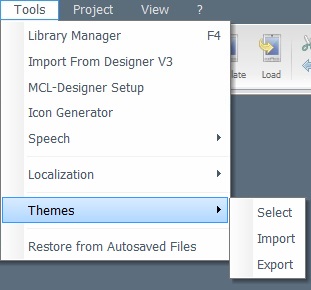
Themes |
Provides access to a theme related menu (to select, import and/or export themes). See Themes. |
|
Restore from Autosaved Files |
Provides access to a window which displays the current project's restore points. See Restore Points window. |
|
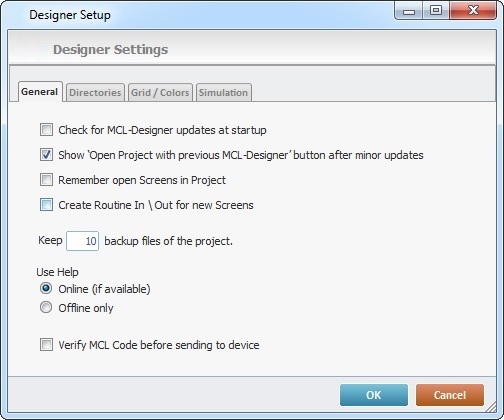
Click each tab and fill in/check the available options, as required by your project.
General tab
General tab |
|
Check for MCL-Designer updates at startup |
Check this option to enable an automatic check for updates on start-up. |
Show "Open Project with previous MCL-Designer" button after minor updates |
Check it to enable the |
Remember open Screens in Project |
Check this option to reopen the screens left open in the previous session. |
When checked this option automatically creates an empty "routine in" and "routine out" in future screens. The previously created screens within the project stay the same. If you uncheck this option mid-project, the new screens will NOT include a "routine in" and a "routine out" but the older screens will NOT be affected. |
|
Keep...backup files of the project |
Define the number of backup files for a project.
•You save a project. •an autosave occurs (the autosave occurs automatically after the user inserts information/modifications and does not save the inserted data). •before converting an old project to a new version of MCL-Designer. •before generating or simulating a project. •you load a previous version of the current project.
|
Use Help |
Select one of the following options: Online (if available) - If, at the time you want to access Help, there is no internet connection, you will be provided with the offline version. Offline only - When checked, this option only provides the Help File included in MCL-Designer. |
Verify MCL Code before sending to device |
Check this option to perform an MCL code verification. This is recommended before simulating or sending it to a device. |
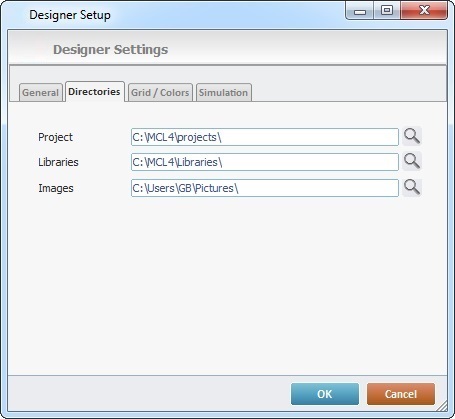
Directories tab |
|
Project |
Enter the project's directory location or click |
Libraries |
Enter the libraries directory location or click |
Images |
Enter the location for the current user's pictures directory or click |
Grid/Colors tab
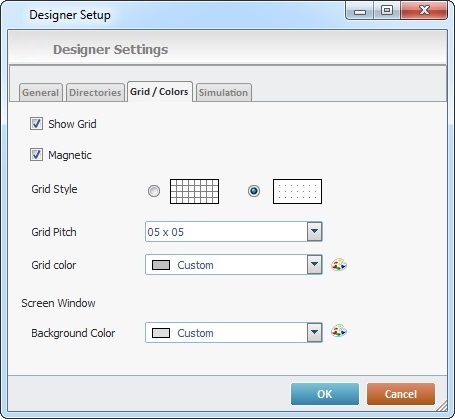
Grid/Colors tab |
|
Grid/Magnetic |
Define the grid specifications by checking “Show Grid” or “Magnetic” options. |
Grid Style |
Select the grid style preference, either squares or dots. |
Define the grid spacing by selecting the pitch in the drop-down list. |
|
Grid Color |
Define the grid color by selecting it from the drop-down list or customize it by clicking |
Background Color |
Define the background color for the screen window. Either select it from the drop-down list or customize it by clicking |
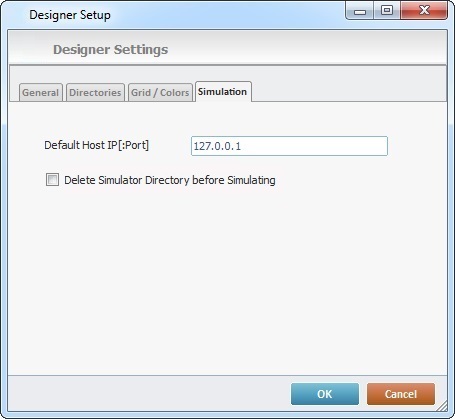
Simulation tab |
|
Default Host IP |
Define the default Host IP that establishes a connection to the MCL-Net installed in your PC. |
Delete Simulator Directory before Simulating |
Check this option to delete test data before any simulation. |
After altering the desired values, click ![]() to proceed or
to proceed or ![]() to abort.
to abort.
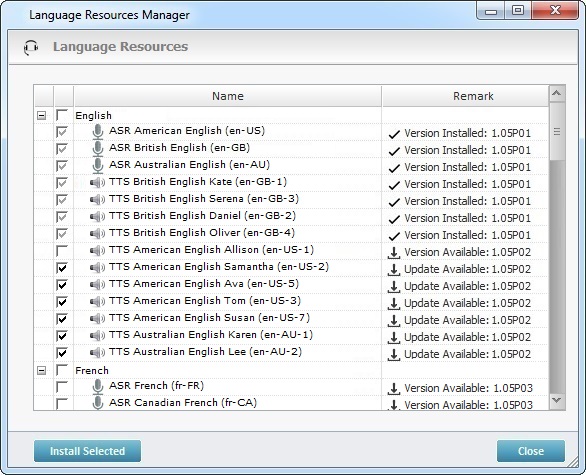
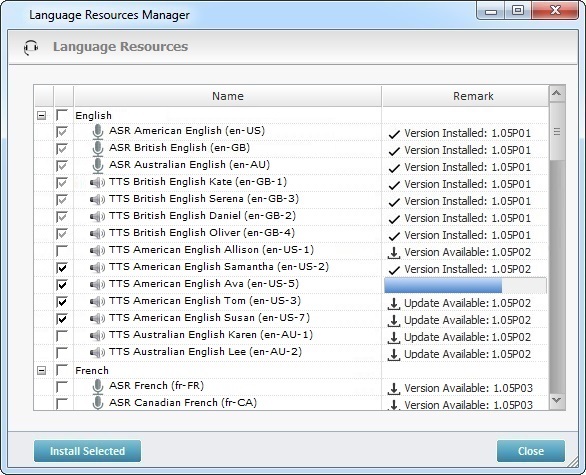
The Language Resources Manager
MCL-Designer V4 provides language possibilities for speech application testing (ex: American English, British English) but, to use any of these languages, you must first install the necessary language packages (the corresponding ASR and TTS files) so they are available within MCL-Simulator.
The Language Resources Manager displays the languages that can be used in the speech applications developed within MCL-Designer V4 and, potentially, be used in a test environment (MCL-Simulator).
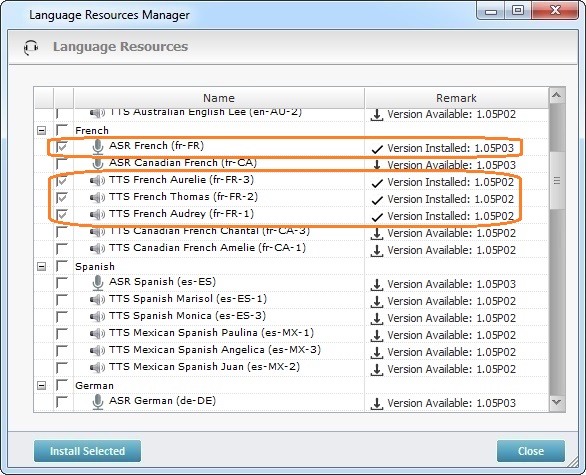
The Language Resources Manager window displays the following:
|
Expands (+) or hides (-) the content of the available/installed language packages, meaning, the TTS files (output language with male and female versions) and ASR file (input language) included in each language package. |
Check boxes column |
The current state of the check box (checked/unchecked) provides information on the corresponding language file: An unchecked box means that the corresponding language file has not been downloaded/installed yet OR that there is an update available. A checked box means that the corresponding language file is installed and up to date. |
Name column |
The name of the language package(s) and corresponding resources (TTS/ASR files) you can use for speech application development and the ones that have already been installed and are effectively available within MCL-Simulator. |
Remark column |
The displayed information depends on the selected language file's current state: If the language file has already been installed and there are no updates available, you view the version of the installed file. (Ex: " If the language file has not been downloaded/installed, it displays the available version for download/installation. (Ex: " If the language file has been downloaded/installed and there is an update available, you view the update's version. (Ex: " If the language file's download did NOT succeed, there is a failure message - "Failed". |
Use the ![]() button to install (see To Install a Language Resource below) or update (see To Update a Language Resource) the selected language file(s).
button to install (see To Install a Language Resource below) or update (see To Update a Language Resource) the selected language file(s).
To Install a Language Resource
1. In the "Tools" menu, mouse over the "Speech" option and, then, select "Language Resources Manager".
2. Check the language packages(s)/language file(s) you want to install.
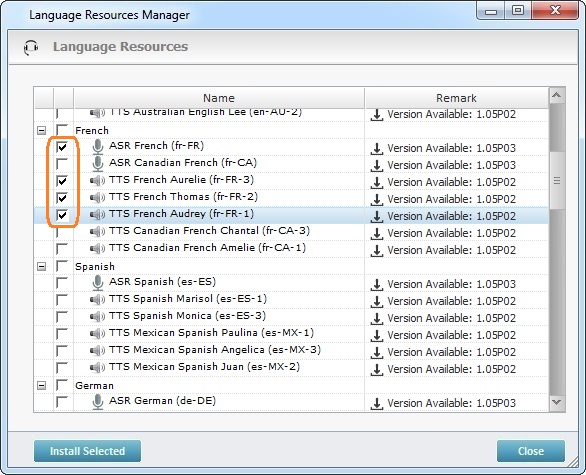
3. Click ![]() .
.
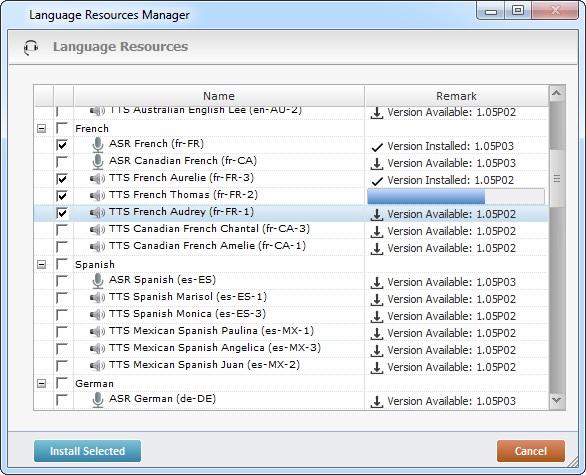
4. Wait for the download/installation to proceed.
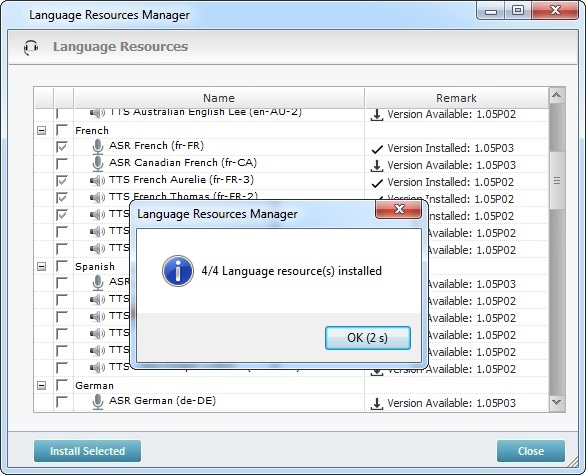
5. Click ![]() to conclude or wait for the countdown to end.
to conclude or wait for the countdown to end.
Once the selected language resources are downloaded and installed, the corresponding box will be checked and the "Remark" column will refer the file version that was installed.
6. Click ![]() to close the "Language Resources" window.
to close the "Language Resources" window.
1. Open the "Language Resources" window (in the "Tools" menu, mouse over the "Speech" option and, then, select "Language Resources Manager").
2. Select the language resource that requires update - the resources available for update are always checked and the corresponding "Remark" column displays the ![]() icon with the information of "Update Available" followed by the update's version.
icon with the information of "Update Available" followed by the update's version.
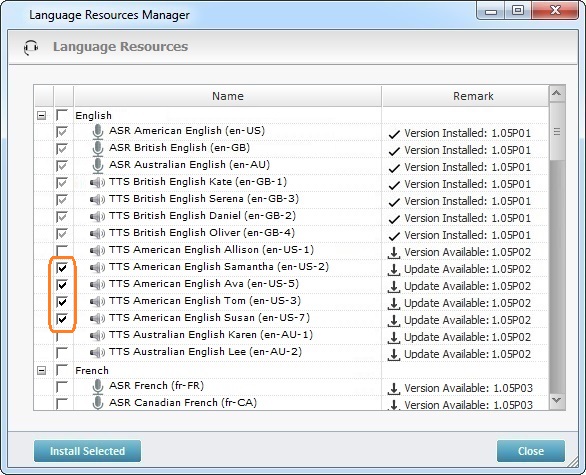
3. Click ![]() .
.
4. Wait for the update to proceed.

5. Click ![]() or wait for the countdown to conclude the update.
or wait for the countdown to conclude the update.
6. Click ![]() to close the "Language Resources" window and return to the MCL-Designer environment.
to close the "Language Resources" window and return to the MCL-Designer environment.
Clicking the "Prompt List" option opens a window with all the prompts created for the current project.
It displays the content of the prompt and its position within the project.
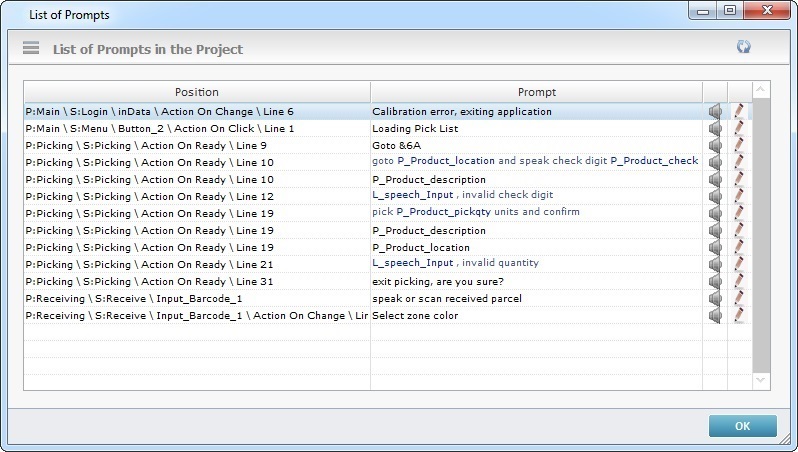
This window allows you to perform the following actions:
•Double-click a row to open the corresponding process or control's properties window.
![]()
The "Prompt List" window is always on focus, meaning, the process or control's properties window you call with the double-click opens behind the "Prompt List" window. You have to either minimize the "Prompt List" window or drag it across the work area to expose the newly opened properties window.
•Click the intended prompt's ![]() to open the corresponding "Speech Prompt Builder" so you can edit it. See Speech Prompt Builder.
to open the corresponding "Speech Prompt Builder" so you can edit it. See Speech Prompt Builder.
•Click the intended prompt's ![]() to hear it.
to hear it.
•Click ![]() to update the window's content (changes in the prompt itself and/or in its position).
to update the window's content (changes in the prompt itself and/or in its position).
•Click ![]() to exit the window.
to exit the window.
Detail of Localization Options
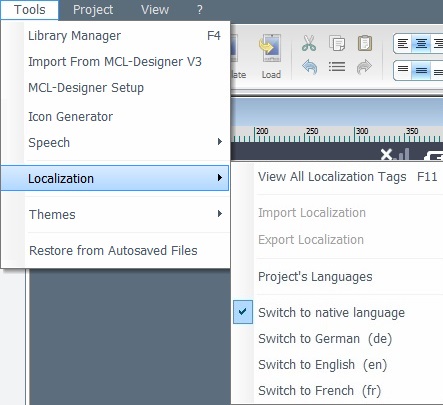
Localization provides access to the following options:
View All Localization Tags
If you select this option, a "Localization" window opens:
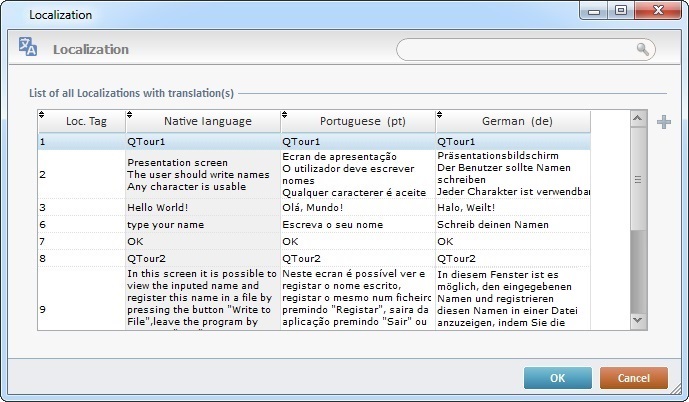
The window displays all the localization tags within the project as well as the native language values and the corresponding translated values.
Localization |
|
|
The search box allows you to search the localization tag, the native language value and/or the available languages values. To conclude the search, simply erase the value in the search box. |
Loc. Tag column |
Displays the localization tag's ID number. |
Native Language column |
Displays the text value within each tag. |
Available Languages columns |
Displays the corresponding translation to the native language's localization tag. There is a column for each of the previously selected languages available in the project. See Localization. |
|
If required, add localization tags. Click
Make sure that the "Loc. Tag" column is in ascending order so that you know which ID number to attribute to the new localization tag. Should you attribute an already in use "Loc. Tag", an error message is displayed. Click |
|
This button only becomes active after you have added a localization tag. You can only delete localization tags you have manually added |
This table is automatically generated and can be fed with imported language files. See Localization.
If needed,you can also edit any of the localization tags' fields. Double-click the field you want to edit, enter the new value and click ![]() to apply the modification(s).
to apply the modification(s).
Import Localization
Is used to import a Localization file. See To Import a Localization.
Export Localization
Is used to export a Localization file. See To Export a Localization.
Project's Languages
Is used to add or remove languages defined in the current project. It opens the "Localization" tab included in the project's properties. See Localization.
Switch to...
Is used to change the project's language utilizing a predefined list of languages. See To Switch Languages Within the Project.
MCL-Simulator uses the currently defined language during project development.
Within MCL-Designer V4, the theme relates to the layout/styles of controls within the project's screens (for instance, the style of a Button, a Signature Capture, an Advanced List Box, etc.).
MCL-Designer V4 provides a default theme with the internal (default) layouts/styles. When you create your own control styles during project development you may want to use them in future projects or share them with other MCL-Designer V4 environments. In that case, you can export a theme with those custom styles and have it imported into your new project or into projects developed within another MCL-Designer V4 environment.
Ex: A programmer creates custom styles for all the controls he uses in Project A (specific colors/fonts/images that represent the final customer's trademark). If the programmer intends to develop more projects for that same customer, he can export the customized theme from Project A (containing the control styles he created) and import it into a new project (Project B) - Projects A and B are developed within the same MCL-Designer V4 environment.
If, for some reason, Project B is to be developed by another programmer, the exported theme can also be imported into the other programmer's MCL-Designer V4 environment. This way, Project B will have the same customized layout/styles available as Project A.
![]()
Consider that the project with the customized theme and the future project that will also require the customized theme are developed within the same MCL-Designer V4 environment:
If you export the customized theme into the “Themes” folder of the “Designer” directory (the suggested location for the export), there will be no need to import the theme into any future MCL projects because it will be available from the start.
Remember, this ONLY works for projects developed within the same MCL-Designer V4 environment and if the exported theme is placed in the default folder "Themes".
If the theme is placed anywhere else or if the new project is being developed in a different MCL-Designer V4 environment, the “theme import” operation is ALWAYS required.
You can access the theme related options from the "Tools" menu:
a. Open the "Tools" menu.
b. Mouse over "Themes" to access the following options:
Select
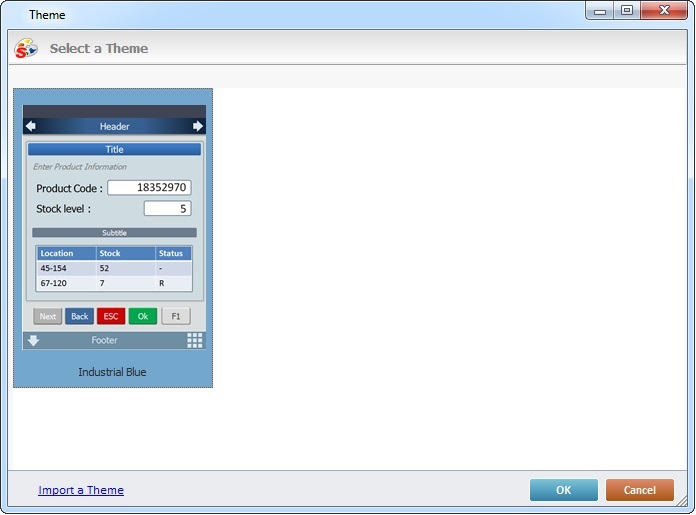
Is used to view the available themes (the default one and any customized themes you may have imported).
This window also provides an option to import themes - ![]() :
:
a. Click ![]() .
.
b. Browse for and select the intended theme in the resulting OS File Explorer window.
![]() The only compatible theme files are .ZTY extension files.
The only compatible theme files are .ZTY extension files.
The imported theme is displayed along side the other theme(s) in this window. The styles/layouts contained in the newly imported theme are included in the style lists of the related controls.
Import
Is used to import an external/customized theme. This theme is usually one that was preciously created within another MCL project or another MCL-Designer V4 environment and exported.
a. In the "Tools" menu, mouse over the "Themes" option.
b. Click "Import" in the resulting menu.
c. Browse for and select the intended theme in the resulting OS File Explorer window.
![]() The only compatible theme files are .ZTY extension files.
The only compatible theme files are .ZTY extension files.
d. Click ![]() if you want to assign the newly imported theme to the current project or
if you want to assign the newly imported theme to the current project or ![]() if you simply want to add this theme to the list of available themes.
if you simply want to add this theme to the list of available themes.
The imported theme is displayed along side the other themes in the "Themes Select" window. The styles contained in the newly imported theme are included in the style lists of the related controls.
Ex: If you create a customized style for a "signature capture" control in Project A, perform a theme export and, then, import it into Project B, the customized "signature capture" style will be displayed in the corresponding "Style Preview Section" when you select a "signature capture" in the "Control" tab.
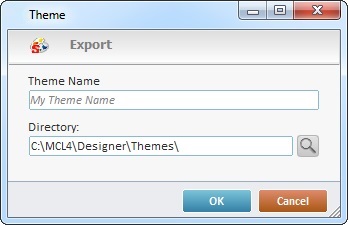
Is used to export the customized layout/control styles the programmer has created during the current project's development. The resulting exported theme can, then, be used by the programmer in future MCL projects or it can be shared for use with other programmers in different MCL-Designer V4 environments.
a. Enter a name for the theme to export (mandatory field).
b. Maintain the suggested directory OR enter the name of the target location OR use ![]() to browse for a target location.
to browse for a target location.
![]() We recommend you maintain the suggested default destination folder - the "Themes" folder within the "Designer" directory.
We recommend you maintain the suggested default destination folder - the "Themes" folder within the "Designer" directory.
c. Click ![]() .
.
d. A window with information on the exported theme's name and location opens. Click ![]() to close it and conclude the export.
to close it and conclude the export.
Project menu
|
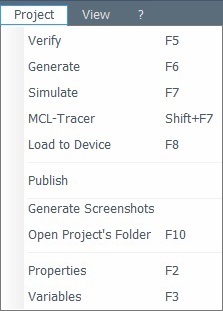
Project menu |
|
Verify |
Is used to verify the consistency of the current project's MCL code. If there are issues, a report window will open to display them. |
|
Generate |
Is used to generate the MCL code. If there are issues, a report window is opened displaying them. See Detail of Project Verification Report. The first time you use the "Generate" option, you create a PDK file. Any subsequent “Generate” actions update that PDK file. The PDK file (located in the “Deploy” folder of the project’s directory) is used as a container to install the application outside the MCL-Designer environment (ex: the pdk file can be uploaded into your MCL-Mobility Platform account – in the “Applications” module.)
|
|
Simulate |
Is used to simulate and test the current project. See Simulating a Project. If there are issues, a report window is opened displaying them. See Detail of Project Verification Report. |
|
MCL-Tracer |
Is used to analyze (debug) the current project. See MCL-Tracer. |
|
Load to Device |
Is used to send the MCL project to the device. The device must be on and connected via Windows Mobile Device Center connection, and the MCL-Client waiting (in "Wait" mode). See Loading an Application/Project to a Device. |
|
Publish |
Is used to close the project version. This version CANNOT be edited. This option should only be used when the project is ready to be sent to the customer and used in a production environment. See Publishing a Project. |
|
Generate Screenshots |
Is used to generate all screen shot images within the current project. When clicked, this option opens a window with the option to select the language for the project screen shots. See Detail of Generate Screenshots. |
|
Open Project's Folder |
Is used to open and view the project's directory. |
|
Properties |
Is used to display and edit the current project's properties. See Project Properties. |
|
Variables |
Is used to display a window with a variable list - a Floating Variable Select window. The content of this window, which is editable, depends on the currently active context (ex: a program, a screen, a control, etc.). See Detail of Variable Select windows. |
|
Detail of Project Verification Report
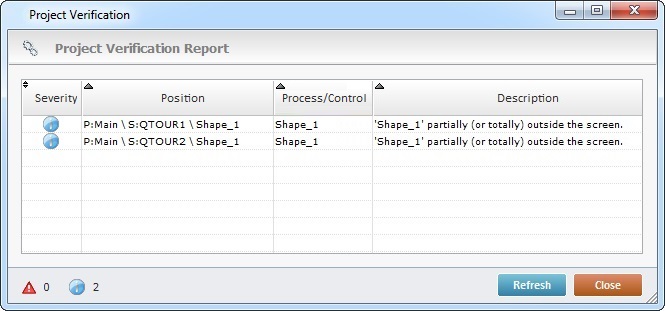
By double-clicking each error/warning line, the corresponding properties window is opened allowing corrections to be made. After editing the properties window, click ![]() to apply them.
to apply them.
Click ![]() to update the information or click
to update the information or click ![]() to close the window.
to close the window.
It is possible to filter the displayed information. Click ![]() to only display critical errors or
to only display critical errors or ![]() to view information errors in the project.
to view information errors in the project.
Detail of Generate Screenshots
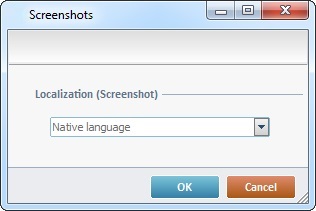
If the project includes languages other than the "native language" (see Localization), select the required one from the drop-down list and click ![]() .
.
This opens your project's screen shot destination folder where you can view the generated screen shot(s).
|
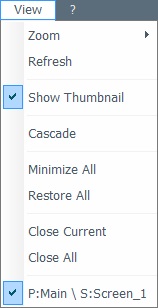
View menu |
|
Zoom |
Is used to select the zoom percentage which affects the viewing of the open screens in the Working Area (10%; 25%; 50%; 75%; 100%; 150%; 200%). |
|
Refresh |
Is used to refresh the Working Area. |
|
Show Thumbnail |
Is used to display the Thumbnail Section. |
|
Cascade |
Is used to display all opened screens in a cascade view, in the Working Area. |
|
Minimize All |
Is used to minimize all opened screens into the Thumbnail Section. |
|
Restore All |
Is used to open all minimized screens in the Thumbnail Section. |
|
Close Current |
Is used to close current screen. This can also be done by clicking the |
|
Close All |
Is used to close all open screens. |
|
The final area of this menu displays the name of the opened screens as well as the active screen (with the |
||
|
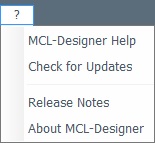
? menu |
|
MCL-Designer Help |
Used to access MCL-Designer V4's user guide. It opens a CHM file if MCL-Designer V4 is offline or a web page if MCL-Designer V4 is online. See MCL-Designer Setup. |
|
Check for Updates |
Used to check for updates to MCL-Designer V4. Only works if the product is activated. See Check for Updates. |
|
Release Notes |
Used to view the release notes for the current MCL-Designer V4 version. You also have access to previous release notes associated to older versions. |
|
About MCL-Designer |
Used to view the current version of MCL-Designer V4. See Detail of "About MCL-Designer" window below. |
|
Detail of About MCL-Designer window
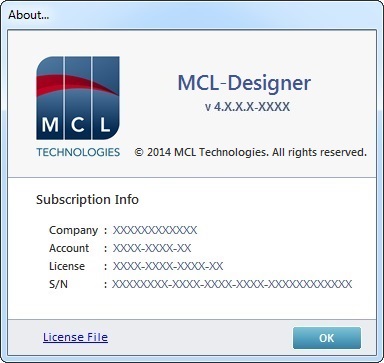
License/Subscription Info |
|
Depending on your current license type (subscription or perpetual license), the window may display "Subscription Info" or "License Info". See To Activate MCL-Designer V4. |
|
Company |
The MCL-Mobility Platform company associated to MCL-Designer V4. See details in To Activate MCL-Designer V4. |
Account |
The MCL-Mobility Platform account number associated with MCL-Designer V4. See details in To Activate MCL-DesignerV4. |
License |
The license or subscription number associated to MCL-Designer V4. |
S/N |
The software's serial number of the PC where MCL-Designer V4 is installed. |
Clicking License File opens the license file folder. |
|
![]()
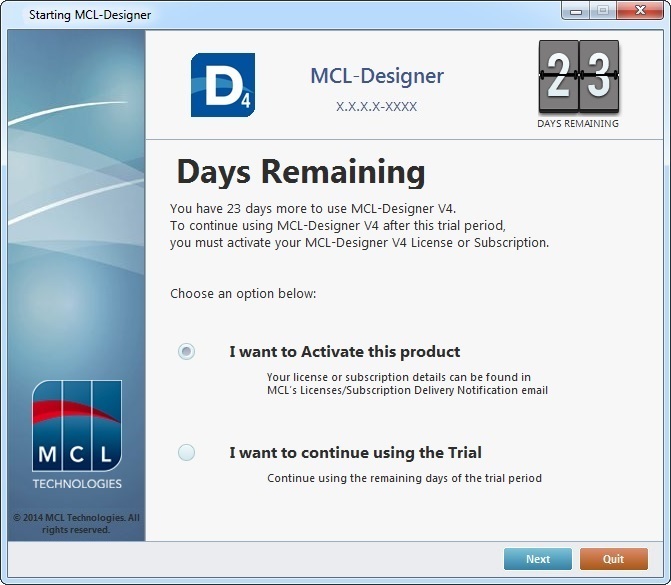
If you are using MCL-Designer V4 on "trial mode", the "About MCL-Designer..." window is different. It displays/offers:
•the current MCL-Designer V4 version.
•the days you have left in "trial mode"
•the possibility to activate a license/subscription so you can continue using MCL-Designer V4 in the "licensed mode", without restrictions.
For more information on the "trial mode", see MCL-Designer V4 Trial Mode.