|
Working with Set Read Mode Process |
  
|
Working with Set Read Mode Process
|
Working with Set Read Mode Process |
|
Process Purpose
The Set Read Mode process is used to define the read mode which includes selecting a profile and whether the read should end on a trigger release, a time out or after a predetermined number of reads.
![]()
Make sure you have already created the required RFID profiles. See Creating an RFID Profile.
Check the necessary steps to create an RFID program in To Create an RFID Program.
When you add a process, you are required to define its settings. This occurs in the process's properties window which is displayed automatically after having added the Set Read Mode process.
If any subsequent edition is required, double-click the process to open its properties window and enter the necessary modifications.
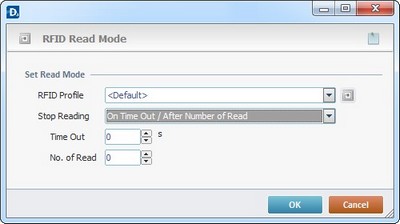
Define the read mode by completing the following options:
Set Read Mode |
|
RFID Profile |
Select the appropriate RFID profile from the drop-down list. If required, click |
Stop Reading |
Select the adequate read ending: On Trigger Release - The RFID reader stops reading RFID tags when the device operator releases the trigger (hard trigger). After 1 Read - The RFID reader stops reading after the first read. After # Read - The reading stops after a predetermined number of reads. If selected, this option activates the "# Read" option. On Time Out - The reading stops after a predetermined period of time. If selected, this option activates the "Time Out" option. On Time Out/After # Read - the RFID reader stops reading after the pre-established time out or the number of reads is reached, whichever occurs first. This option activates both boxes below: "Time Out" and "# Read". |
Time Out |
This option is activated if "On Time Out" or "On Time Out/After # Read" is selected, so you can enter the period of time (in seconds) after which the reading stops. |
# Read |
This option is activated if "After # Read" or "On Time Out/After # Read" is selected, so you can define the number of reads until the RFID reader stops reading. |
If necessary, click ![]() to attach any relevant notes to this process. Click it and enter your notes in the resulting text box. These notes will be displayed in the corresponding "Actions" tab or "Process" window (in the "Notes" field) and in the "Developer Report".
to attach any relevant notes to this process. Click it and enter your notes in the resulting text box. These notes will be displayed in the corresponding "Actions" tab or "Process" window (in the "Notes" field) and in the "Developer Report".
Click ![]() to create a new profile or edit an existing one, if required. See Creating an RFID Profile.
to create a new profile or edit an existing one, if required. See Creating an RFID Profile.
Click ![]() to conclude the operation.
to conclude the operation.
The added process is displayed in the corresponding "Actions" tab or "Process" window.
![]()
Taking into consideration that the gathered tag data (via RFID Tag reads) will have to be handled, remember to use the “On RFID tag Read” event (associated to a screen) and, if necessary, the” Decode BCD” process to organize/decode/store the incoming information.
See Events associated with Screens.
See Working with Decode BCD Process.
![]()
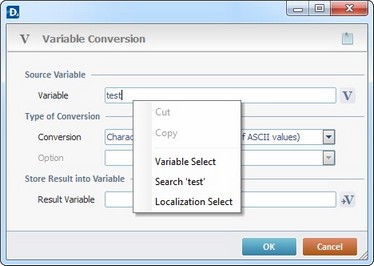
Use the right click in MCL-Designer's input boxes to access certain features regarding the input box's option as well as general actions such as "Copy"; "Paste"; "Search".
Ex: If you right-click the "Variable" input box (included in a "Conversion's" properties window), you are provided with the "Search..."and "Variable Select" options.
If you right-click another input box, it will provide other possibilities.