|
Account Details |
  
|
Account Details
|
Account Details |
|
Overview
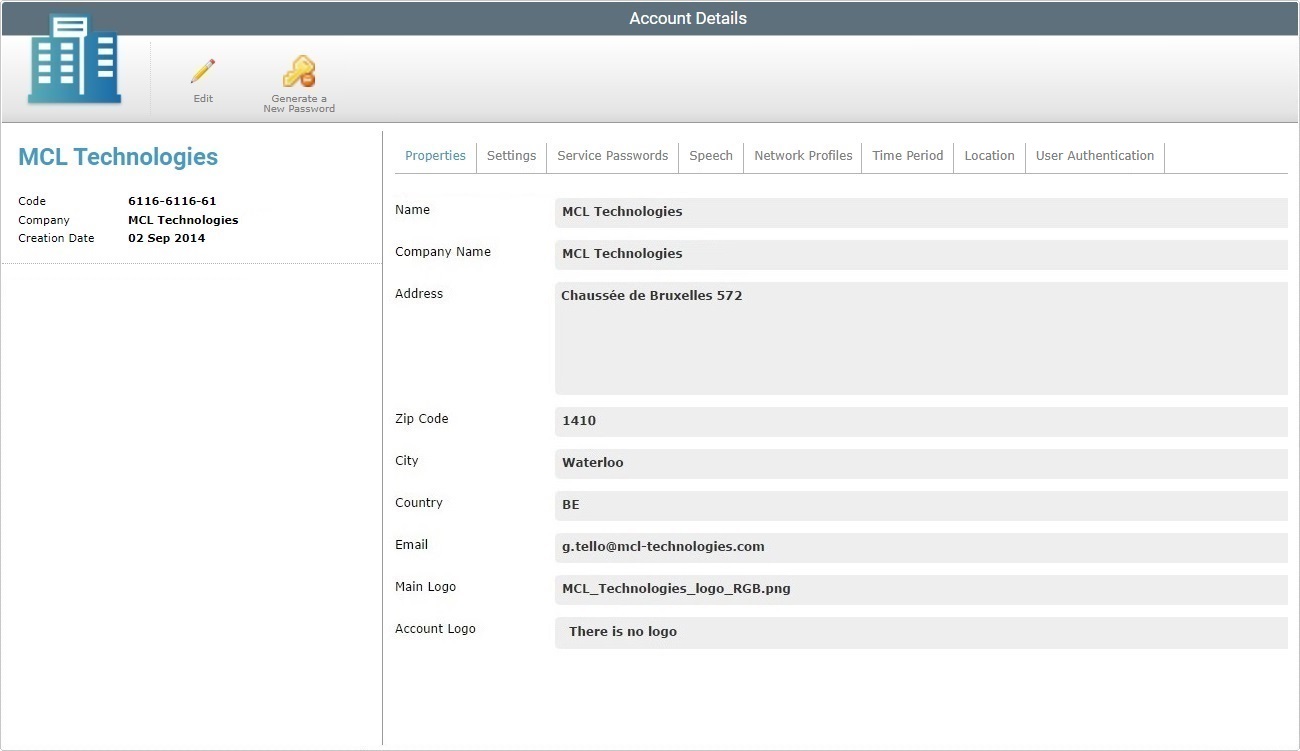
The "Account Details" sub-module of the "Control Panel" refers to the account's setup (account name, logo, location, global speech profiles, etc.).
Clicking the  button opens the "Account Details" page that provides general information on the account grouped into several tabs. The displayed information can vary according to the subscribed services (ex: if the subscription does NOT include Speech services, there will be no "Speech" tab in this page).
The account information can be edited, at all times, by the account administrator.
To access the "Account Details" page, click ![]() (located in the "Control Panel") and, then, select , in the resulting row. The ensuing page includes several tabs (the "Speech" tab is ONLY available if the account is associated to a subscription with Speech services) and a left panel:
(located in the "Control Panel") and, then, select , in the resulting row. The ensuing page includes several tabs (the "Speech" tab is ONLY available if the account is associated to a subscription with Speech services) and a left panel:
The "Properties" tab is open, by default. It displays the following information:
Name |
The account name. |
Company Name |
The company name associated to the MCL-Mobility Platform's account. |
Address |
The main address of the account (ex: the company's head office). |
Zip Code |
The address zip code. |
City |
The city. |
Country |
The country. |
The email of the account owner. |
|
Main Logo |
The company's logo which is displayed in the page's header. To add, change or remove the company's logo, see To Add/Edit a Main or Account Logo. |
The account's logo which is displayed to the left of the "edit" button. There is a default logo but it is possible to substitute it by a logo of your choice. |
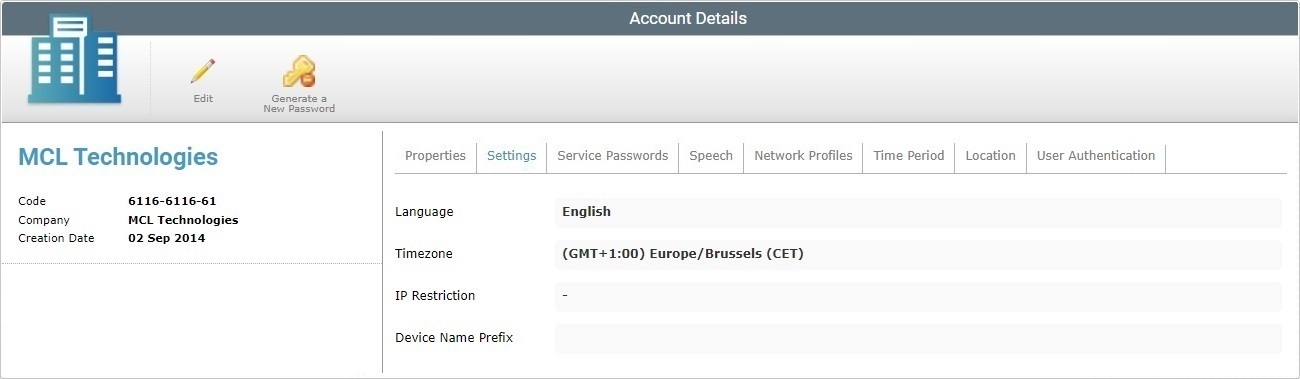
The "Settings" tab includes the following information:
Language |
The account's localization language. When creating a user, this language is proposed by default. |
Timezone |
The account's time zone. It is applied to the time display in the Admin Dashboard's header. The time zone defined here also becomes the default value for any new sites. This value can and should be changed according to each site's geographic location/time zone (in the site's own settings). The DST ("Daylight Saving Time") is applied, by default, to the selected time zone (usually between March-April and September-November). |
IP Restriction |
The authorized IP range to access the account's web interface and Back-end api (that require an Access token). Multiple IP addresses require the use of a comma to separate them or CIDR notations (ex: 10.3.34.0/24).
This restriction does NOT affect the access of Account Administrator users in the account's web interface and/or Filebox users when using the Back-end api. |
Device Name Prefix |
The defined prefix to be applied to the name of the devices that are paired to the account. this is optional. The original name of the newly paired device is replaced with the defined prefix plus an incremental number.
If there is a defined name prefix within the target site, the devices that are paired with that site will NOT adopt the prefix set at account level, their names will consist of the prefix that was defined in that site (plus an incremental number). |
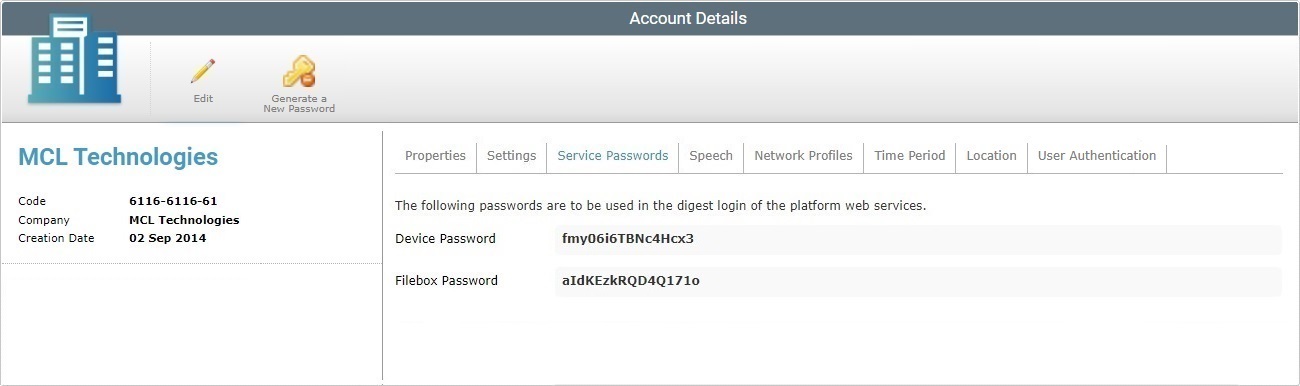
In the "Service Passwords" tab, you can view the passwords used by the devices and the Filebox web services called by external systems.
Device Password |
Refers to the digest authentication password that the device uses to communicate with MCL-Mobility Platform. This password is NOT editable. |
Filebox Password |
Refers to the digest authentication password that the external systems need to use to call the "Filebox" service.
It is possible to generate a different password. See To Generate a New Filebox Password. |
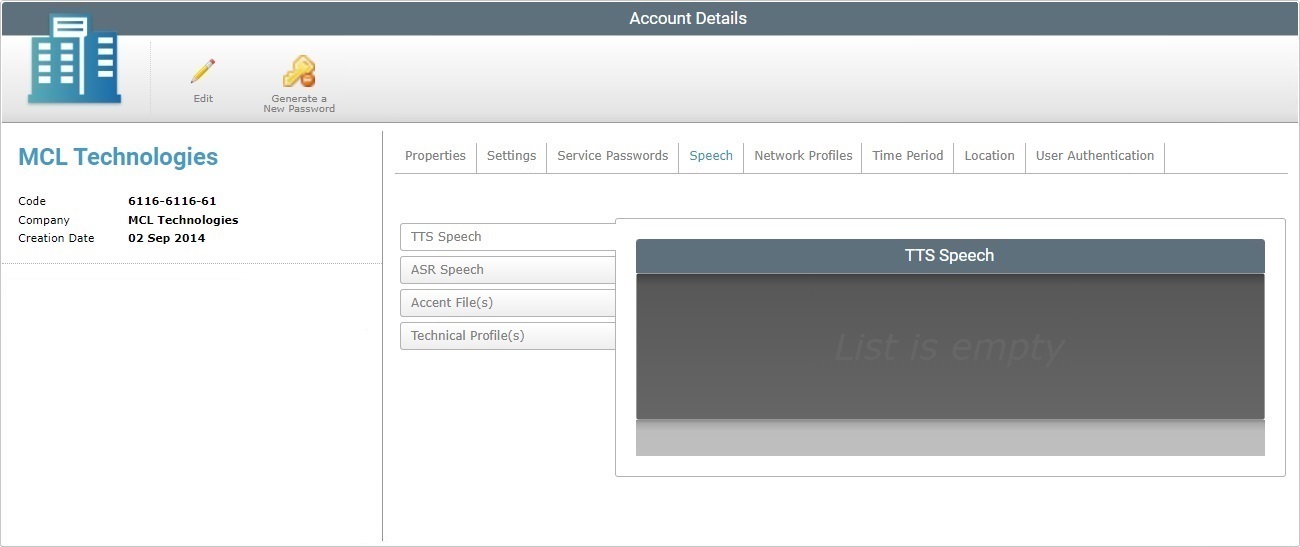
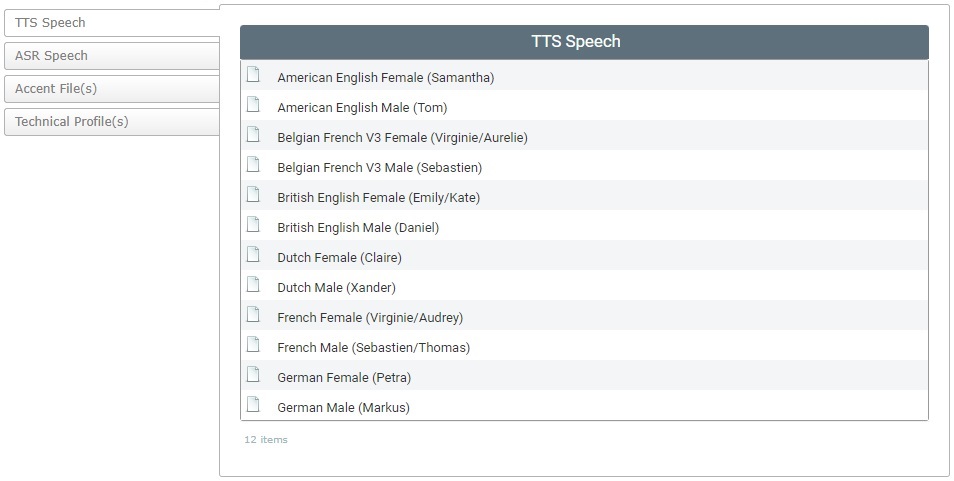
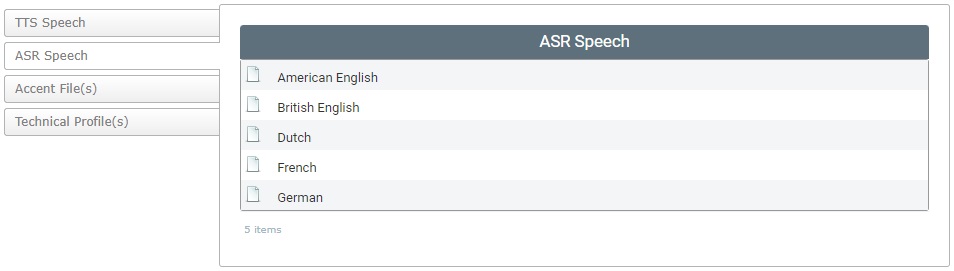
This tab is only active if the account contains a subscription which includes Speech services. It displays the available speech resources (technical profiles and language files) and the selected input/output languages.
By clicking each side tab, you can view the corresponding information:
The "TTS Speech" tab displays the output language(s) you have selected to be used in speech applications.
|
The "ASR Speech" tab shows the input language(s) you have selected to be used in speech applications.
|
An Accent File is a configuration file, provided by MCL, that allows for the fine tuning of the MCL-Voice Client behavior, specifically, the fine tuning of speech recognition (the adding of speech transcriptions for the original spoken word).
This tab displays the accent files that are available to speech applications.
If required, you can download uploaded accent files. To do so, click the corresponding
|
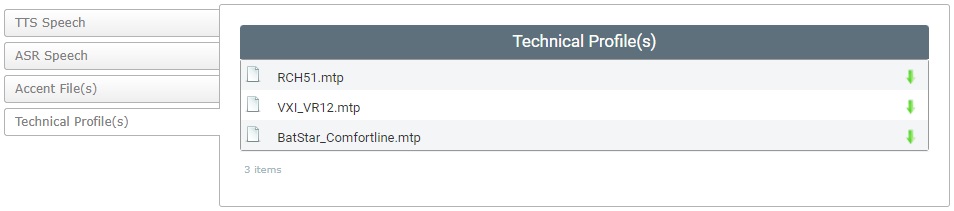
A Technical Profile is a configuration file, provided by MCL, that allows for the fine tuning of the MCL-Voice Client behavior, specifically, the setting of the parameters for the combination of the headset and the device.
This tab includes the technical profiles that can be used by speech applications.
If required, you can download uploaded technical profiles. To do so, click the corresponding
|
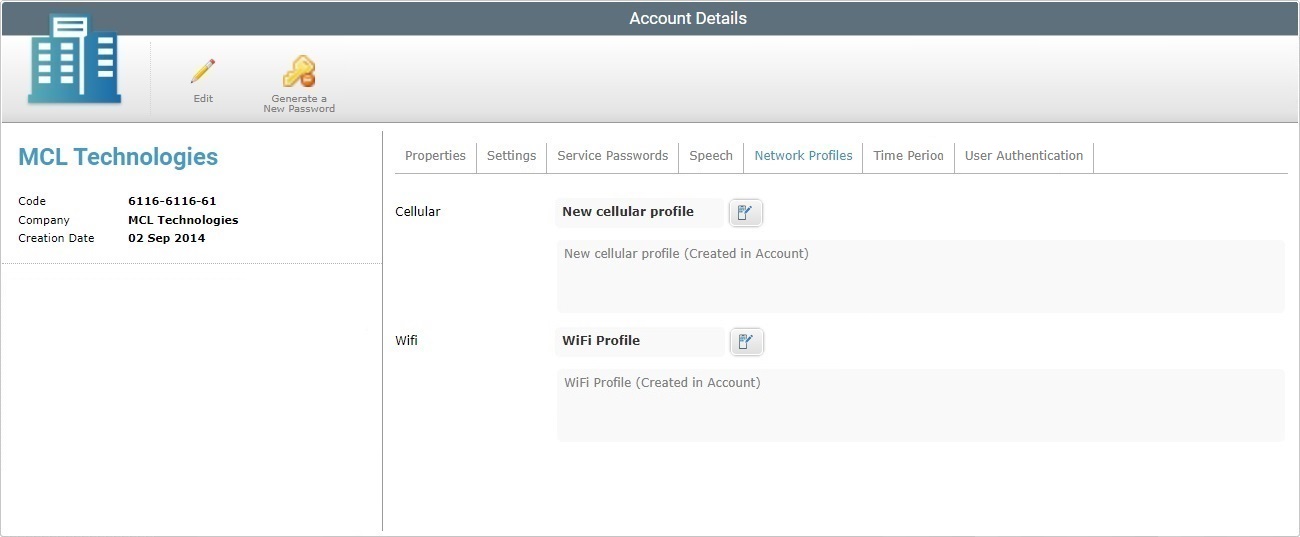
The "Network Profile" tab displays the Cellular and Wifi profiles that are defined as the default settings throughout the account.
Cellular and Wifi profiles are created in the "Profiles" sub-module. See Profiles.
Cellular |
Refers to the cellular profile that was selected to be the default cellular profile in the account (ex: All new sites will adopt the cellular profile defined here, as the "default").
This If NO cellular profile is defined ("<None>"), this option is NOT available/visible unless the page is set to edit mode. |
WiFi |
Refers to the wifi profile selected to be the default wifi profile in the account (ex: All new sites will adopt the wifi profile defined here, as the "default").
The If NO wifi profile is defined ("<None>"), this option is NOT available/visible unless the page is in edit mode. |
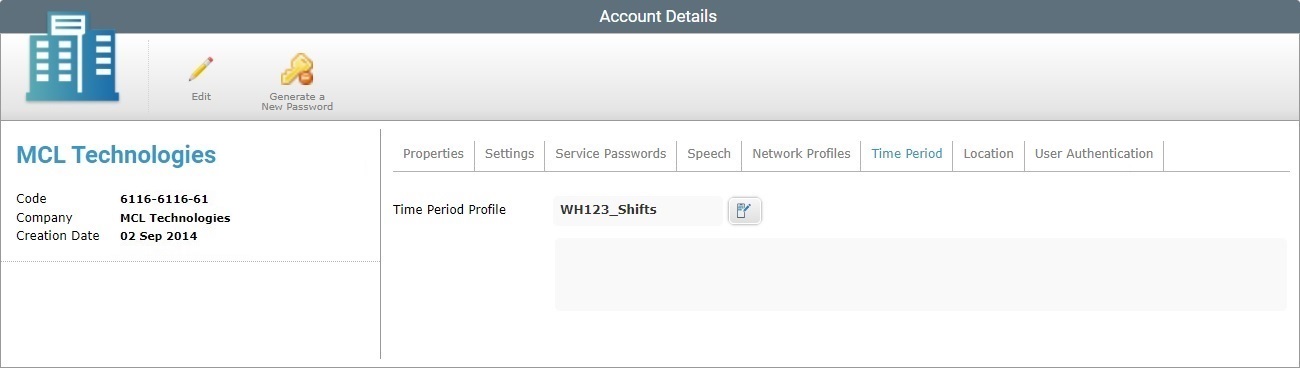
The "Time Period" tab displays the Time Period profile that is defined as the default throughout the account.
Time Period profiles are created in the "Profiles" sub-module. See Profiles.
Time Period Profile |
Refers to the profile that was selected to be the default Time Period for the sites (ex: All the sites that are set to use the default Time Period profile will adopt the profile defined here). If "None" is defined, there is NO default Time Period profile to be inherited by the account's sites. If necessary, a site is able to define a Time Period profile locally - each site can also create its own Time Period profiles and select one in its "Site Details" sub -module. See Site Details - Time Period Tab.
The If NO Time Period profile is defined ("<None>"), this option is NOT available/visible unless the page is set to edit mode. |
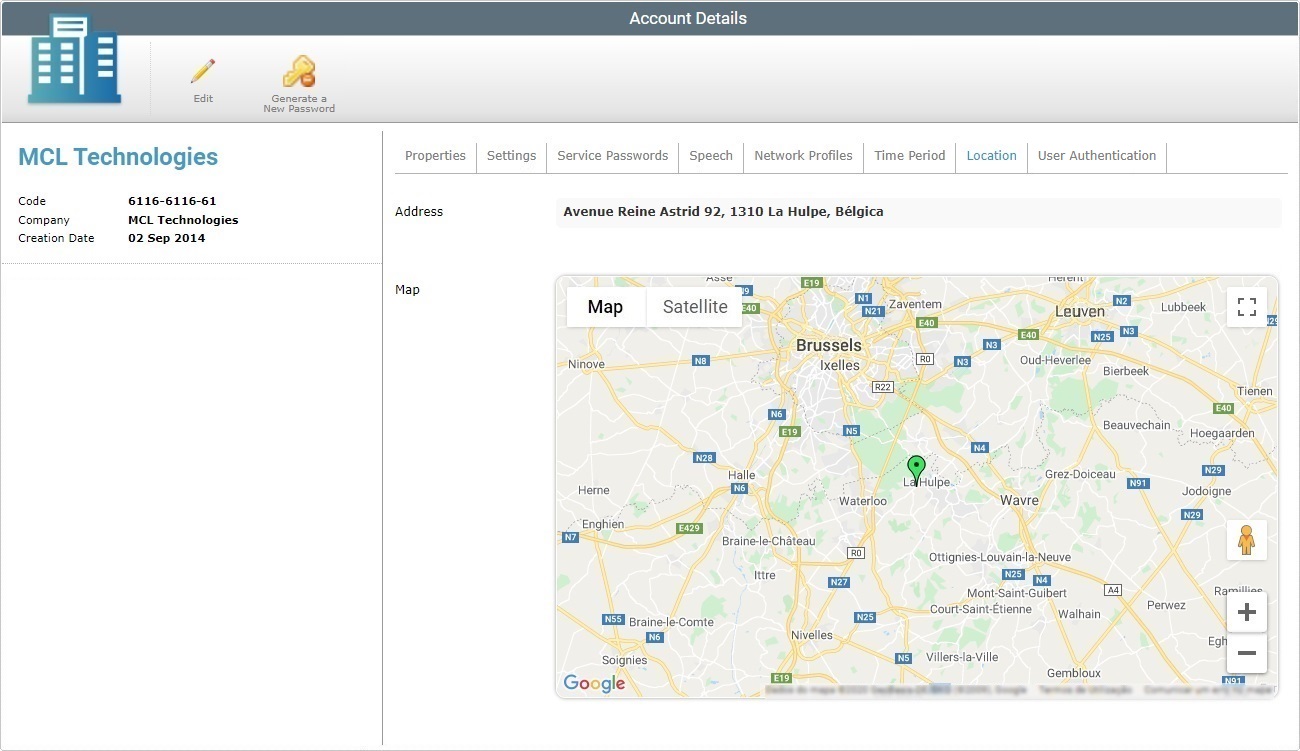
This tab displays the account's address as well as a map marking the site's exact location.
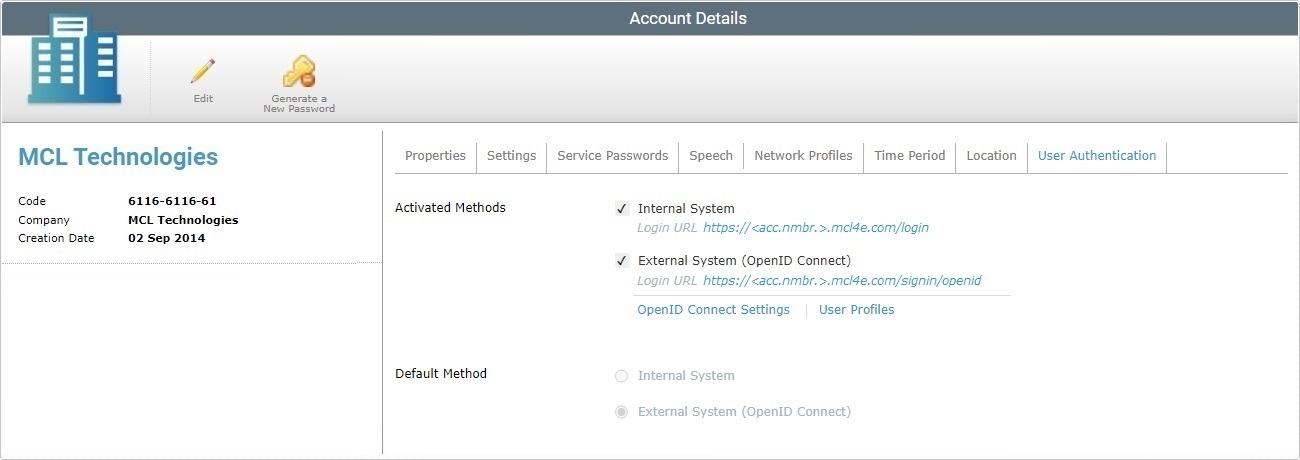
This tab displays the available user authentication methods in your MCL-Mobility Platform account (the platform's internal authentication system and an external OpenID Connect-based authentication provider). The method that is checked is activated.
It also refers the default/currently implemented authentication method for the account, meaning, it defines which URL the platform user should enter when logging in and the login page he will land on.
Activated Methods |
Displays the available user authentication methods for MCL-Mobility Platform.
Internal System - This is the default MCL-Mobility Platform user authentication method - User authentication is managed internally via the "Users" sub-module. The attached internal account URL can be used to log in to the account's login page. This method is ALWAYS active ( = cannot be unchecked).
External System (OpenID Connect) - This user authentication method is based on the OpenID Connect protocol. It means user authentication is managed by an external provider. See External System User Authentication Method. The corresponding URL redirects the user to an external login page managed by the external authentication provider where he is meant to log in using the provided external credentials.
The OpenID Connect Settings link opens a page with the currently defined OpenID Connect settings (ex: the mapping of the external user roles onto the user profiles created internally). See The "OpenID Connect Settings" Page.
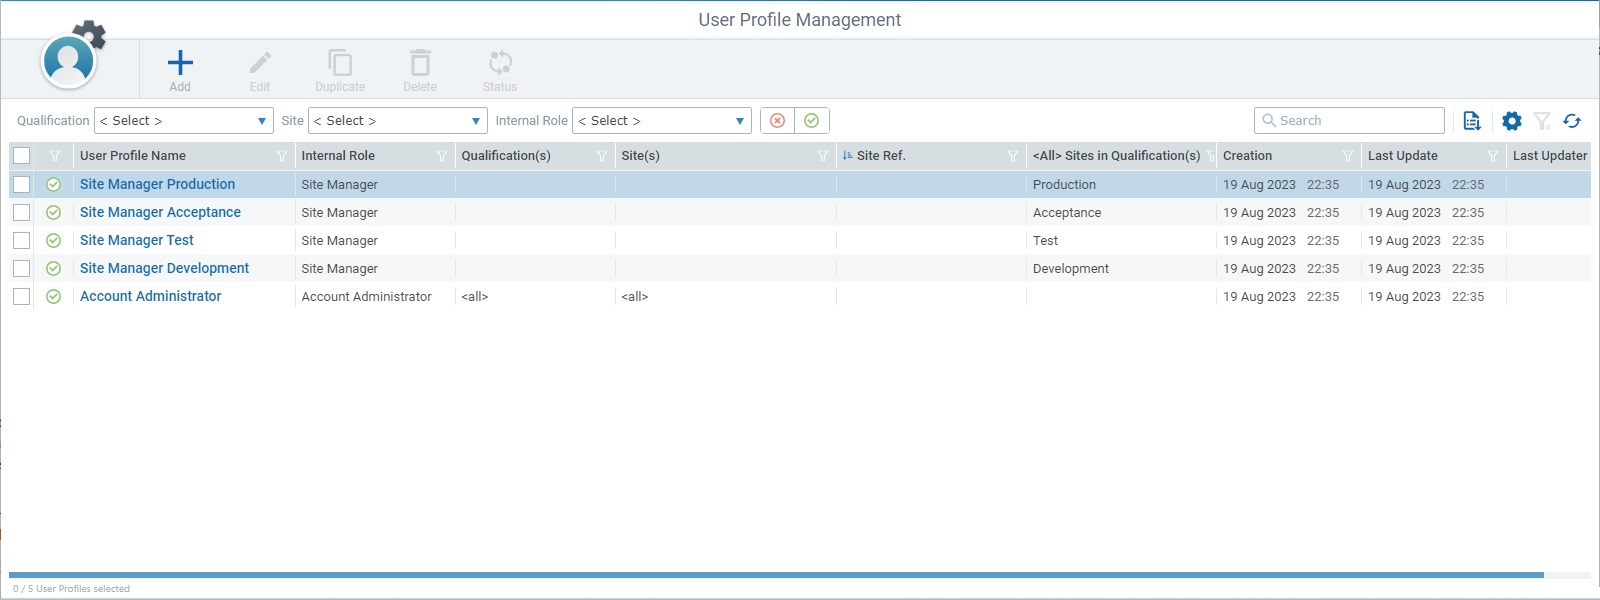
The User Profiles link opens the "User Profile Management" page (Admin Dashboard's "Control Panel" > "Set Up" module > "User Profiles" sub-module) where you can view the user profiles available for mapping to the external user roles, create more profiles and edit/duplicate/delete a profile. See User Profiles.
If a method is checked, it means it is active. |
Default Method |
There are 2 possible user authentication methods. The checked option becomes the default method for logging in.
Internal System - associated to the MCL-Mobility Platform user authentication method. If this option is checked: •The user can enter the account URL (https://<account number>.mcl4e.com/) OR the internal account URL (https://<account number>.mcl4e.com/login) to log in to the account - this will open the MCL-Mobility Platform's login page. The same goes for any other account access links (ex: the link in the logout page). •The user must enter his internal credentials (username defined in his details page + the password he defined).
External System (OpenID Connect) - refers to the use of an external user authentication provider. If this option is checked: •The user can log in using the account URL (https://< your Account Code>.mcl4e.com/) OR the "External System ..." URL (displayed in the upper section) and be redirected to the login page of the external provider (ex: https://<account number>.mcl4e.com/signin/openid). Other access links, such as the one in the logout page, will also redirect to the external login page. •The user must enter the credentials generated/provided by the external provider. •After a successful login, the user will be redirected to the landing page within your MCL-Mobility Platform account that is compatible with his defined access rights. Ex: If the logged-in user has a site manager role with several sites assigned to him, he will land in a site selection page where he can select the site he wants to access. If the logged-in user is only assigned to a single site, he will land on that site's Site Dashboard.
If, for some reason, the external system authentication method does not work, it is possible to access an MCL-Mobility Platform account using the internal account URL and the internal credentials to log in, provided that the user trying to log in still has an "enabled" status. |
External System User Authentication Method
MCL-Mobility Platform allows you to integrate an OpenID Connect-based external user authentication provider to handle user access to your account. This means control over the login page and authentication policy (ex: login page layout, password policy and management, implementation of multi-factor authentication).
The implementation of an OpenID Connect-based provider requires you to:
•assign specific attributes, such as roles, to the users in the used external provider,
•map each role attribute to a user profile (created in the "User Profiles" sub-module) in your MCL-Mobility Platform account,
•activate the "External System" method in your MCL-Mobility Platform account and set it as the default method ("User Authentication" tab - "Account Details" page).
![]() If, for some reason, you require a hybrid approach (= an activated "External System" but with the "Default Method" set for "Internal System"), make sure you provide the compatible URL and respective credentials to the intended users:
If, for some reason, you require a hybrid approach (= an activated "External System" but with the "Default Method" set for "Internal System"), make sure you provide the compatible URL and respective credentials to the intended users:
•The account URL (https://<account number>.mcl4e.com/) and the internal account URL (https://<account number>.mcl4e.com/login) and other access links such as the link in the logout page will lead to the MCL-Mobility Platform login page. The user will have to use the credentials defined within the MCL-Mobility Platform account.
•The external system URL (available in the "Activated Methods" section) will open the external login page and the user will have to enter the credentials provided by the external provider.
External User Authentication Provider Settings
Define the following elements/entities in your external user authentication provider's account:
•Client ID/Client Secret
Credentials to be used by your MCL-Mobility Platform account to communicate with the external provider.
•Issuer URI
The endpoint to be used by your MCL-Mobility Platform account when connecting to the external provider. It must comply with the current OpenID Connect specification.
Example of an Issuer URI for a Microsoft Provider: https://login.microsoftonline.com/f927adf4-a99b-4ddd-baa6-21e048c27fb8/v2.0
•Callback URL
This URL will be used by the external provider (after a successful user validation) to return the flow back to the MCL-Mobility Platform account with information on the user that is logging in. This URL MUST include the following elements: https://<MCL-Mobility Platform's account_code>.mcl4e.com/ui/srv-auth/oauth2/code
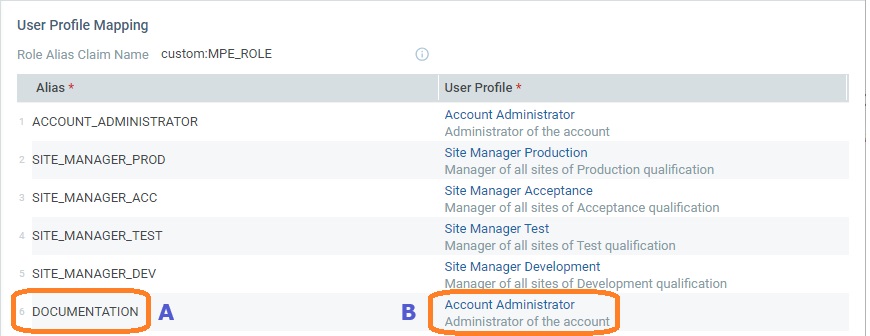
•User Roles and corresponding Aliases
The user role alias will be used to map the external user role to the intended user profile created within your MCL-Mobility Platform account.
Operationally speaking, a group of external users is associated to an external user role with an alias. That alias will be mapped to a user profile created in your MCL-Mobility Platform account. As a result, whenever one of the external users associated to an external user role logs in to the account, he will adopt the role/access rights set for the mapped user profile.
![]() Be aware that steps to create this setup depend on the chosen external authentication provider. You must contact that external authentication provider's Support team for more information.
Be aware that steps to create this setup depend on the chosen external authentication provider. You must contact that external authentication provider's Support team for more information.
If you need help with the integration of those entities/elements into MCL-Mobility Platform, you can contact MCL Support.
The entities/elements generated in the external user authentication provider must be set up/mapped in your MCL-Mobility Platform account:
MCL-Mobility Platform Setup
•Access the User Profiles sub-module to check the available user profiles and, if necessary, create new ones. See User Profiles.
Example 1: If you want to have one or more external site supervisors per site, you can create a user profile with a "site supervisor" role per site and map each user profile to an external user role that includes the intended external users. For instance, User A, User B and User C must be associated to Site London and User D and User F must have access to Site Lisbon. This requires creating an external user role for Users A/B/C and another one for Users D/F plus a user profile with a site supervisor role assigned to site London and another one, with the same role, assigned to site Lisbon. User role A/B/C must be mapped to user profile London and user role D/F with user profile site Lisbon.
Example 2: If your organization has one or more site managers that manage all your production sites, you should add a user profile with a "site manager" role that is associated to "<All> Sites in Production" and map it to the external user role that includes these site managers.
•Go to the "Account Details" sub-module and activate the "External System (OpenID Connect)" user authentication method and set it as the default. See Editing Account Details - "User Authentication" tab.
•Open the "OpenID Connect Settings" page and define the required information/map the external user roles to the internal user profiles. See Editing Account Details - To Edit the OpenID Connect Settings.
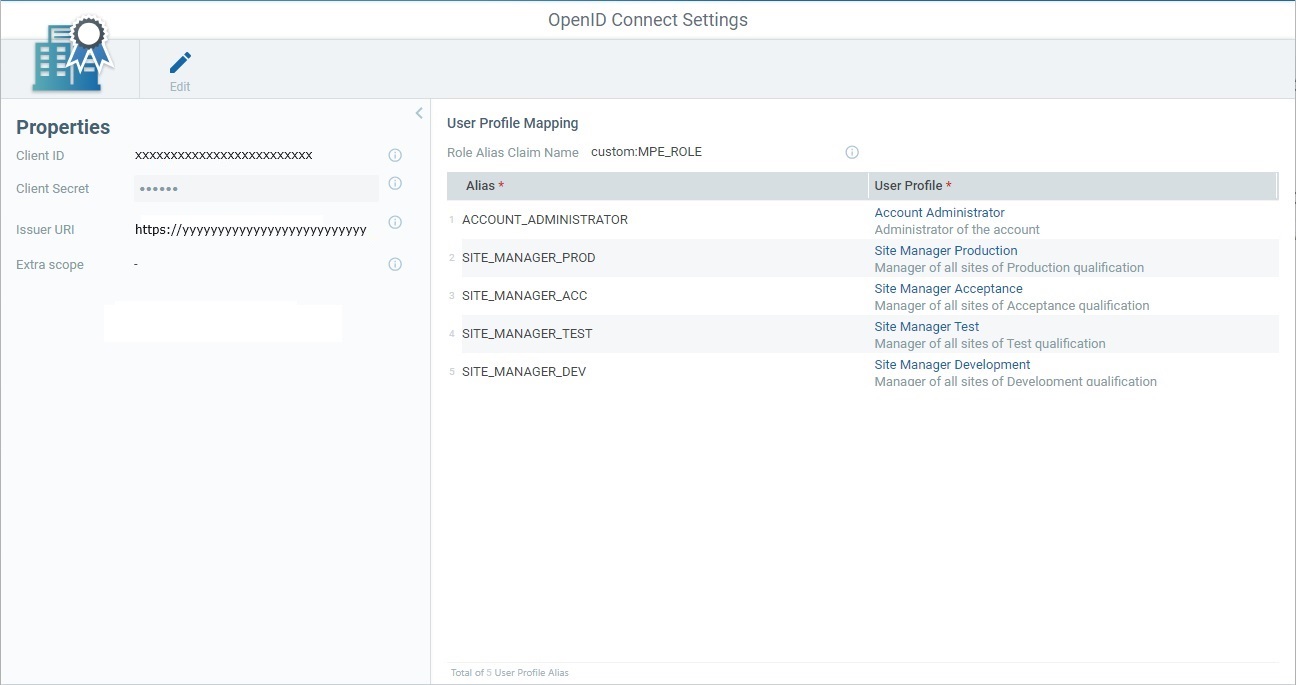
The "OpenID Connect Settings" page handles the settings required to ensure a connection between the external user authentication provider and your MCL-Mobility Platform account. Ex: It refers the credentials (Client ID + Client Secret) that your MCL-Mobility Platform account must use to connect to the external user authentication provider and it displays the mapping of the external user roles to the internal user profiles. This page is accessed via the "OpenID Connect Settings" link available in the "User Authentication" tab of the "Account Details" page.
The page is divided into the "Properties" and "User Profile Mapping" panels.
The "OpenID Connect Settings" page also includes a shortcut icon in the page's header - See Editing Account Details - To Edit the OpenID Connect Settings.
If you mouse over the
|
||||||||||||||||
The left side of the page also displays information:
|
(Account logo) |
The defined account logo. See To Add/Edit a Main or Account Logo. |
(In blue) |
The name of the account. |
|
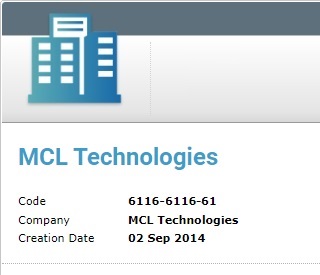
Code |
The identification number of the account. |
|
Company |
The name of the company associated to the account. |
|
Creation Date |
When the account was created. |
Available Operations
The "Account Details" page provides direct access to specific operations:
To edit the account's details, click ![]() to set the "Account Details" page to edit mode. For more detailed information, see Editing Account Details.
to set the "Account Details" page to edit mode. For more detailed information, see Editing Account Details.
To generate a new "filebox password", use the ![]() button. For more information, see To Generate a New Filebox Password.
button. For more information, see To Generate a New Filebox Password.
This topic includes a sub-topic:
Topic/Operation |
Description |
|---|---|
Edit the account's own settings. |