|
Editing Account Details |
  
|
Editing Account Details
|
Editing Account Details |
|
Overview
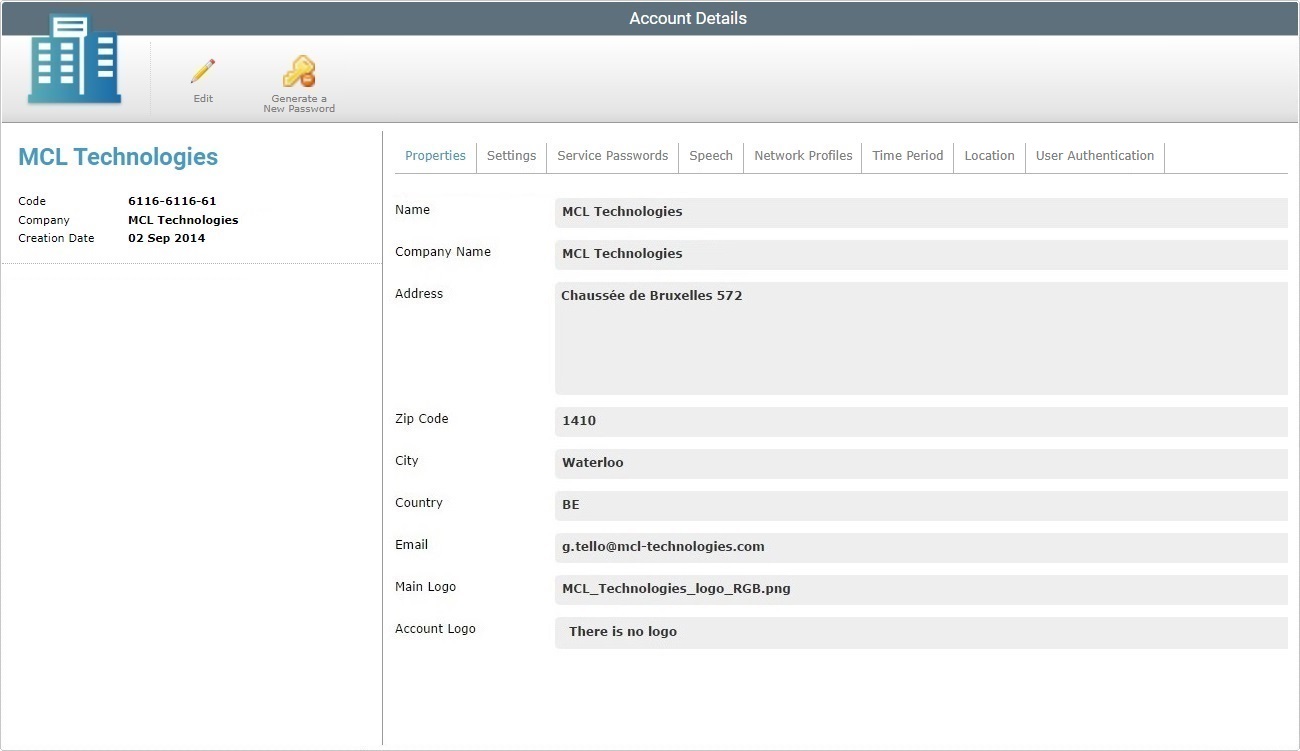
The "Account Details" page provides information on the account. Most account details are editable.
![]() The editing of the page's tabs requires setting the page to edit mode. The exception is the "Service Passwords" tab:
The editing of the page's tabs requires setting the page to edit mode. The exception is the "Service Passwords" tab:
•The "Device Password" CANNOT be edited but you can generate a new "Filebox Password" with the use of the ![]() button which is only available if the page is in view mode.
button which is only available if the page is in view mode.
See To Generate a New Filebox Password.
Step-by-step
1. Click ![]() (located in the "Control Panel) and, then, select
(located in the "Control Panel) and, then, select  . The resulting page includes several tabs (the "Speech" tab is only available if the account is associated to a subscription with Speech services). The "Properties" tab is open by default.
2. To edit the page, click ![]() . The page is, now, set to edit mode.
. The page is, now, set to edit mode.
3. Edit the information in the tabs/fields, as necessary. The fields marked with an asterisk are mandatory, meaning, they must always contain information.
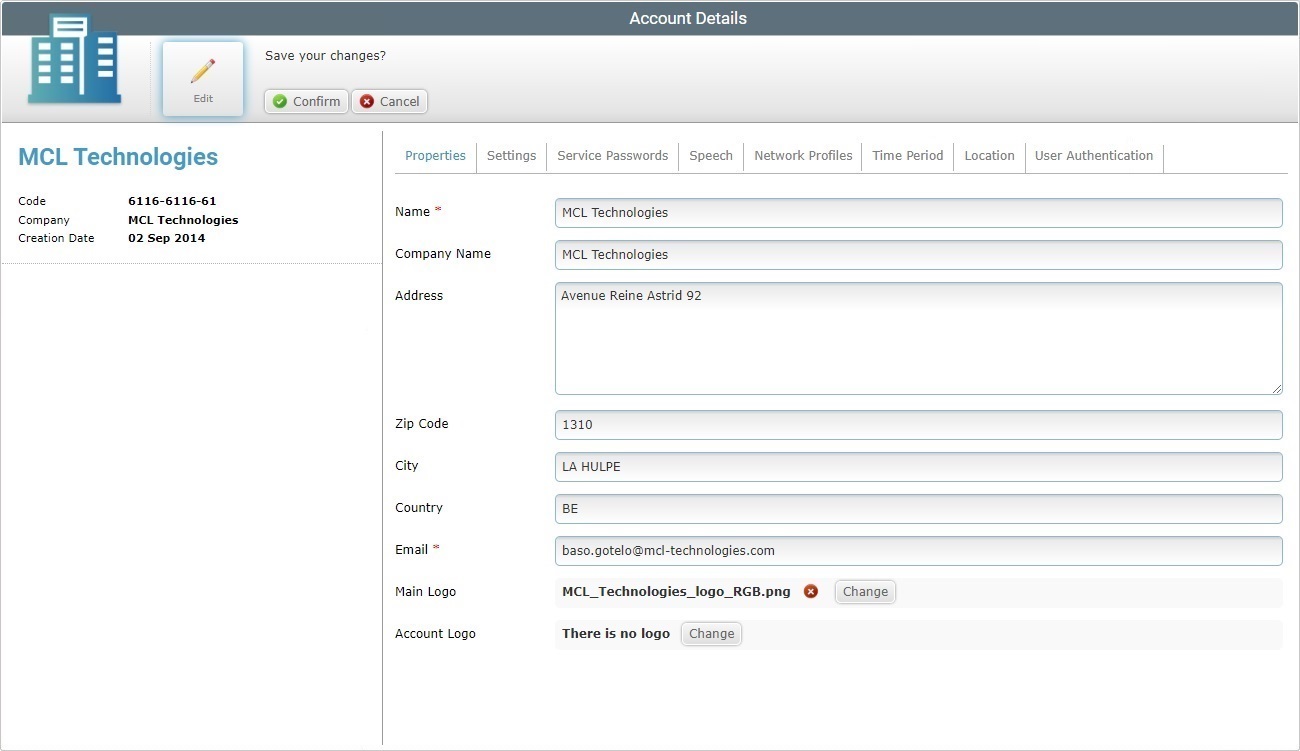
"Properties" tab
Name* |
Maintain or edit the account name.
The underscore and/or dash characters are allowed. Start the account's name with an alphabetic character. |
Company Name |
Maintain or edit the company name associated to the MCL-Mobility Platform's account.
The underscore and/or dash characters are allowed. Start the account's name with an alphabetic character. |
Address Zip Code City Country |
Maintain or edit the address elements (Address, Zip Code, City, Country). |
Email * |
Maintain or edit the account owner's email. |
Main Logo |
Maintain, change or remove the company's logo. See Adding/Editing of a Main or Account Logo below. |
Account Logo |
Maintain the default logo or substitute it. See Adding/Editing of a Main or Account Logo below. |
Step-by-step
To add a main or account logo, make sure that the page is set to edit mode.
a. Click
b. Click the corresponding
c. In the resulting OS File Explorer window, select the desired file image.
d. Click
The added logos are, now, displayed in their corresponding location within every MCL-Mobility Platform page.
To remove an image file, click the corresponding
To change a logo, click
Before attempting to do any of these actions (adding, removing or changing a logo), do not forget to set the page to edit mode (step 1). It is the only way to access the necessary buttons.
|
"Settings" tab
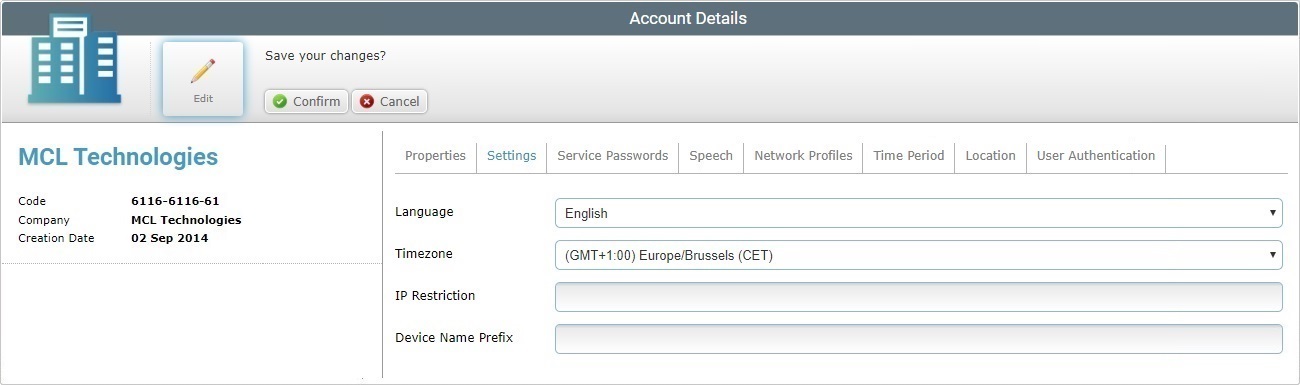
Language |
Maintain or select another language for the account. |
Timezone |
Maintain or select a different time zone for the account. This time zone will be considered the "default time zone" and applied throughout the account as such (ex: When creating a site, it will adopt this default time zone unless you specifically set a timezone in the new site's settings).
|
IP Restriction |
If required, increase or decrease the authorized IP range that can be used by site managers/platform users to access the account's web interface.
|
Device Name Prefix |
If required, define/edit the prefix to be added to the name of the devices that are paired to this account. As a result, the original name of the device will be replaced with this prefix (plus an incremental number).
If the destination site for the pairing also has a defined device name prefix, the newly paired device will ignore the prefix set at account level and adopt that prefix in its name (plus an incremental number). At site level, the device name prefix is defined in the site's own details page - "Properties" tab. |
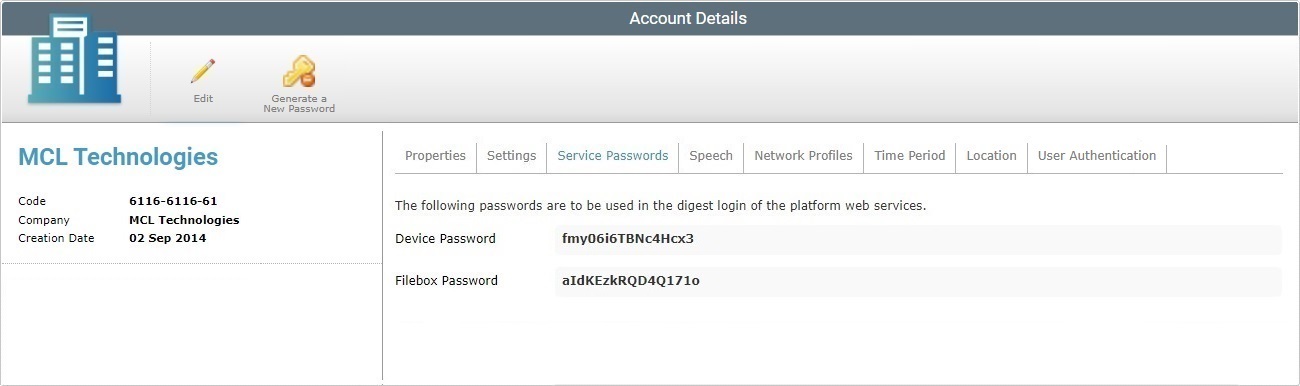
"Service Passwords" tab
The "Service Passwords" tab has no editable information. The "Device Password" CANNOT be modified but you can generate a different "Filebox Password". To do so, you must use the ![]() button.
button.
Since this button is located in the page's header, the "Account Details" page must be set to view mode NOT edit mode - follow the steps described in To Generate a New Filebox Password.
"Speech" tab
This tab is only available if the account's subscription includes speech services).
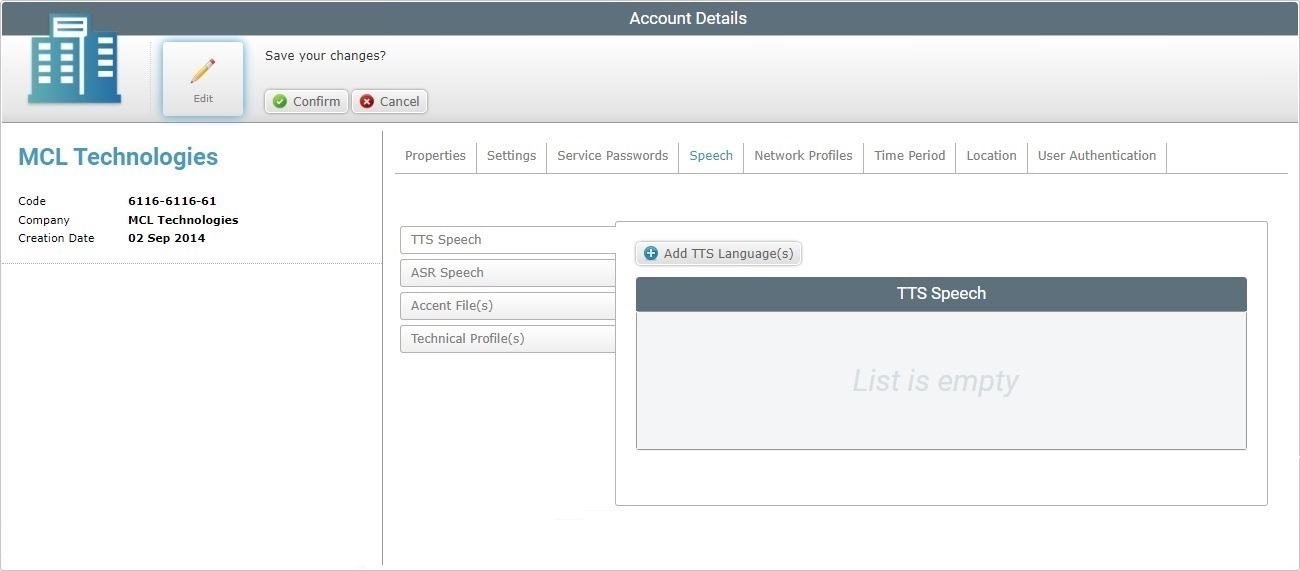
Open the side tab you want to edit and follow the corresponding step-by-step:
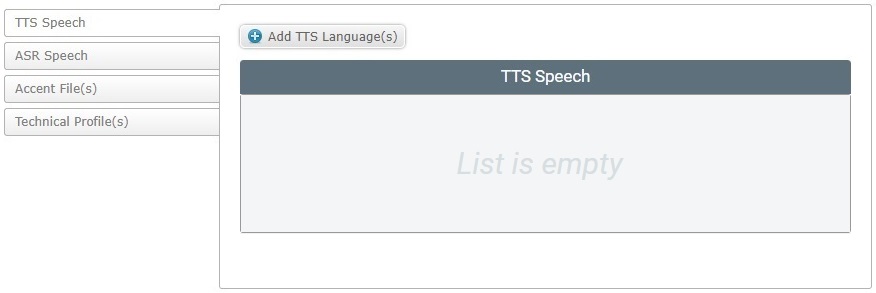
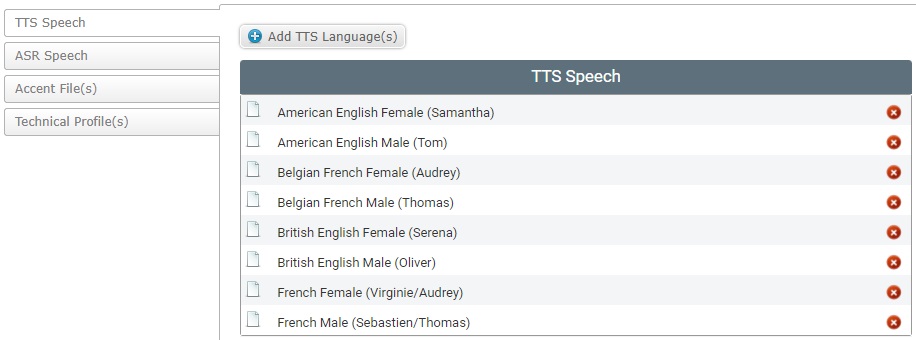
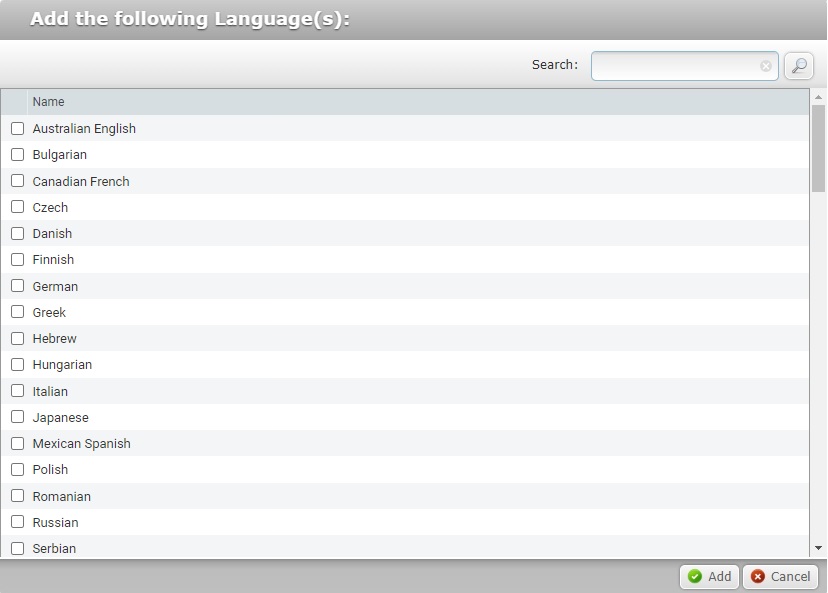
I. Click the "TTS Speech" tab to open it.
II. Click
III. If required, use the
IV. Select the required language(s) by checking the corresponding
V. Click
The selected languages are displayed in the "TTS Speech" tab.
You can, at any moment, delete an output language from the "TTS Speech" by clicking the corresponding
|
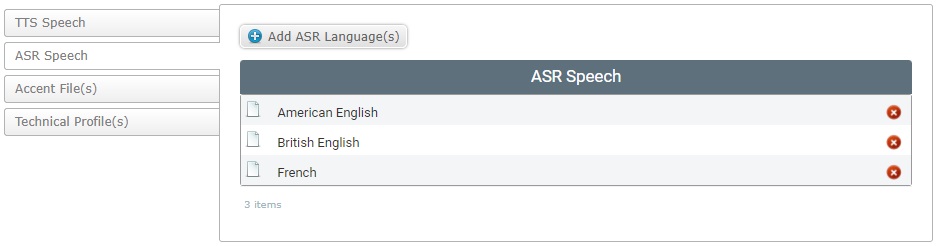
I. Click the "ASR Speech" tab to open it.
II. Click
III. If required, use the
IV. Select the required language(s) by checking the corresponding
V. Click
The selected languages are displayed in the "ASR Speech" tab.
You can, at any moment, delete an input language from the "ASR Speech" tab. To do so, click the corresponding
|
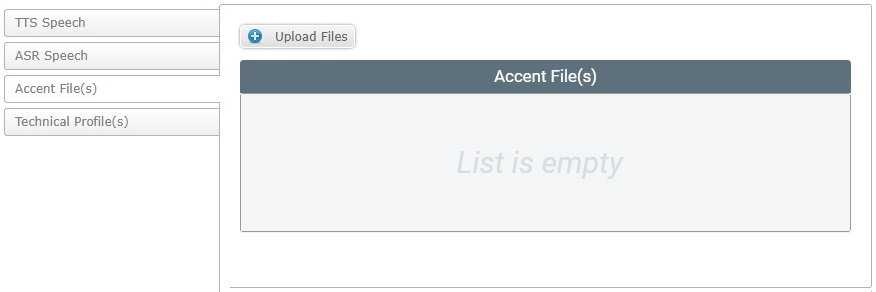
I. Click the "Accent File(s)" side tab to open it.
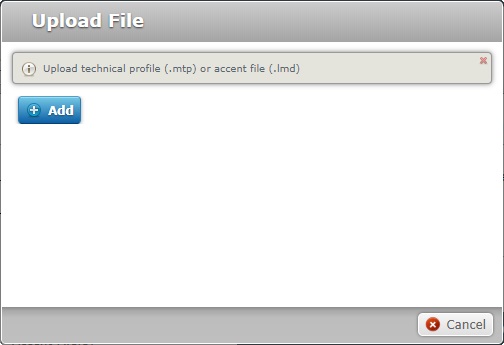
II. Click
III. Click
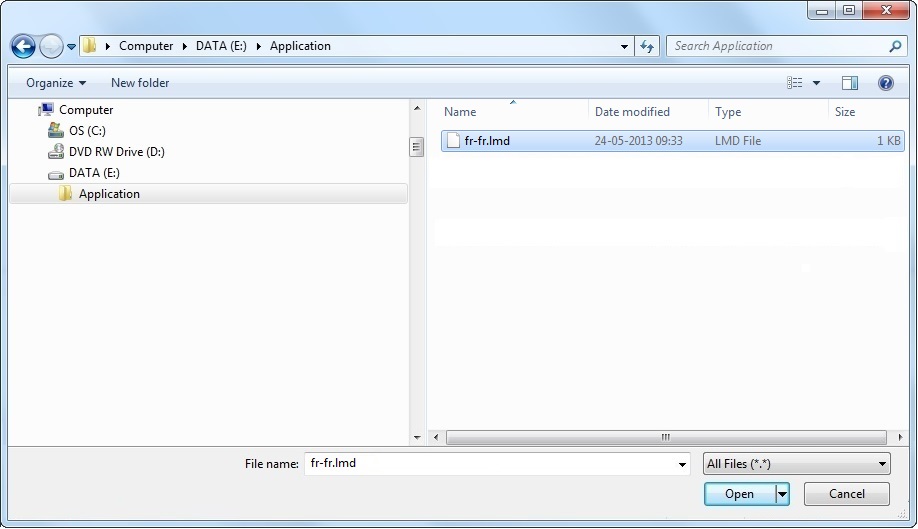
IV. Select the appropriate file (with an ".lmd" extension) and click
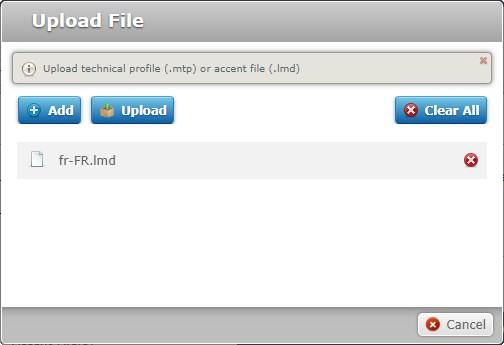
V. If you want to upload more ".lmd" files (accent files), click
If necessary, you can delete added files. To delete one file, click the corresponding
VI. Once you are done adding accent files for upload, click
The selected files are displayed in the "Accent File(s)" tab.
You can, at any moment, delete uploaded accent files. To do so, click the corresponding
|
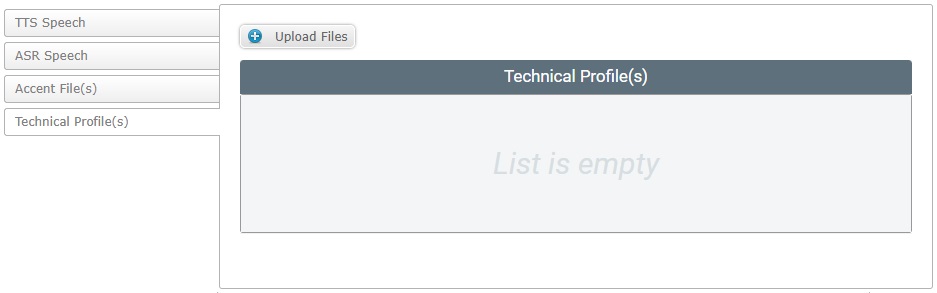
I. Click the "Technical Profiles(s)" side tab to open it.
II. Click
III. Click
IV. Select the appropriate file (with an ".mtp" extension) and click
V. If you want to upload more ".mtp" files (technical profiles), click If necessary, you can delete added files. To delete one file, click the corresponding
VI. Once you are done adding technical profiles for upload, click
The selected files are displayed in the "Technical Profile(s)" tab.
You can, at any moment, delete uploaded technical profiles. To do so, click the corresponding
|
"Network Profiles" tab
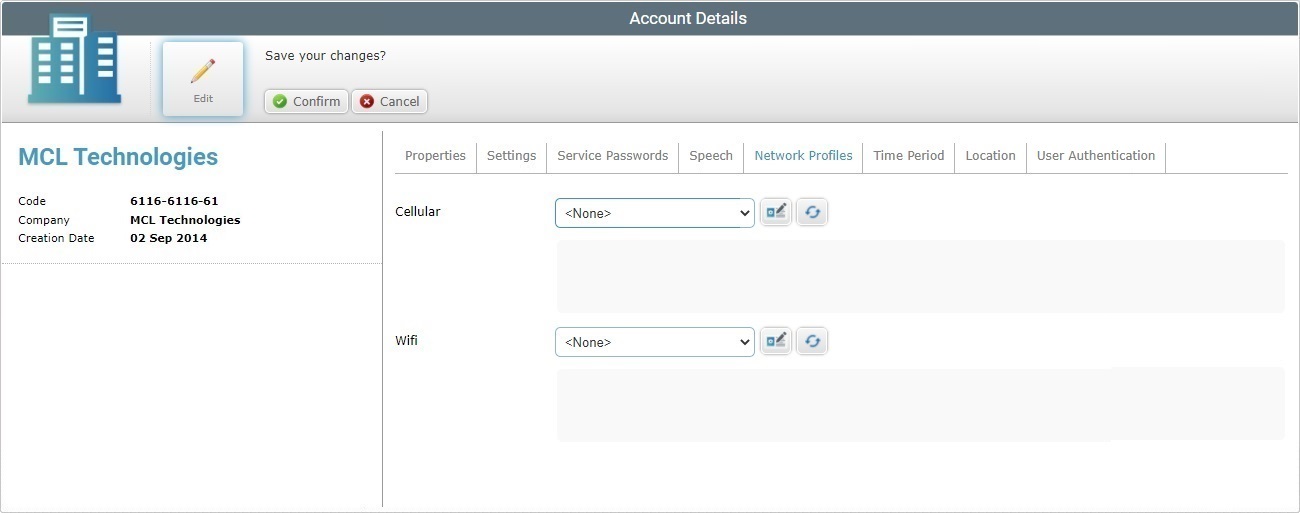
Cellular |
Maintain or select a different cellular profile from the drop-down. If necessary, click If "<None>" is the selected option, the button will open the "Profile management" page. If you edit the selected profile's settings, click |
Wifi |
Maintain or select a different WiFi profile from the drop-down. Use the If "<None>" is the selected option, the button will open the "Profile management" page. If you edit the selected profile's settings, click |
"Time Period" tab
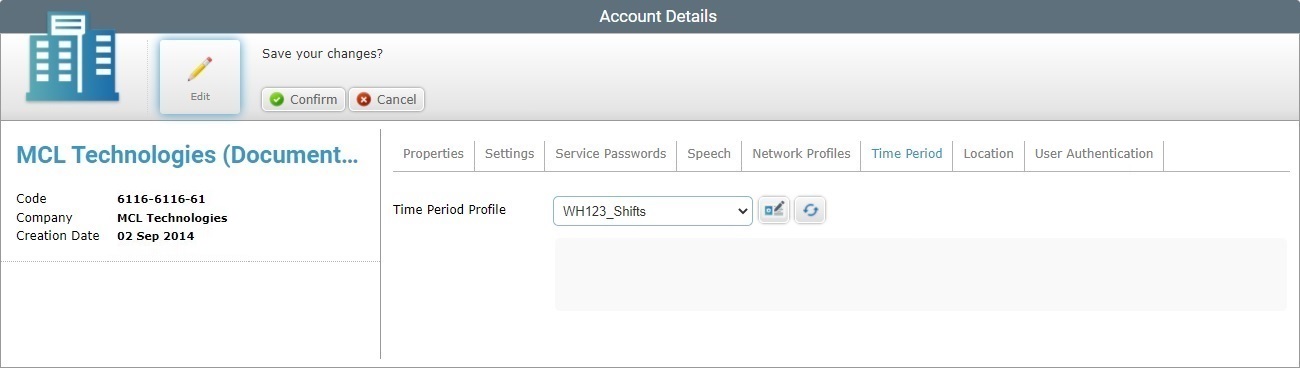
Time Period Profile |
Maintain or define another Time Period profile from the drop-down. If you want to edit the selected Time Period profile, use the If you have selected "<None>", clicking
Use the
If you select "None", any site with a defined "default" Time Profile, will not have any related Time Period settings available (ex: the Time Resolution drop-down available in dashboards will ONLY list the general time periods - "Hour", "Day (UTC)", "Day (Local)", "Week (Day (UTC))", "Week (Day (Local))" and "Month"). |
[Description box] |
Displays information about the selected profile. Not editable. |
"Location" tab
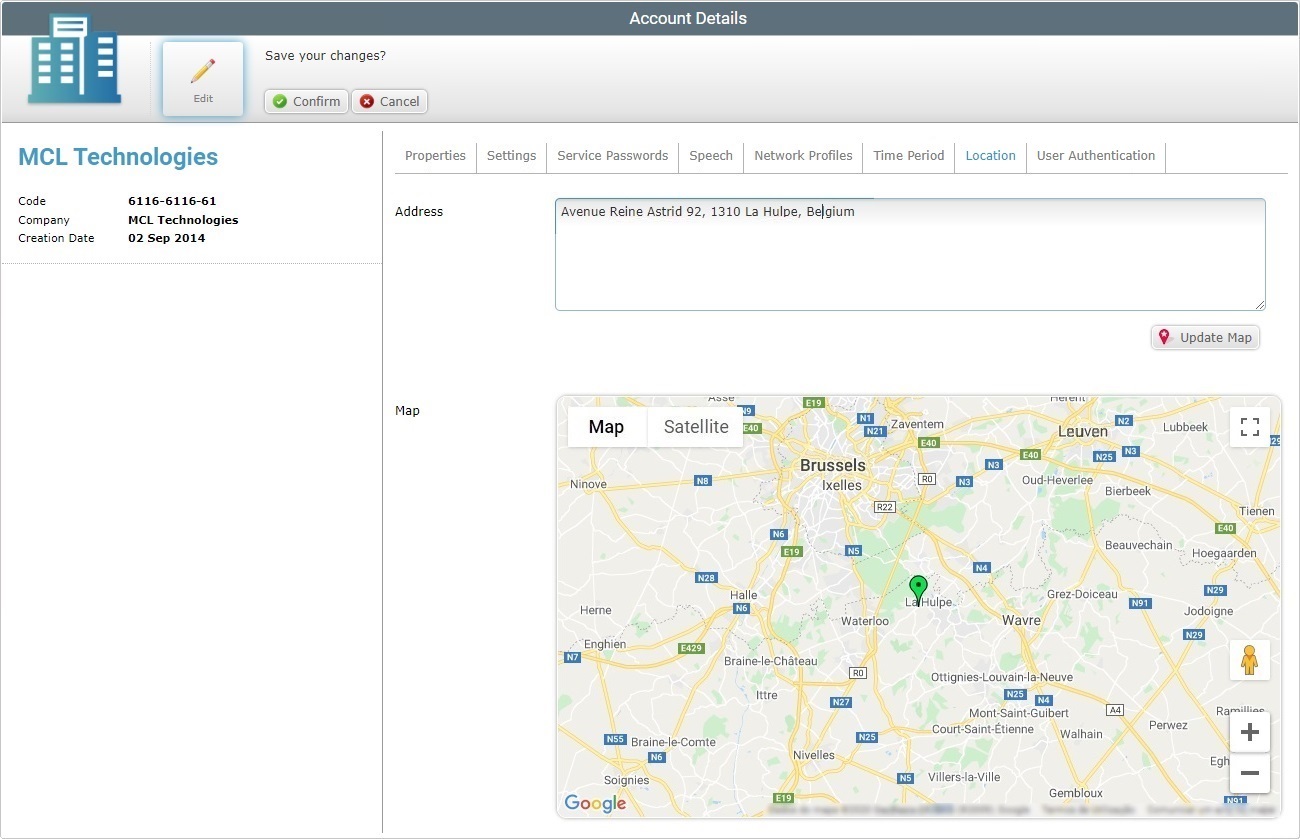
Address |
Maintain or edit the site's address.
The latitude and longitude coordinates are automatically filled in, as soon as you click the |
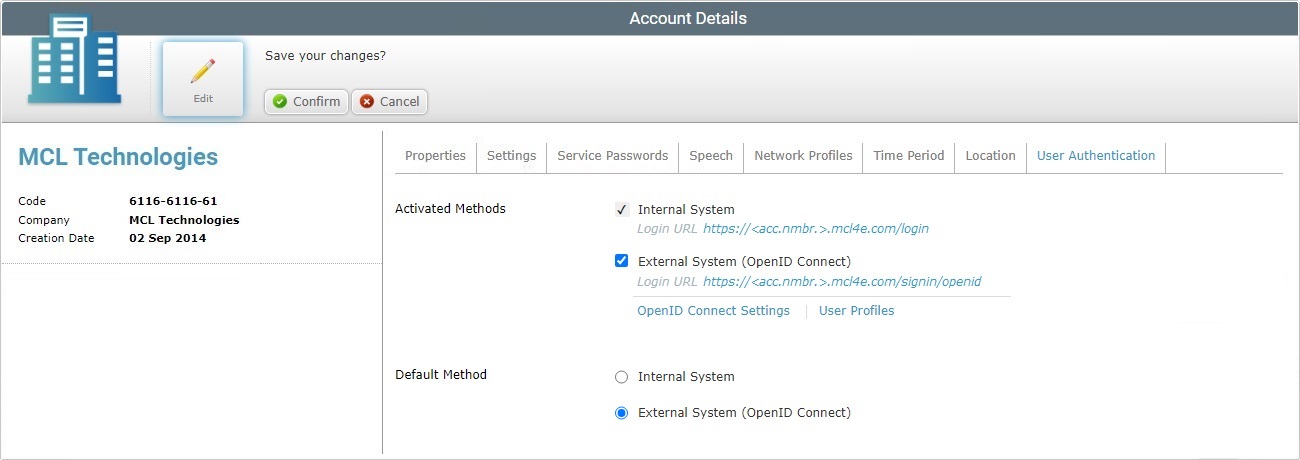
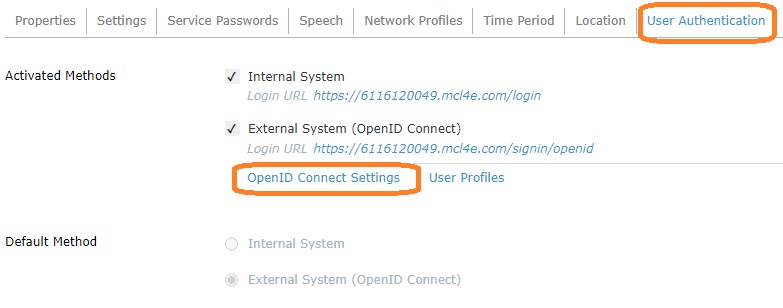
Activated Methods |
Maintain or change the currently active user authentication methods.
The "Internal System" option (= user authentication managed by MCL-Mobility Platform) CANNOT be unchecked. This user authentication method must always be active. It is ONLY possible to activate/deactivate the "External System..." option.
Be aware that checking the "External System (OpenID Connect)" option requires you to define specific settings to integrate the external user authentication provider into your MCL-Mobility Platform account. •The setup within the used external provider must include specific elements. See External System User Authentication Method. •The necessary user profiles must be available within the "User Profiles" sub-module so they can be mapped/connected to the external user profiles. You can use the link "User Profiles" to open the "User Management" page and create and/or edit user profiles. See User Profiles. •You must define the external provider being used and map the intended external entities (ex: user roles with an alias) to the internal entities (= user profiles). Follow the "OpenID Connect Settings" link to open the corresponding page and define your setup. See To Edit the OpenID Connect Settings.
|
Default Method |
Maintain or change the current default authentication method.
Internal System - If this option is checked, user authentication is managed internally, by MCL-Mobility Platform. The login can be executed via the account URL (https://<account number>.mcl4e.com/) OR the internal account URL (https://<account number>.mcl4e.com/login) in the account's login page. The user will have to enter the credentials that were set within the account. All account access links will redirect to the internal login page (ex: the account access link in the logout page).
External System... - If this option is checked, user authentication is managed by an external provider. The user can access the account via the account URL (https://<account number>.mcl4e.com/) OR the external system URL (attached to the "External System..." option in the "Activated Methods" section) The user will log in to an external login page where he will enter the credentials generated/provided by the external provider. |
![]() If, for some reason, you opt for a hybrid approach (= activated "External System" + "Internal System" set as default method), make sure the intended users receive the required URLs/credentials and know which ones to use:
If, for some reason, you opt for a hybrid approach (= activated "External System" + "Internal System" set as default method), make sure the intended users receive the required URLs/credentials and know which ones to use:
•The account URL and/or the internal account URL (and other access links such as the link in the logout page) lead to the MCL-Mobility Platform login page. The user must enter the credentials defined within the MCL-Mobility Platform account.
•The external system URL (available in the "Activated Methods" section) opens the external login page and the user must enter the credentials provided by the external provider.
4. Once you have edited the required tabs/fields, click ![]() to save those modifications. The page will be back to view mode.
to save those modifications. The page will be back to view mode.
To Edit the OpenID Connect Settings
The link available in the "User Authentication" tab - "OpenID Connect Settings" - opens the page that allows you to define the connection between your MCL-Mobility Platform account and the external user authentication provider and to map external user roles to the user profiles/internal roles created in the account.
Follow the step-by-step below to integrate the external provider onto your MCL-Mobility Platform account.
Step-by-step
1. In the "User Authentication" tab (Admin Dashboard's "Control Panel" > "Set Up" module > "Account Details" sub-module > "Account Details" page), click the "OpenID Connect Settings" link to open the corresponding "OpenID Connect Settings" page.
|
|
|
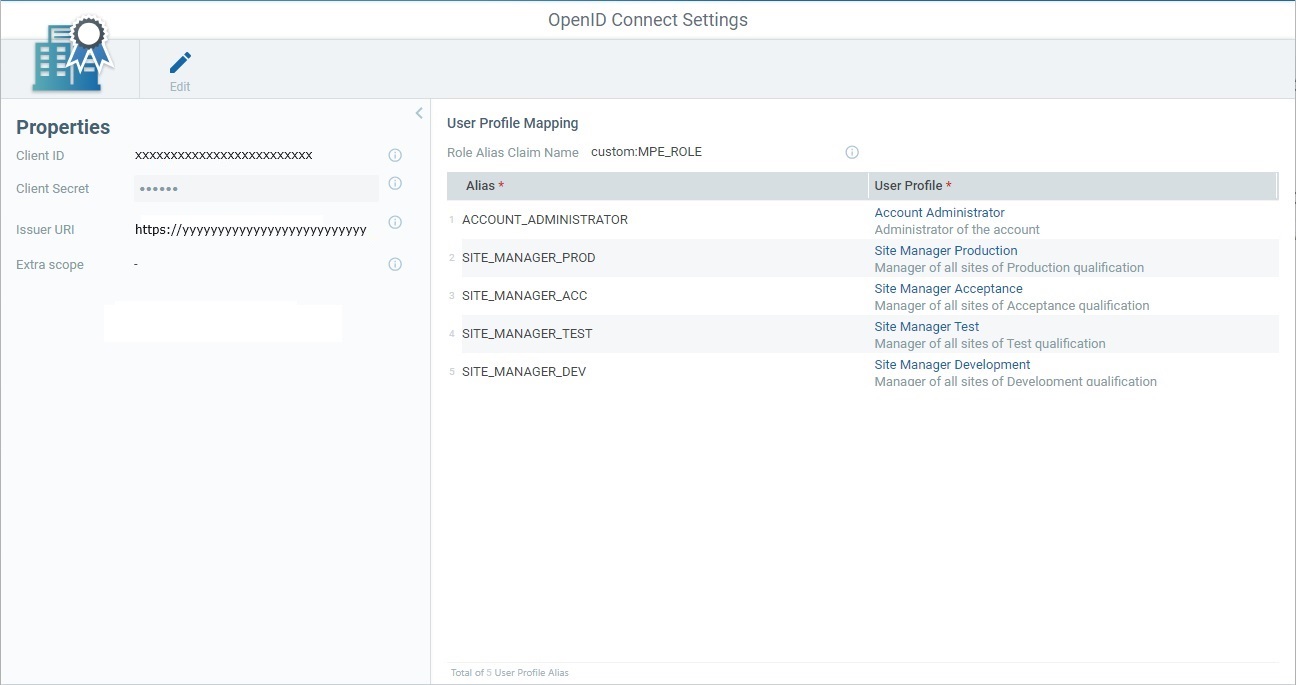
The "OpenID Connect Settings" page is divided into a "Properties" panel and a "User Profile Mapping" panel.
2. Click ![]() to set the page to edit mode.
to set the page to edit mode.
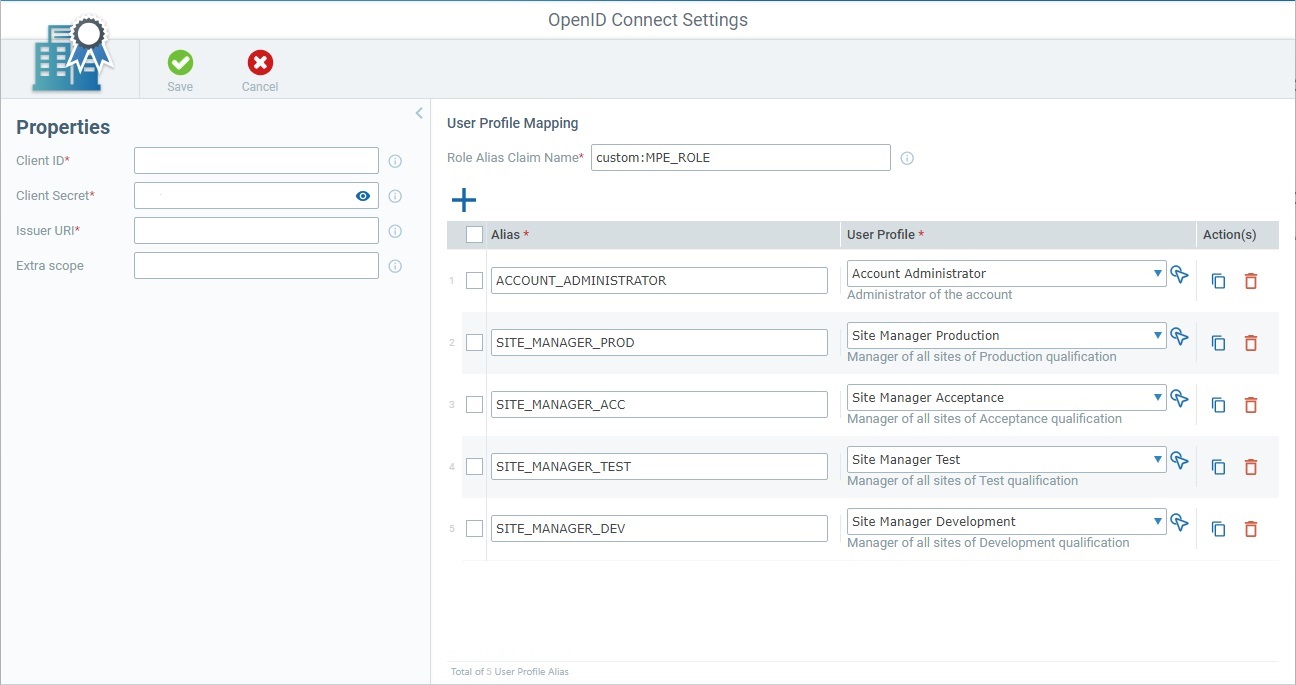
3. Fill in/edit the fields in the "Properties" panel. The fields marked with an asterisk are mandatory, meaning, they must always contain information.
Client ID* |
Maintain or edit the client ID. This string (generated/provided by the external user authentication provider) is used by your MCL-Mobility Platform account (along with the Client Secret) to connect to the OpenID Connect provider. |
Client Secret* |
Maintain or edit the client secret. This string (generated/provided by the external user authentication provider) is used by your MCL-Mobility Platform account (along with the Client ID) to connect to the OpenID Connect provider. |
Issuer URI* |
Maintain or edit the issuer's URI. The URI of the OpenID Connect provider (= endpoint used by MCL-Mobility Platform to connect to the external user authentication provider). |
Extra scope |
Maintain or edit any added scopes. This field is optional. It is used by MCL-Mobility Platform to ask for extra information associated to a different scope.
If you add or edit a scope, make sure that that scope matches an existing one in the external user authentication provider. The entered scopes must be separated by comas. |
4. Proceed to the "User Profile Mapping" panel and add/edit the available fields as necessary. Fields marked with an asterisk are mandatory/must contain information.
Role Alias Claim Name* |
Maintain or edit the name of the role alias claim. This is the name of the claim with user role info that is contained in the ID Token sent by the external user authentication provider to your MCL-Mobility Platform account. Ex: "custom:MPE_ROLE". |
Alias*/User Profile* columns |
This section displays the external user role aliases and the mapped internal user profiles. If required, you can edit an existing alias (A) or user profile (B), add another alias and corresponding user profile (C), duplicate (D) or delete them (F).
A. Editing an Alias Simply edit the entered alias manually. Be aware, however that this edition must match an existing external user role alias in the external user authentication provider, otherwise the connection will be broken.
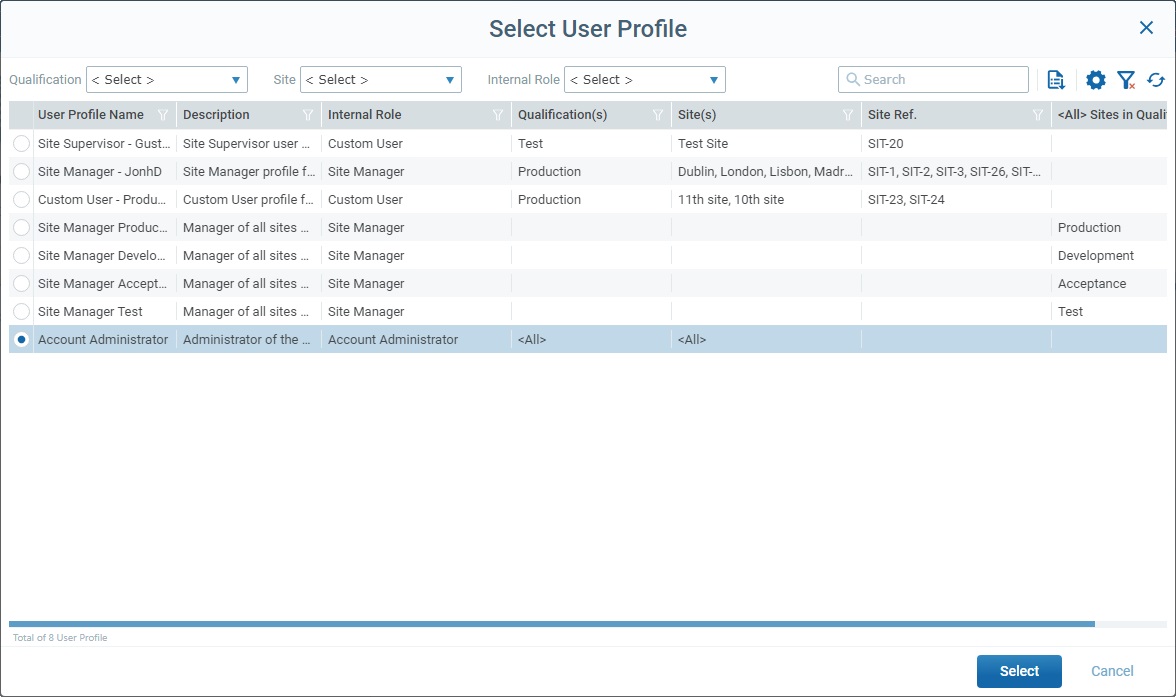
B. Editing a User Profile Select a different user profile from the drop-down OR click the corresponding
C. Adding an Alias + User Profile Click
D. Duplicating an existing Alias + User Profile Click the
F. Deleting an existing Alias + User Profile Click the
▪As an alternative to a single-row duplication/deletion, you can perform a bulk duplication or deletion: a. Click the check box to the right of the "Alias" column to select all rows at once or check the intended rows. b. Click |
5. Once you have edited the required fields in the "Properties" and "User Profile Mapping" panels, click ![]() to apply the modifications.
to apply the modifications.
This pop-up window, which opens when you click the
Available options:
•Use the
•Enter a user profile related value in The list will automatically change according to the search. To end the search, empty the search box OR click The search will ONLY apply to the currently displayed list.
•Use
•Click
•Click
•Use
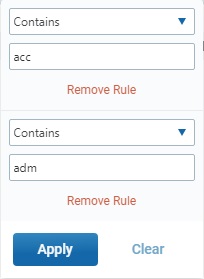
•Use the options included in the header of each column to organize/filter the listed items:
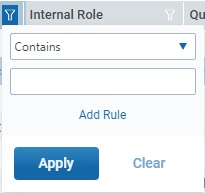
Example:
Make sure the defined rules do NOT conflict with each other because it could lead to an empty view.
If required, click You can use the |
To Generate a New Filebox Password
Step-by-step
1. Click ![]() (located in the "Control Panel) and, then, select to access the "Account Details" page. The page MUST be set to view mode.
(located in the "Control Panel) and, then, select to access the "Account Details" page. The page MUST be set to view mode.
2. Click ![]() .
.
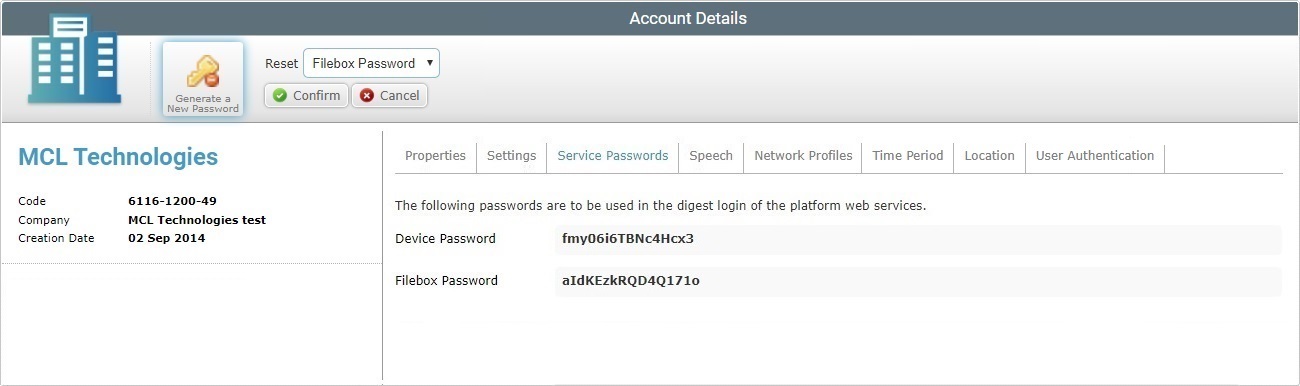
3. Click ![]() to generate a new password for the Filebox Service.
to generate a new password for the Filebox Service.
The new password is displayed in the "Service Passwords" tab, in the "Filebox Password" field.