|
Adding a Site User |
  
|
Adding a Site User
|
Adding a Site User |
|
Overview
Only a site's site manager (or the account administrator) can create standard/support users with a specific role and the necessary rights to access a site or sites.
Step-by-step
1. Click ![]() (in the "Control Panel" section) and, in the resulting row below, select
(in the "Control Panel" section) and, in the resulting row below, select  to open the "User Management" page.

2. Click ![]() to open a "New User" page which is already set to edit mode.
to open a "New User" page which is already set to edit mode.
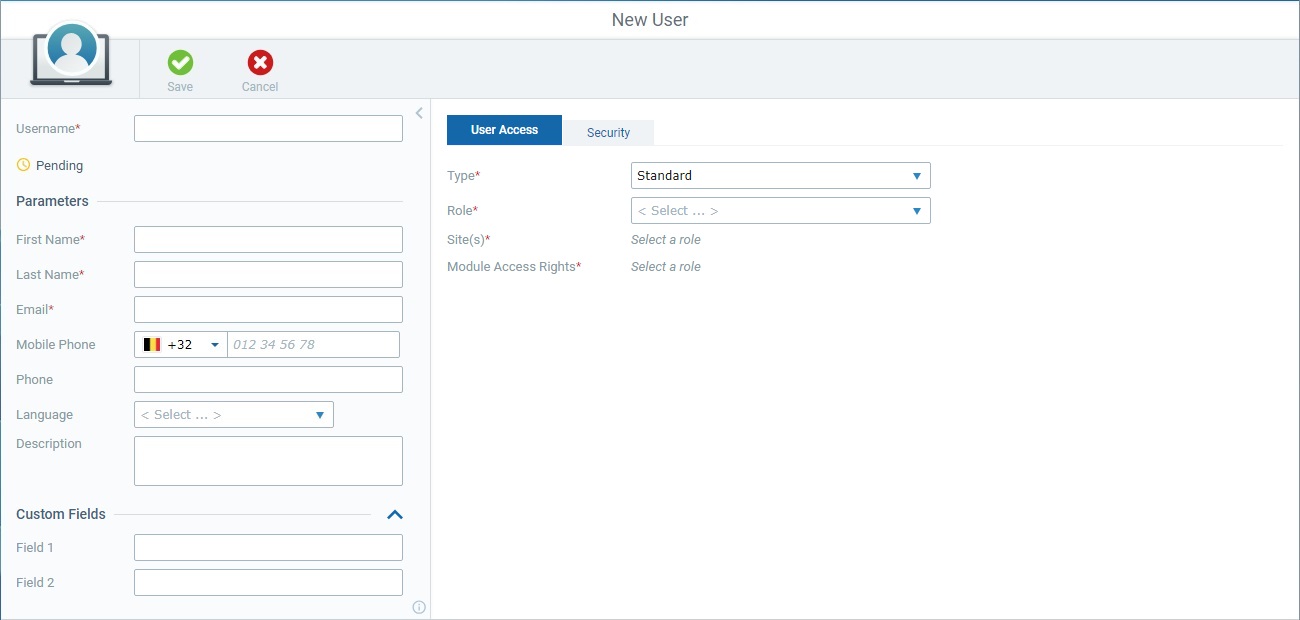
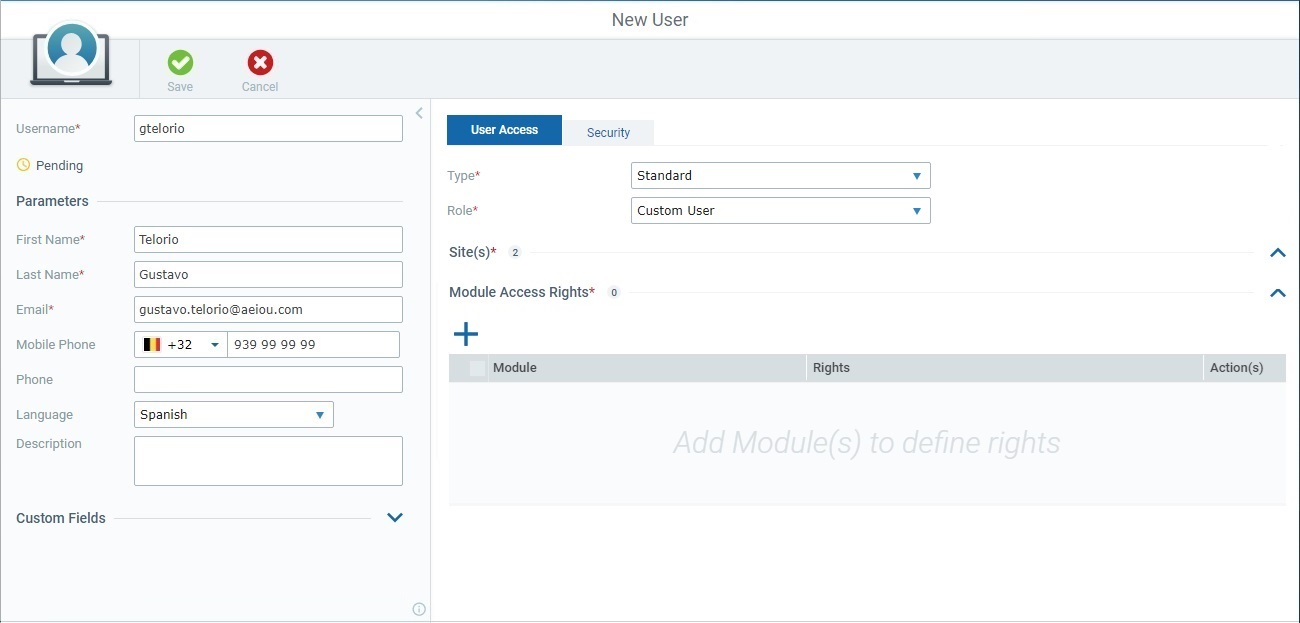
3. Start by filling in the available options in the left panel. Make sure the mandatory fields (marked with an asterisk) have information.
Username * |
Define a username to be entered by the user when he logs in to the site. Once defined, the username CANNOT be edited.
The username MUST comply with the following rules: •Minimum of 4 characters. •Maximum of 30 characters. •Special characters allowed: "-" "_" "." "@" "#" •Spaces are NOT allowed.
|
Parameters |
|
First Name * |
Enter the user's first name. |
Last Name * |
Enter the user's last name. |
Email * |
Enter the user's email.
If you enable the "Email" method for the Two-Factor Authentication (in the "Security" tab), you will receive the email with the required code on this address. |
Mobile Phone |
Enter the user's mobile phone number.
If you enable the "SMS" method for the Two-Factor Authentication (in the "Security" tab), you will receive the SMS with the required code on this number. If this field is left empty, the "SMS" option for Two-Factor Authentication (in the "Security" tab) will NOT be active. |
Phone |
Enter the user's telephone number. |
Language |
Select the language to be used by the new user from the drop-down. |
Description |
If relevant, add notes regarding the new user. |
Custom Fields |
|
Field 1 |
If required, fill in one or both fields with information on the new user.
If this section is hidden, click the arrow to the right to expand it:
|
Field 2 |
|
4. If required, click ![]() (panel's upper right corner) to hide the panel and have an expanded view of the "User Access" and "Security" tabs. To view the panel again, click
(panel's upper right corner) to hide the panel and have an expanded view of the "User Access" and "Security" tabs. To view the panel again, click ![]() (upper left corner).
(upper left corner).
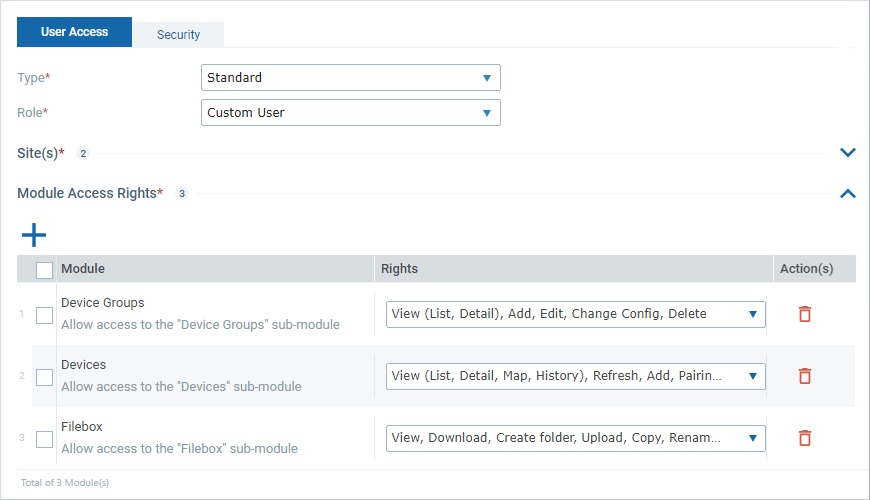
5. Proceed to the "User Access" tab. The fields marked with an asterisk are mandatory, meaning, they must always contain information.

6. Select the new user's type from the corresponding drop-down. There are 2 types of users to choose from:
Standard - This is for the typical user within the organization that will require day-to-day access to the site(s) assigned to him.
Support User - This is for an external user that will only access the site(s) assigned to him to provide Support.
![]()
Make sure you select the correct user type because once the new user is saved, it is NO longer possible to change it.
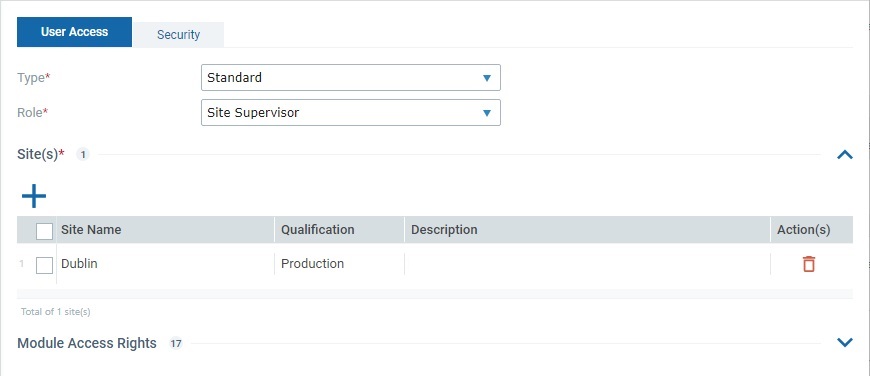
7. Select the new user's role from the corresponding drop-down. There are 7 different user roles to choose from.
Role |
Access Rights |
Site Supervisor |
Can access all operational sub-modules within the site(s) he is associated to. Does NOT have access to the site's setup. |
MDM Manager |
Can access all sub-modules related to the device and application management of the site(s) he is associated to. |
Device Manager |
Has access to the sub-modules related to device management of the site(s) he is associated to. |
Operator Manager |
Has access to the operator related sub-modules within the site(s) he is associated to. |
Deployment Manager |
Has access to the sub-modules that handle device groups, configurations and deployments of the site(s) he is associated to. |
Configuration Manager |
Can only access the applications/configurations related sub-modules of the site(s) he is associated to. |
Custom User |
Can have access to the operational sub-modules you have chosen for this user within the site(s) he is associated to. |
8. In the "Site(s)" section, the current site is already attributed to the new user.
If you want this new user to access more sites, follow the steps described in the "Site Selection" link below.
![]()
If the "Site(s)" section is collapsed, click the arrow to the right to expand its content.
![]()
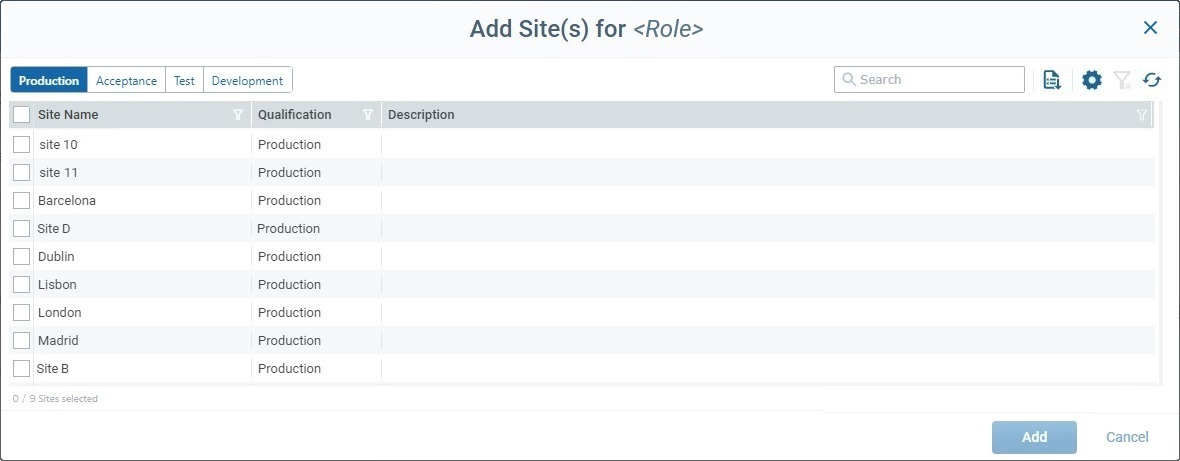
a. Click
b. Select, at least, one site.
If available, you can use the "Production", "Acceptance", "Test" and "Development" buttons (upper-left corner) to filter the site list per qualification. The display of the Qualification button(s) depends on the qualification of the account's sites. For instance, if the account only has sites with a "Production" and "Development" qualification, this window will only display the "Production" and "Development" buttons. For more details on this window, see Details on the Site Selection window ("User Access" tab).
c. Click
|
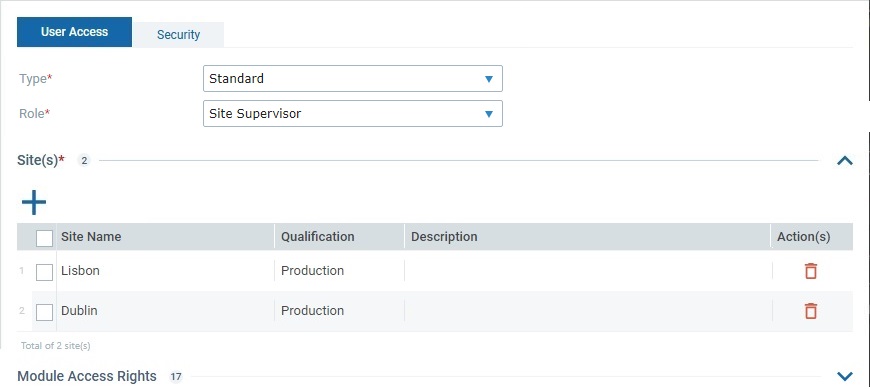
The "User Access" tab, now, displays the selected site(s).
If necessary, you can:
•click ![]() to delete the corresponding site from the list.
to delete the corresponding site from the list.
•execute a bulk deletion by checking the box next to the "Site Name" column so all listed sites are selected (this activates the ![]() button) and click
button) and click ![]() .
.
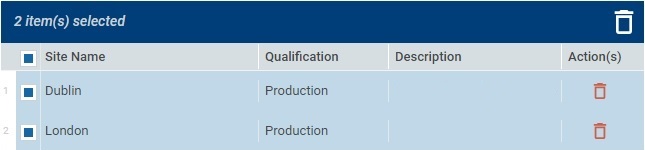
Either action (single/bulk deletion) requires you to confirm the deletion by clicking the corresponding ![]() button.
button.
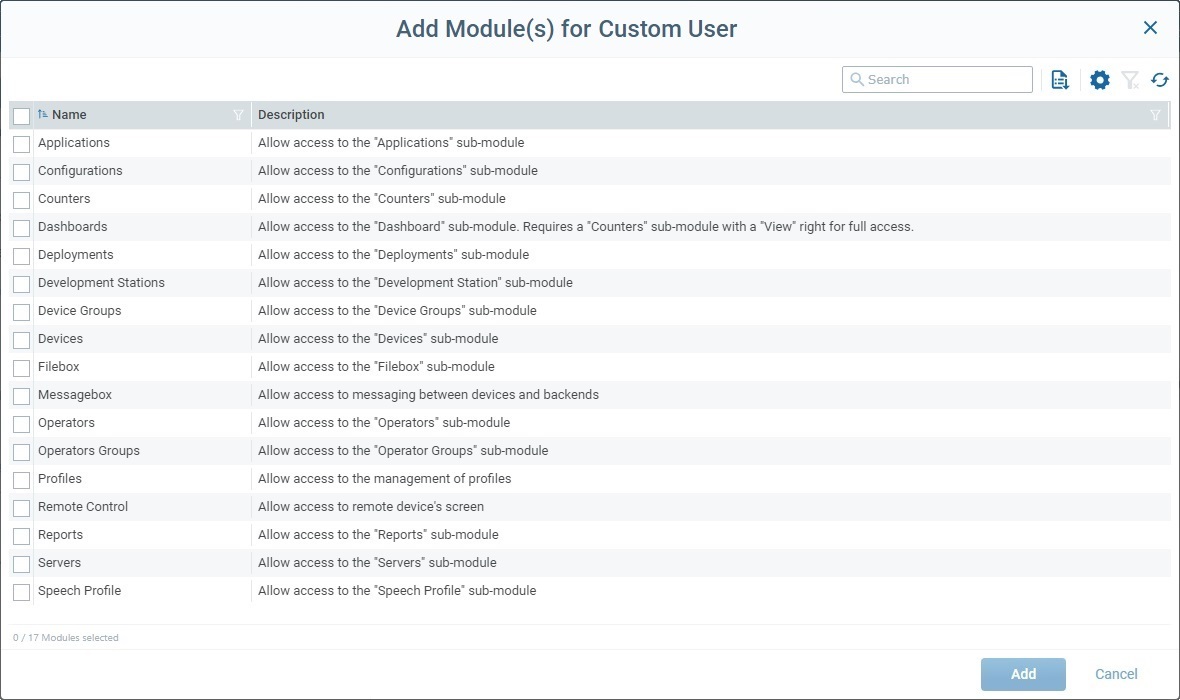
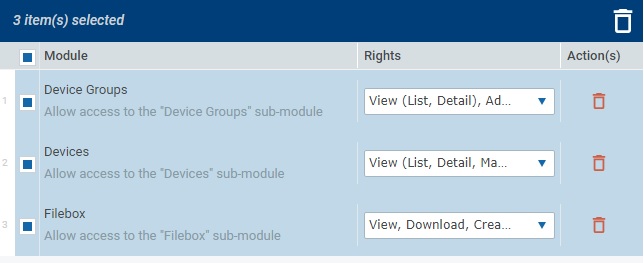
9. If you have selected the custom user role for the new user, you must select which modules he can access, in the "Module Access Rights" section. This will apply to all the previously selected site(s).
Proceed as described in the "Access Rights Selection" link below.
![]()
If the "Module Access Rights" section is collapsed, click the arrow to its right to expand its content.
![]()
a.In the "Module Access Rights" section, click
b. Check the intended sub-modules. For more details on this window, see Details on the Sub-Module Selection Window.
c. Click
|
10. Once you have added the sub-modules you want the custom user to access, you will be able to edit those sub-modules and corresponding operations he can perform.

a. If necessary, you can delete added sub-modules:
•click ![]() to delete the corresponding sub-module from the list.
to delete the corresponding sub-module from the list.
•execute a bulk deletion by checking the box next to the "Module" column so all listed sub-modules are selected (this activates the ![]() button) and click
button) and click ![]() .
.
Either action (single/bulk deletion) requires you to confirm the deletion by clicking the resulting ![]() button.
button.
b. If you want to edit the default rights of a listed sub-module, open the corresponding drop-down in the "Rights" column and check/uncheck the intended rights.
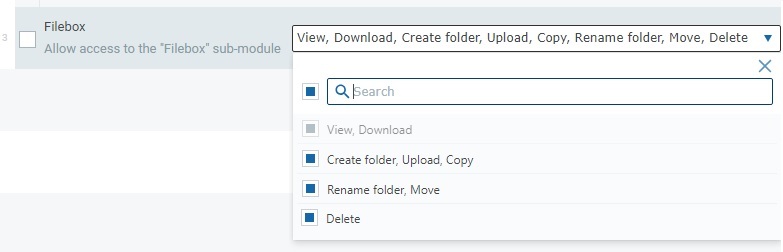
You can use the search box to look for a specific right.
Click outside the drop-down or the X button to close the drop-down.
11. Open the "Security" tab.
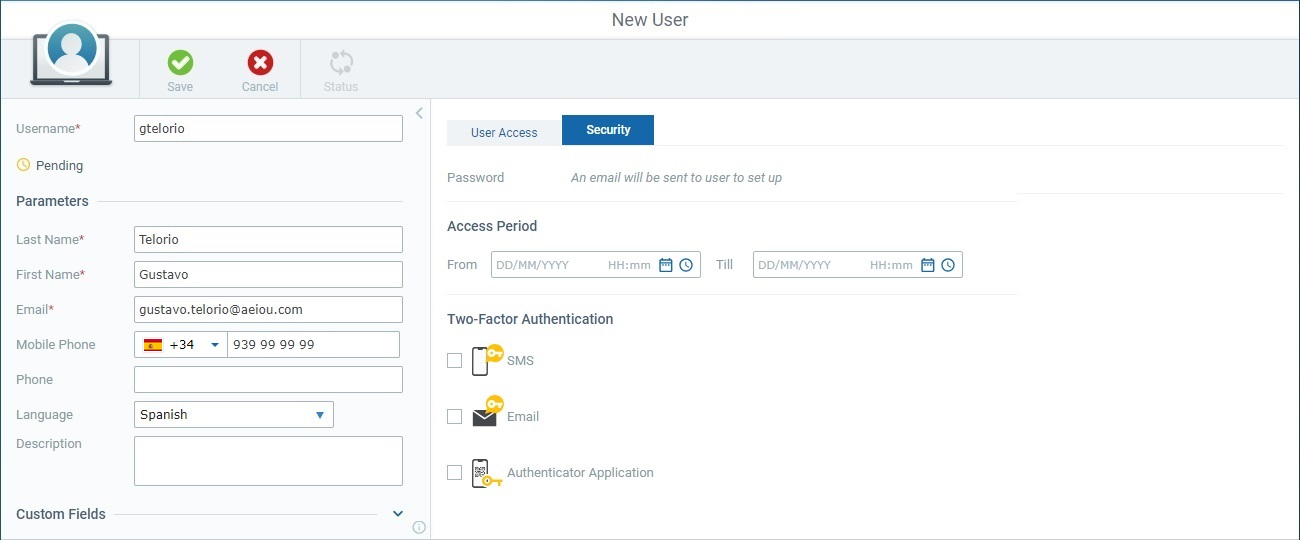
This tab informs you that an email will be sent to the email address defined in the left panel so the user can set up a password - it is the new user that sets up his own password, NOT the site manager (or account administrator) creating the user. See Initial Password Setup.
12. If required, define the time frame for the new user's access to his assigned sites (= when the user can log in).
If no time period is defined, the new user will be able to log in whenever necessary.
![]()
For security reasons, we recommend defining an access period for Support users (= users outside the organization that should only access the account for support purposes). You can adopt the suggested time frame (a 5-day access period) or define a more appropriate one.
Access Period |
|
From...Till... |
Enter the start date/time for user access in the "From" input field and an end date/time in the "Till" input field. You can enter the start and end dates/times manually (if so, use the given format for date - "DD/MM/YYYY" and time - "HH:mm" OR use the See Details on the Use of the Date/Time Buttons ("Security" tab).
If the new user is a Support type user, the "Access Period" will suggest a start date based on the current date and an end date set for 5 days later. |
13. Define the methods that should be available to the user to execute a Two-Factor Authentication.
If you only check one method, the user will have to apply that method plus the username & password for the login procedure.
If you check more than one method, the user will be able to choose which one he wants to use along with the username & password.
Two-Factor Authentication |
|
SMS |
Only available if the user has a mobile phone number defined in the left panel. Check this option so the user can choose to use the code provided via SMS (plus the username/password) to log in. |
Check this method to make it available to the user when he logs in - he will be able to select this method and use it along with the username/password. The required code will be sent to the email address defined in the left panel. |
|
Authenticator Application |
Check this option so the user can choose the authenticator application method (plus the username/password) as part of the Two-Factor Authentication to log in. Once this is applied (= changes are saved) an email will be sent to the user with instructions for the configuration of the authenticator application. For more info, see To Set Up the Authenticator Application. |
![]()
If you do NOT check any of the options, the Two-Factor Authentication will NOT be activated and the new user will only need his username/password to log in to MCL-Mobility Platform .
14. Once you have filled in/checked the required options in the left panel and tabs, click ![]() to apply.
to apply.
The page will be set to view mode with the information you added.