|
Users / Internal Users |
  
|
Users / Internal Users
|
Users / Internal Users |
|
Overview
The "Users" sub-module deals with the creation/management of site users.
A site can have Standard and/or Support type site users:
•The type Standard is for users within the organization that require access to the MCL-Mobility Platform sites to perform regular, day-to-day tasks.
•The type Support is for users that are not a part of the organization but require access to the MCL-Mobility Platform sites to provide Support to the organization.
Whatever the type, a site user always has a specific role attributed to him (Site Supervisor, MDM Manager, Device Manager, Operator Manager, Deployment Manager, Configuration Manager, Custom User) with settings that can be edited when necessary.
Site users have limited access to the Site Dashboard of the site(s) they are included in - a site user, regardless of his role, can be associated to more than one site.
Since they perform operational tasks, their access rights do NOT include access to sub-modules related to a site's setup. Ex: The "Set Up" module.
Only the site manager (and the account administrator) can create and manage site user profiles.
![]() If the MCL-Mobility Platform account is set up for external user authentication (via an OpenID Connect authentication provider integrated into the account), this sub-module will be renamed "Internal Users". Since user authentication will be managed externally, site users will no longer be created/managed in this sub-module.
If the MCL-Mobility Platform account is set up for external user authentication (via an OpenID Connect authentication provider integrated into the account), this sub-module will be renamed "Internal Users". Since user authentication will be managed externally, site users will no longer be created/managed in this sub-module.
In this context, site users can use the account URL (https://< your Account Number>.mcl4e.com/) OR an external system URL to log in.
Since the site user will be redirected to an external login page, it will NOT be possible to use the credentials (username + password) defined within the MCL-Mobility Platform account - the credentials to use will be provided by the external provider.
If you have any issues logging in, please contact your account administrator.
This sub-module will still be available and the internal site users with an "Enabled" status can still access MCL-Mobility Platform via an internal URL (https://< your Account Number>.mcl4e.com/login), using the credentials defined within MCL-Mobility Platform, if necessary.
The "User Management" Page
To access the "User Management" page, click ![]() (in the "Control Panel") and, then, select
(in the "Control Panel") and, then, select ![]() .
.
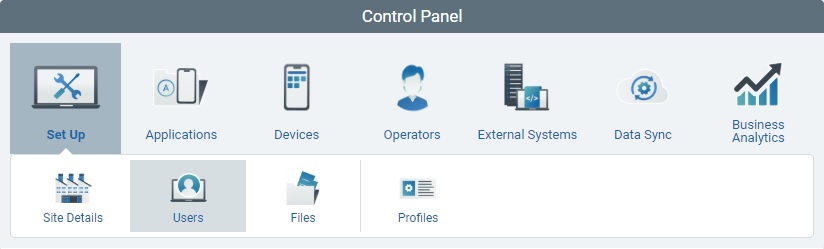
The image below illustrates the page that is accessed when clicking ![]() .
.
Default Info/View
The user information is presented in a list view (by default, ordered according to creation date):
Status column |
The initial column displays an icon that represents the user's current status regarding access to MCL-Mobility Platform. Available User Status Icons:
|
Access Period column |
The displayed icon represents the status of the user's current access period (Access Period = time frame defined for a user to be able to log in to the MCL-Mobility Platform. See Site User Details - "Security" tab). Possible icons:
|
Username (in light blue) |
The user's login. You can click it to access the corresponding "User Details" page. See User Details. |
First Name |
The user's first name. |
Last Name |
The user's last name. |
Role |
The user's role within the site(s):
Site Supervisor - Access to all the modules of the site(s) he is assigned to except the "Set Up", "External Systems" and "Business Analytics" modules. MDM Manager - Access to the sub-modules related to mobile device management within the site(s) he is included in - "Applications", Configurations", "Deployments", "Device Groups" and "Devices". Device Manager - Access to the "Devices" module of the site(s) he is included in (= "Device Groups" and "Devices" sub-modules). Operator Manager - Access to the "Operators" module of the site(s) he is associated to (= "Operator Groups", "Operators" and "Speech Profiles" sub-modules). Deployment Manager - Access to the "Device Groups", "Deployments" and "Configurations" sub-modules of the site(s) he is assigned to. Configuration Manager - Access to the "Applications" and "Configurations" sub-modules of the site(s) he is associated to. Custom User - Custom access to the selected sub-modules of the site(s) he is assigned to.
It is possible to check which modules/sub-modules can be accessed by a user in the corresponding details page ("User Access" tab). This is particularly useful in the case of a Custom User and you want to check what he has access to within the site he is associated to.
|
Qualification(s) |
The qualification of the site that the user is assigned to. If the user has been assigned to multiple sites with different qualifications, the "Qualification(s)" field will include the different qualifications. Ex: Site Supervisor assigned to Site A ("Production" qualification), Site B ("Production" qualification) and Site C ("Development" qualification) = "Qualification(s)" field displays "Production, Development". |
Site(s) |
The site or sites that the user is associated to. |
Site Ref. |
The site's identification reference. |
Two-Factor Auth. |
The icons that represent the Two-Factor Authentication methods (SMS, Email and/or Authenticator Application) that are available to the corresponding user. The user will have to choose one of the methods and use it along with the password to log in to MCL-Mobility Platform. See Two-Factor Authentication Login.
If the column is empty, it means that Two-Factor Authentication has not been implemented for the corresponding user and he will only require his username & password to log in. |
Creation |
When the user was created. |
Last Update |
The user's last update date. |
Last Updater |
The name of the user that last updated the user's info. |
Use the check box in the table header (to the left) to select all the users, at the same time.
Available Display/Navigation Options
Regardless of the selected view, the "Site Users" page offers the following options:

![]() Filters the display to users with the selected type (Standard or Support).
Filters the display to users with the selected type (Standard or Support).
![]() Filters the display to users with the selected role ("Site Supervisor", "MDM Manager", "Device Manager", "Operator Manager", "Deployment Manager", "Configuration Manager" or "Custom User".
Filters the display to users with the selected role ("Site Supervisor", "MDM Manager", "Device Manager", "Operator Manager", "Deployment Manager", "Configuration Manager" or "Custom User".
If you do not clear this drop-down (= "<Select>") before leaving the "User Management" page, the next time this page is opened your drop-down selection will still be in place.
Click the intended button to activate the corresponding filter.
![]() Shows users with a "Pending" status.
Shows users with a "Pending" status.
![]() Displays the users that have an "Enabled" status.
Displays the users that have an "Enabled" status.
![]() Displays "Disabled" users.
Displays "Disabled" users.
![]() Shows users that have a "Pending Password Request" status.
Shows users that have a "Pending Password Request" status.
Once the intended button is clicked (= filter is activated), the button changes color: ![]()
![]()
![]()
![]()
You can have one or more filters active at the same time.
To clear a button filter, click it again - it will return to its original color and the display will change accordingly.
To clear all the page's defined filters, at the same time, click the![]() button located to the right of the search box.
button located to the right of the search box.
If filters are not cleared before leaving the "User Management" page, the next time this page is opened they will still be in place.
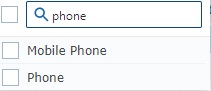
![]()
a. Enter the value you want to search.
The display will change automatically to show a list of users related to the searched value.
b. End the search operation/filtered display by emptying the search box OR by clicking ![]() (button to the right).
(button to the right).
If filters are not cleared before leaving the "User Management" page, the next time this page is accessed they will still apply to the display.
Use this button to export a "*.csv" file with a users list.
![]()
The file will ONLY include the users displayed at the moment of export. If you want to export all the users included in the account, make sure no filters are applied - you can click the ![]()
button to clear all filters at once.
a. Check the displayed user list - you can use filters, if necessary.
b. Click ![]() .
.
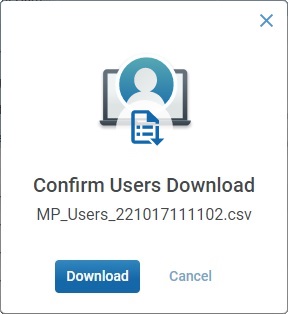
c. Click ![]() to confirm the operation
to confirm the operation
d. The conclusion of the export operation depends on the web browser used. You should be able to save the "*.csv" file in your PC or open it directly after the download.
Use this button to show or hide columns with user information:
a. Click ![]() to access a drop-down with the available columns.
to access a drop-down with the available columns.
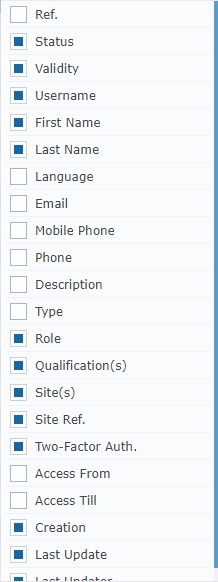
b. Select the column(s) to be shown by checking the corresponding ![]() . Checking the
. Checking the ![]() to the left of the search box, selects all the columns at once.
to the left of the search box, selects all the columns at once.
You can use the search box to look for specific columns. Enter a partial or complete column name into the search box and the list will be limited to that value.
Example:
Any column checking/unchecking is immediately applied to the "User Management" page.
Click it to clear all active filters and search value in the active search box of the "User Management" page. It returns the page to its default full view.
![]() If you do not clear the active filters before leaving the "User Management" page, the next time you return to the page, the filters will still be active - the visible information in the page will be defined by those active filters which could be misleading.
If you do not clear the active filters before leaving the "User Management" page, the next time you return to the page, the filters will still be active - the visible information in the page will be defined by those active filters which could be misleading.
Use this button to refresh the page's information.
This bar provides the following options:
![]() Check this box (to the left of the column names) to select all the displayed users, at the same time.
Check this box (to the left of the column names) to select all the displayed users, at the same time.
Each cell with the column name includes buttons to help you organize the listed items in the corresponding column. Mouse over the cell with the intended column name to access them.
Example:
![]()
![]() Click this button to organize the listed items by ascending/descending order (ex: A to Z/Z to A). You must hover the column's name to make it visible.
Click this button to organize the listed items by ascending/descending order (ex: A to Z/Z to A). You must hover the column's name to make it visible.
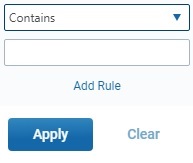
![]() Use this button to filter the column info based on specific rules/conditions. The available conditions are adapted to the info the column is meant to provide.
Use this button to filter the column info based on specific rules/conditions. The available conditions are adapted to the info the column is meant to provide.
The example below allows you to define rules for the filtering of the "Last Name" column:
a. Click ![]() to access the Rules window.
to access the Rules window.
b. Select the desired condition from the drop-down (ex: "Starts with") and fill in the field with the string to be searched (ex: "John").
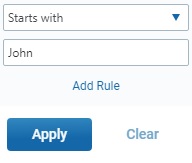
c. Click ![]() to apply and get a filtered view OR select
to apply and get a filtered view OR select ![]() to add a second rule (= condition + search string).
to add a second rule (= condition + search string).
d. Select a condition in the second drop-down, fill in another search string and, then, click ![]() .
.
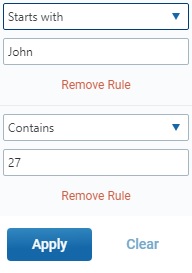
![]() Make sure the defined rules do NOT conflict with each other because it could lead to an empty view.
Make sure the defined rules do NOT conflict with each other because it could lead to an empty view.
If required, click ![]() to clear the corresponding rule from the Rules window (this button is only active once you click
to clear the corresponding rule from the Rules window (this button is only active once you click ![]() )
)
You can use the ![]() button to clear the defined rules OR the
button to clear the defined rules OR the ![]() button (to the right of the search box) which will remove all the filters defined for the page.
button (to the right of the search box) which will remove all the filters defined for the page.
If the defined rules are not cleared before leaving the "User Management" page, the next time this page is accessed, they will still apply to the display.
Available Operations
The "User Management" page also provides direct access to specific operations concerning site users.
There are shortcut icons in the page's header that become available according to the current context, meaning, depending on user selection.
To add a site user, use the ![]() button. It is always available. For more information, see Adding a Site User.
button. It is always available. For more information, see Adding a Site User.
To edit a user, click ![]() . This option is ONLY available after one user is selected. See Editing a Site User.
. This option is ONLY available after one user is selected. See Editing a Site User.
To delete a site user, use the ![]() button. This option is ONLY available after one or more users are selected. For more information, see Deleting a Site User.
button. This option is ONLY available after one or more users are selected. For more information, see Deleting a Site User.
To enable/disable the selected user's current status, click ![]() and proceed as described in To Enable/Disable a Site User in the "User Management" Page. This option is ONLY available after one or more users with the same status are selected.
and proceed as described in To Enable/Disable a Site User in the "User Management" Page. This option is ONLY available after one or more users with the same status are selected.
This chapter includes all the aspects associated to site users (the adding, editing and deleting of site users).
Topic/Operation |
Description |
|---|---|
View a site user's details (ex: personal details, access rights, etc.). |
|
Create the necessary site users and define their access rights. |
|
Modify a site user's details (ex: personal details, access rights, etc.) as well as his status ("Enabled"/"Disabled"). |
|
Delete a site user. |