|
Working with the Remote Database Processes Group |
  
|
Working with the Remote Database Processes Group
|
Working with the Remote Database Processes Group |
|
Process Purpose
The Remote Database group of processes enables the device to directly exchange data with an SQL database on the host server. Most used SQL transactions can be defined with dedicated processes for SELECT, UPDATE, INSERT and DELETE records. It is also possible to define a free SQL statement that allows you to call stored procedures, functions, complex chained SELECTs, etc.
MCL-Designer V4 establishes a direct connection to the database and extracts the table's metadata. This allows you to easily build the transactions by mapping the table fields to the variables.
To have the device connecting to the database, MCL-Net + ODBC Bridge are required in the host server.
![]()
There are four recurring icons which appear in these processes:
![]() Click this icon to create a new data file. Go to Creating a Data File to see how to fill in the several options available.
Click this icon to create a new data file. Go to Creating a Data File to see how to fill in the several options available.
![]() Click this icon to view the content of selected database table. See To View the Content of a Table.
Click this icon to view the content of selected database table. See To View the Content of a Table.
![]() This icon is used to setup a timeout. It is located on the upper right corner of the process properties window. See How to Define a Time Out.
This icon is used to setup a timeout. It is located on the upper right corner of the process properties window. See How to Define a Time Out.
![]() Click it to test SQL Scripts. See To Test SQL Scripts below.
Click it to test SQL Scripts. See To Test SQL Scripts below.
![]()
The <Default> host profile option that is available in Host Services processes refers to the server's address defined in MCL-Mobility Platform (set in the Server sub-module and associated to a Device Group within your MCL- Mobility Platform site).
Refer to the MCL-Mobility Platform User Guide for more details.
To Test SQL Scripts
Depending on the process, after defining all the specific settings, click ![]() . This opens a message box:
. This opens a message box:
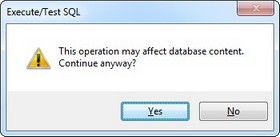
Select ![]() to proceed. This message appears because the process used affects the database (updates, inserts or deletes data).
to proceed. This message appears because the process used affects the database (updates, inserts or deletes data).
Depending on the tested SQL commands, the next window will display the results (ex: Insert Records).
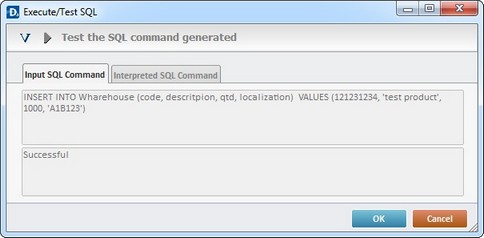
Clicking ![]() opens a new window where you can insert direct values in the “Template” fields. These values are sent, directly, to the selected tables in the data source.
opens a new window where you can insert direct values in the “Template” fields. These values are sent, directly, to the selected tables in the data source.
By clicking ![]() ,you can execute the defined SQL command.
,you can execute the defined SQL command.
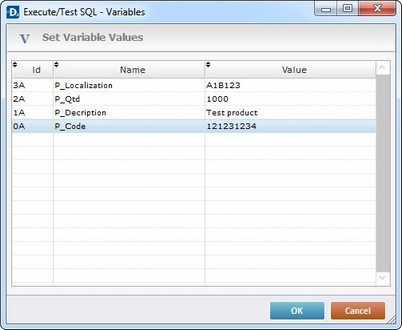
Ex: “ppp”; “pppp”; “pipiii”; “iiii” and “kkkk” where directly keyed into the “Template” fields.
Click ![]() to conclude the insertion of values. Since the process used affects the database, there is another message box:
to conclude the insertion of values. Since the process used affects the database, there is another message box:
Click ![]() to conclude the testing or
to conclude the testing or ![]() to cancel the operation.
to cancel the operation.
Ex:This is a view of both tabs when testing the "Remote Database Insert Record" process:

To View the Content of a Table
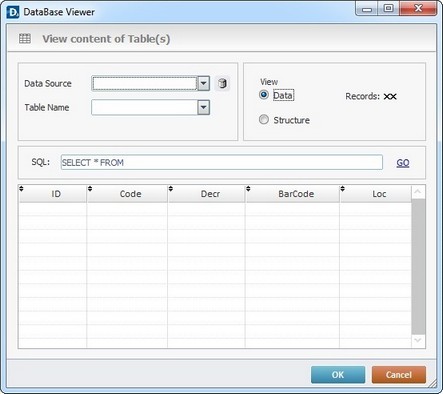
Clicking ![]() provides access to the content of existing database tables. (The “No Source” message is displayed prior to the selection of a database.)
provides access to the content of existing database tables. (The “No Source” message is displayed prior to the selection of a database.)
Proceed as follows:
View content of Table(s) |
|
Data Source |
Select the source Database (ex: Inventory). |
Table Name |
Select the table from the selected database (ex:Warehouses). |
View |
Check “Data” to view the contents of the selected table. See Detail of Data View below. |
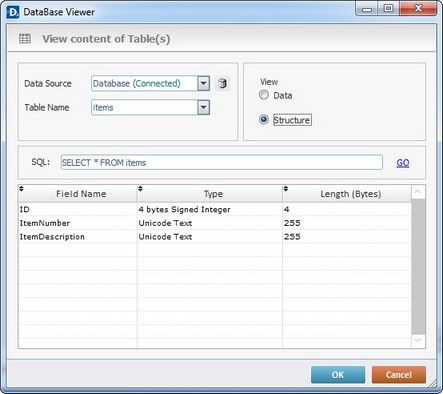
Check “Structure” to view the structure of the selected table. See Detail of Structure View below. |
|
SQL: |
Displays the SQL script for the selected table (ex: SELECT * FROM Warehouses). |
Detail of Data View
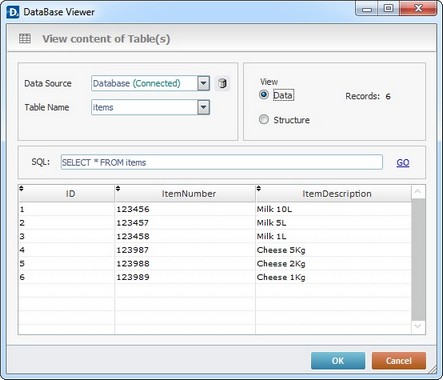
Ex: "Inventory" database with 3 Tables (Items, Locations and Warehouses.
Detail of Structure View
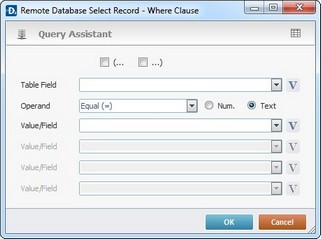
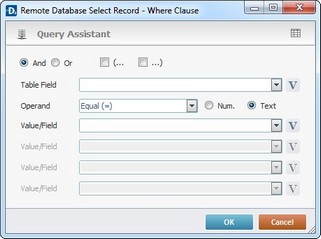
Use the Query Assistant to define a query in a data source table based on "where conditions".
The "Query" tab is present in most of the Remote Database processes.
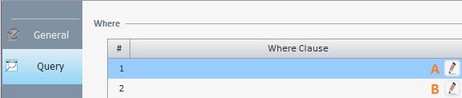
Double-click the required row or click the corresponding ![]() .
.
The content of the resulting window (Query Assistant)depends on the row selected in the "Where Clause" table (the first row (A) or any of the other rows (B)).
If the Query Assistant is called from A |
If the Query Assistant is called from B |
||
|
|
||
|
If needed,check the most adequate parenthesis for your Where clause. |
And Or
|
Check “And” or “Or” and, if needed, the most adequate parenthesis according to your Where clause. |
Table Field |
Select the table field from the drop-down list or click |
Table Field |
Select the table field from the drop-down list or click |
Operand |
Select a comparison operand from the drop-down list. |
Operand |
Select a comparison operand from the drop-down list. |
Num. |
Check this option if the Where clause requires numeric values. |
Num. |
Check this option if the Where clause requires numeric values. |
Text |
Check this option if the Where clause requires text values. |
Text |
Check this option if the Where clause requires numeric values. |
Value/Field |
Click |
Value/ Field |
Click |
Value/Field ... |
Click Its activation depends on the defined “Operand”. |
Value/Field ... |
Click Its activation depends on the defined “Operand”. |
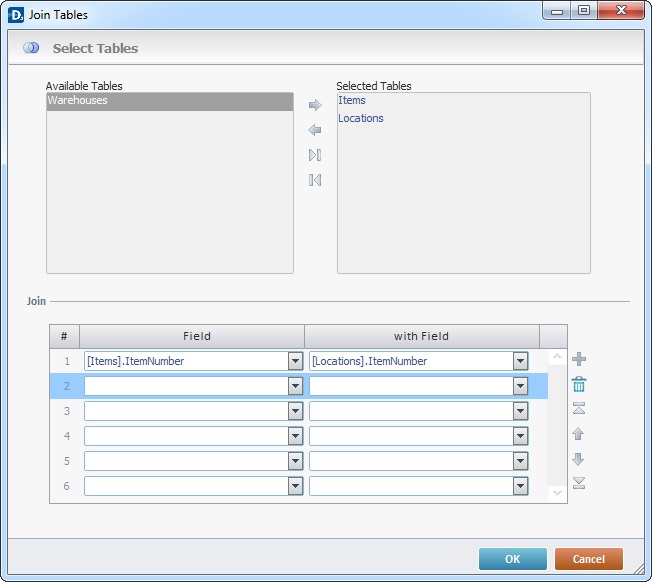
If required, when a source database has more than one table, you can join the fields of the tables to create a joined select statement.
Click ![]() to open the “Select Tables” window, wherever it is available.
to open the “Select Tables” window, wherever it is available.
Ex: The remote database includes 3 tables called "Locations", "Warehouses"and “Items”.
The selected tables to be joined are "Locations"and “Items”.
The data from the "ItemNumber" field of the "Items" table will be joined with the data of the "ItemNumber" field of the "Locations" table".
Proceed as follows:
Select Tables |
|
Available Table(s) |
This box displays the available tables to be joined. The required ones must be moved to the box to the right ("Selected Table"). Use the editing icons |
Selected Table(s) |
This box displays the tables to be used in the “Join Tables” action. Use the editing icons |
Array (table) |
|
Field column |
Select the field to be joined from one table. |
with Field column |
Select the field to be joined from the other table. |
Use the editing icons to the right of the table to move the rows up and down and to delete or add more rows.
After filling in the required options, click ![]() to conclude and go to the "General" tab or click
to conclude and go to the "General" tab or click ![]() to abort the operation.
to abort the operation.
![]() When using an external data source, MCL-Designer V4 creates a cache file which is updated every five minutes. If, for example, you define a data source that is likely to be edited outside the MCL-Designer V4 context in your project, take the 5 minute update period into account.
When using an external data source, MCL-Designer V4 creates a cache file which is updated every five minutes. If, for example, you define a data source that is likely to be edited outside the MCL-Designer V4 context in your project, take the 5 minute update period into account.
The Remote Database group includes the following processes:
----- Basic SQL |
----- SQL on file |
----- Advanced SQL |