|
Scheduling a Deployment |
  
|
Scheduling a Deployment
|
Scheduling a Deployment |
|
Overview
When creating a deployment (see Creating a Deployment), you can schedule it "As soon as possible" or for a specific date and time.
When there are several deployments targeting the same device group, only the last deployment to become "Active" will be delivered to the target device group.
![]()
We recommend a regular check of the completed deployments for archiving purposes. Deployments stay active after completion and require manual archiving.
Since you can plan a deployment in other contexts, not just in the "Deployments" sub-module, the following presents all the possibilities in creating/scheduling a deployment:
a. In the "Deployment Plans" page, click ![]() to create/schedule a new deployment. For more information, see Creating a Deployment.
to create/schedule a new deployment. For more information, see Creating a Deployment.
b. In the "Configurations" page, select the intended configuration and click ![]() . For more information, see Deploying a Configuration.
. For more information, see Deploying a Configuration.
c. In the "Device Groups" page, use the ![]() button. For more information, see Planning a Deployment for a Device Group.
button. For more information, see Planning a Deployment for a Device Group.
It is also possible to reschedule a "planned" deployment:
d. In the "Deployment Plans" page, click the name of a deployment (displayed in light blue), created in the current site, with a "Planned" or "Active" status (deployments created at account level CANNOT be edited within the target site). Ongoing and/or complete deployments CANNOT be edited.
For more information, see Editing a Deployment.
Depending on the chosen option (a., b., c. or d.), you may open a New Deployment Plan wizard or the selected deployment's details page. Either way, once you have selected the configuration and the device group, you must also define the date/time for the deployment. This is done in the "Mode" tab - "Planning Date" option:
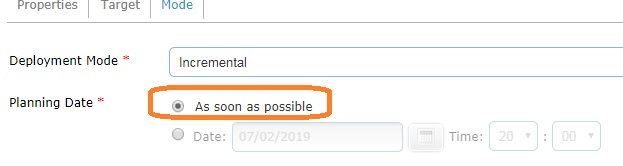
•If you check the "As soon as possible" option, the deployment will start as soon as one of the devices, included in the target device group, meets the deployment profile's criteria/default device criteria (device with an open MCL App Desktop OR MCL application idle for, at least, 1 minute) and contacts the account.
If you have more than one deployment with the "as soon as possible" time frame, the deployment delivery will follow the creation sequence - the one created first is deployed first and so on.
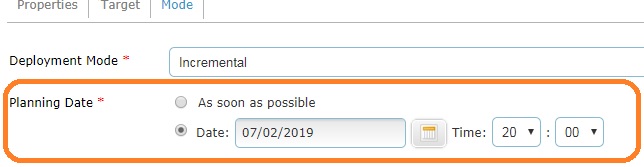
•If you check the "Date" option, the calendar button ![]() and the "Time" drop-down options become available to allow you to define a specific date/time for the deployment.
and the "Time" drop-down options become available to allow you to define a specific date/time for the deployment.
Step-by-step
1. Enter the desired date (DD/MM/YYY) in the box OR click ![]() to display a pop-up calendar.
to display a pop-up calendar.
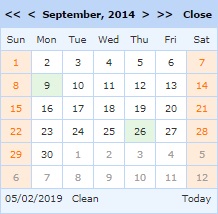
The current day is highlighted in orange.
Use the "<" and ">" buttons to navigate the months in the current year.
Use the "<<" and ">>" buttons to navigate the years.
Click ![]() to clear any entered date.
to clear any entered date.
Click ![]() to close the calendar pop-up. If you click outside the calendar area, it will also close it.
to close the calendar pop-up. If you click outside the calendar area, it will also close it.
2. Select the intended day for the deployment.
If you want to deploy on the day you are scheduling the deployment, click ![]() .
.
![]()
3. Use the drop-down in the "Time" field to define an hour for the deployment. Select the desired hour and minute(s) in the corresponding drop-down.
![]()
4. Click the "Confirm" option to apply your scheduling change.