|
Adding a Dashboard |
  
|
Adding a Dashboard
|
Adding a Dashboard |
|
Overview
Dashboards can be added at site level.
You can add a dashboard and build it from scratch (see To Add a Dashboard below) or select an existing dashboard and duplicate it (see To Duplicate a Dashboard).
Add a Dashboard
Step-by-step
1. To open the "Dashboard Management" page, click  in the Site Dashboard's "Control Panel" and, then, select
 ![]() in the resulting row.
in the resulting row.
2. Select the ![]() button to open the new dashboard's details page set, directly, to edit mode.
button to open the new dashboard's details page set, directly, to edit mode.
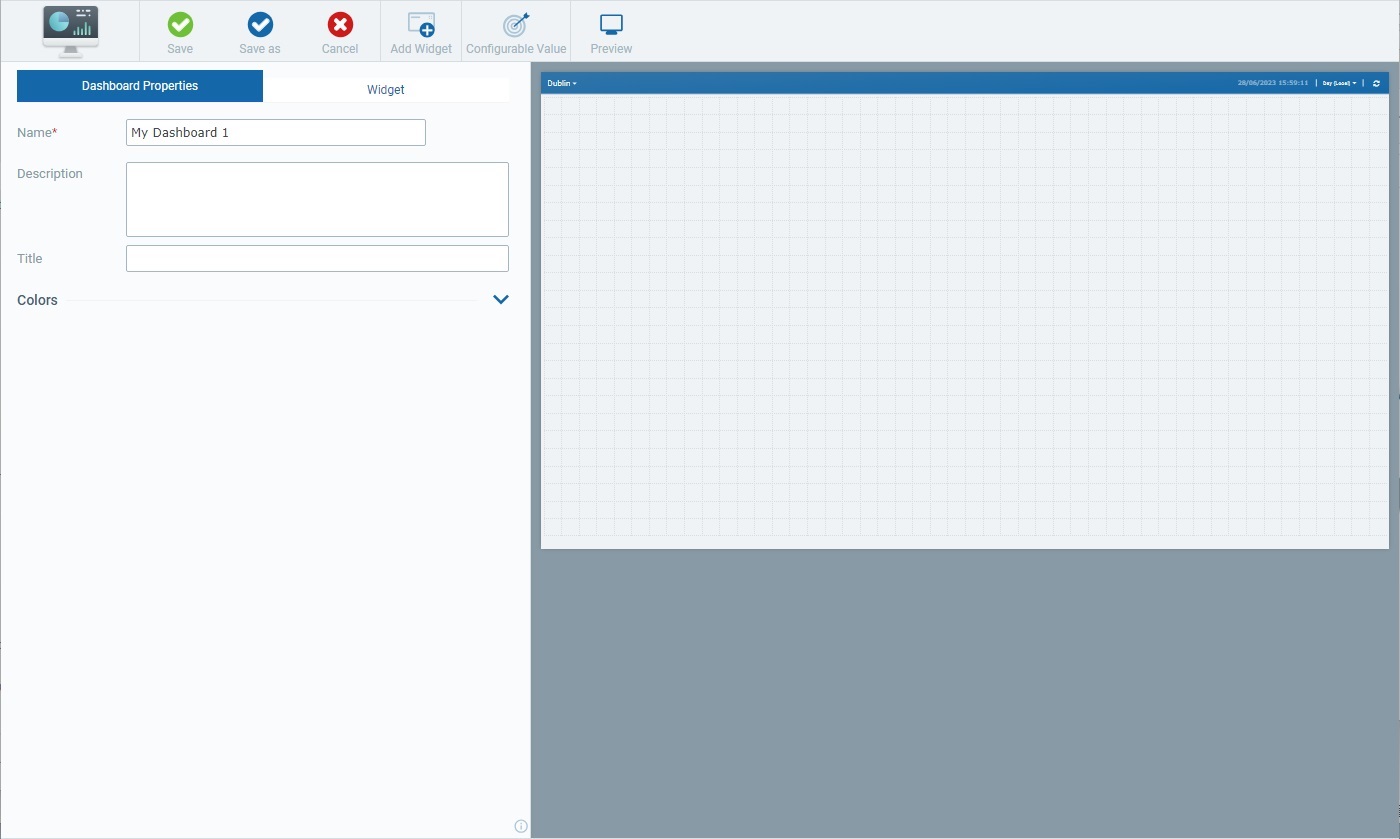
3. In the "Dashboard Properties" tab (to the left of the page), fill in the available fields. The fields marked with an asterisk (*) are mandatory.
Name * |
Enter a name for the new dashboard - this will identify the dashboard within the site but It will NOT be visible in the dashboard itself (meaning, when the dashboard in Live Mode). There is a default suggestion ("My Dashboard #") but we recommend a dashboard name that provides some context to the displayed widgets. |
Description |
If required, enter relevant information on the current dashboard. |
Title |
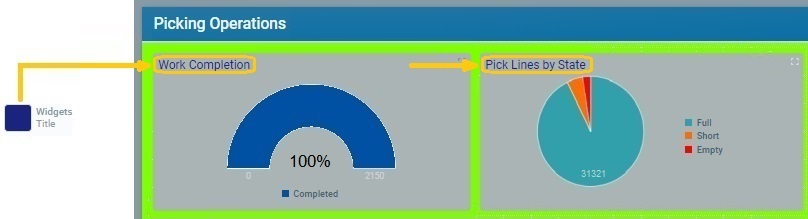
Define a title for the new dashboard to be viewed when the dashboard is set to Live Mode. This title will be displayed in the dashboard's upper left corner so enter a title that relates to the purpose/values you want to display. |
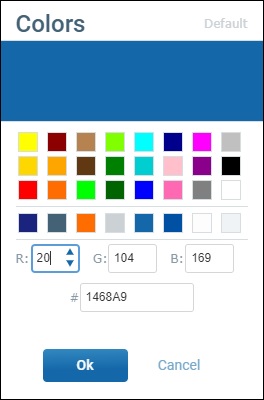
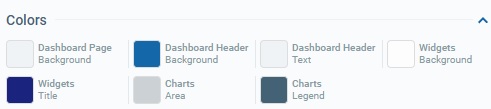
4. If needed, click the accordion attached to the "Colors" section to access its options. You can define the colors of several dashboard and widget elements by clicking each option's box to open the corresponding "Colors" pop-up window.
|
You can keep the default color or customize the corresponding element's color.
To define a different color, select a color from the color palette OR enter the RGB color codes OR Hex color code of the intended color.
If you want to revert back to the default color, click
To apply your color choice, click |
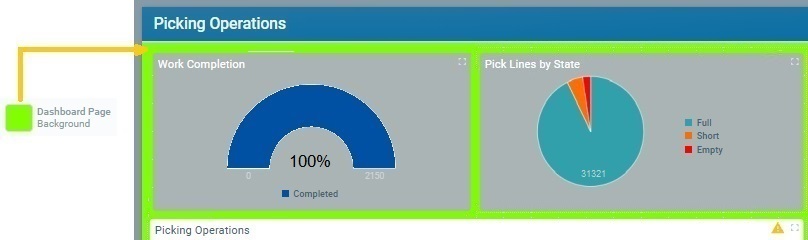
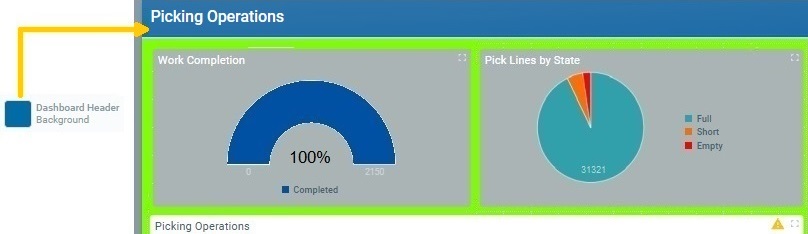
Examples for the Dashboard related colors:
Dashboard Page Background |
|
Dashboard Header Background |
|
Dashboard Header Text |
|
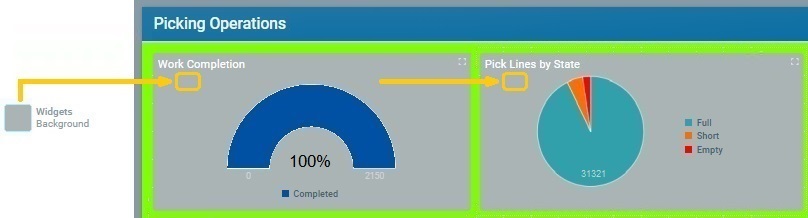
Examples for the Widget related colors:
Widget Background |
|
Widget Title |
|
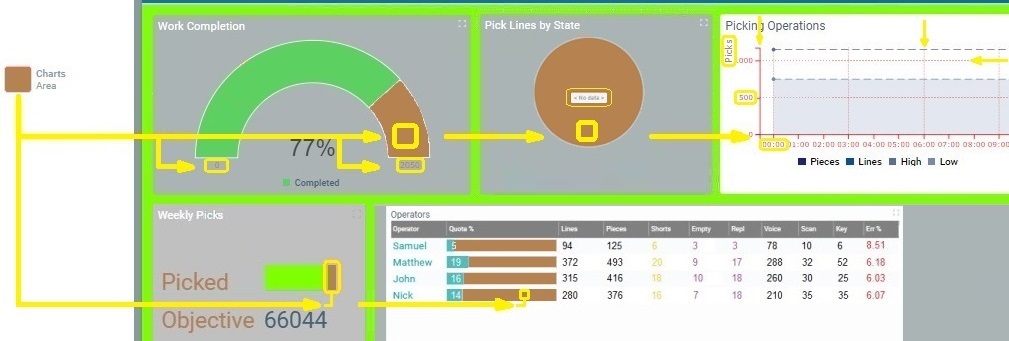
Charts Area |
|
Charts Legend |
|
![]()
The colors defined here for widget elements are considered the "default" colors, at widget level. They are inherited by all the dashboard's widgets.
![]()
Instead of maintaining the default colors defined here, it is possible to customize the color of certain widget elements within a widget's own "Properties"/"Data"tabs. See Details on the Widget "Colors" pop-up window.
5. Click the ![]() button to add widgets to the Preview Section (to the right of the page). See To Add a Widget to a Dashboard.
button to add widgets to the Preview Section (to the right of the page). See To Add a Widget to a Dashboard.
6. Click ![]() to save the new dashboard.
to save the new dashboard.
![]() As an alternative, use the
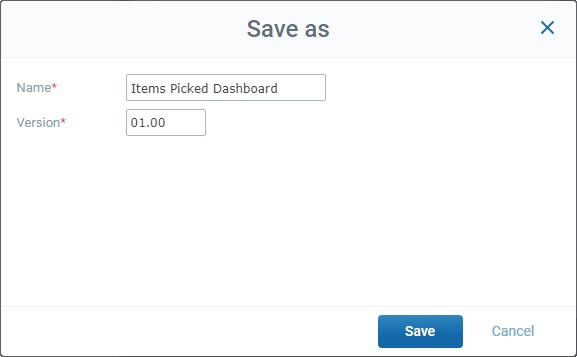
As an alternative, use the ![]() option to save the new dashboard. This option allows you to define a different name and control the dashboard's version, instead of relying on the incremented version that is, automatically, attributed by the system when you create a dashboard. See "Save As" Option.
option to save the new dashboard. This option allows you to define a different name and control the dashboard's version, instead of relying on the incremented version that is, automatically, attributed by the system when you create a dashboard. See "Save As" Option.
![]()
If required, use ![]() to abort the operation. Click that option and, then, confirm the cancellation.
to abort the operation. Click that option and, then, confirm the cancellation.
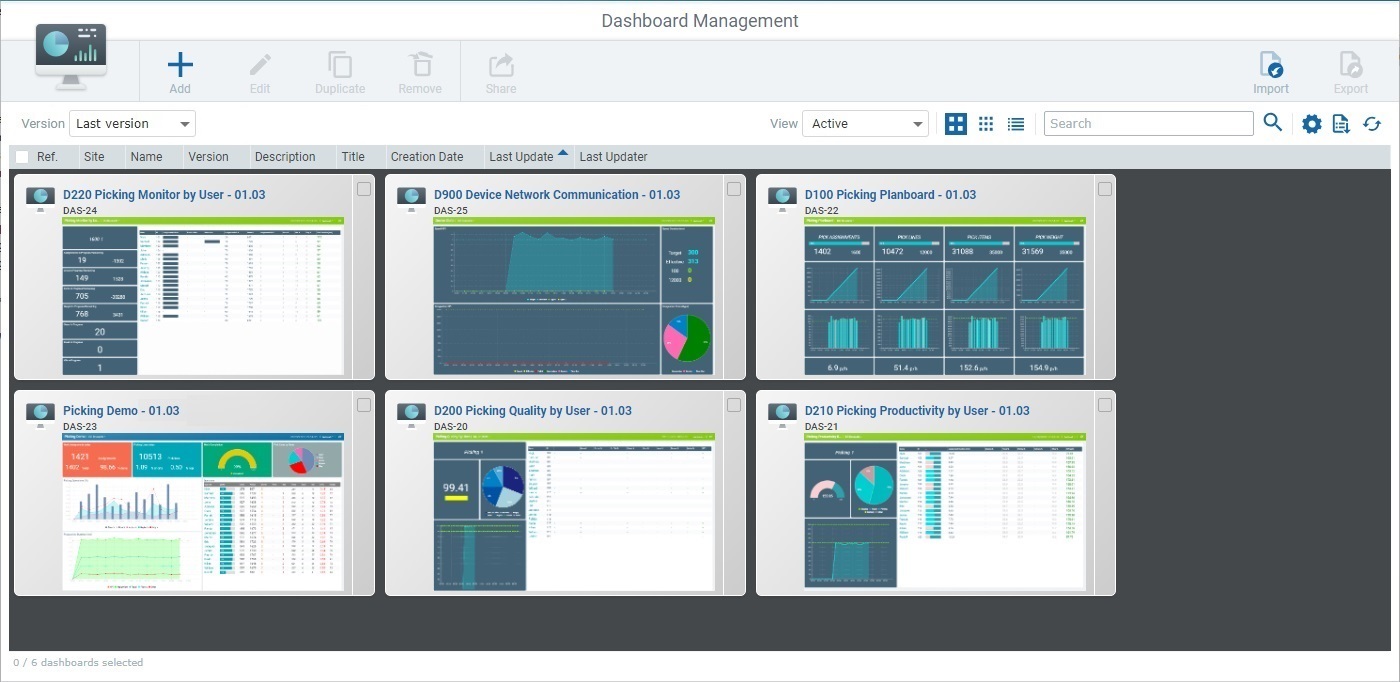
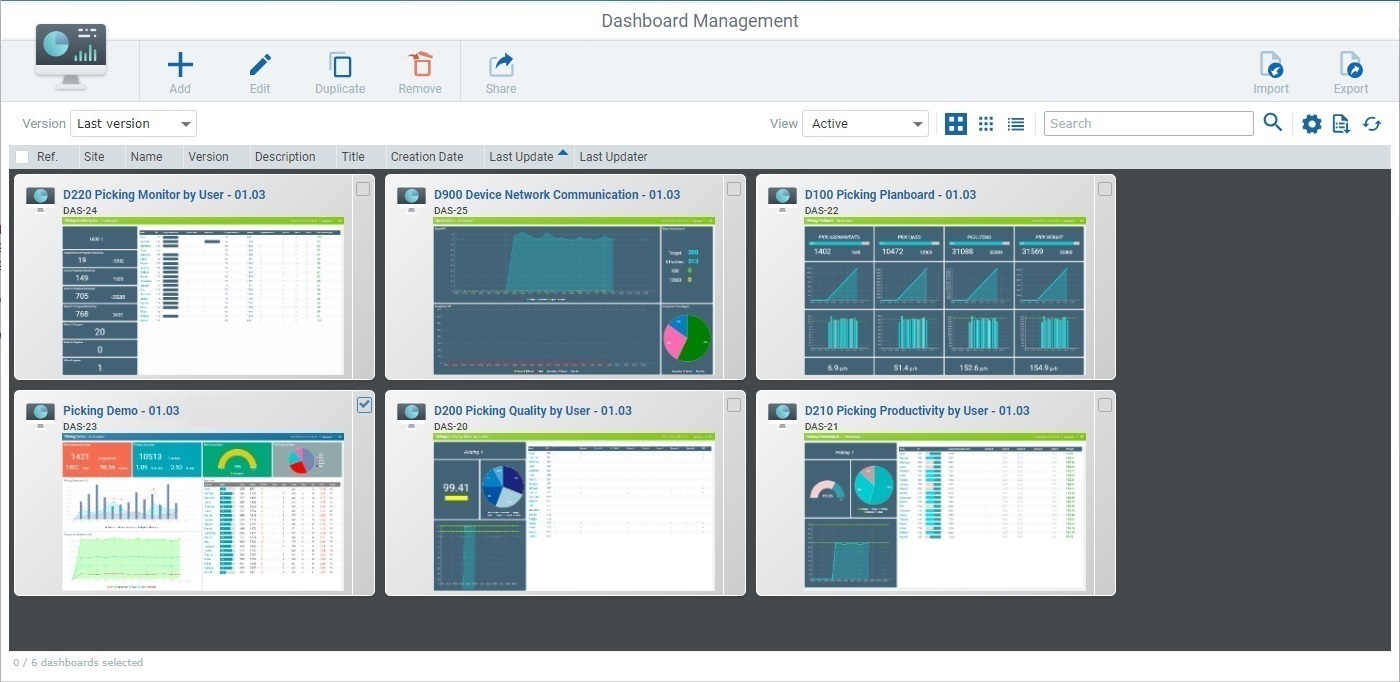
Once the dashboard is saved, the flow is redirected to the "Dashboard Management" page, where the new dashboard is already available.
Step-by-step
1. Click ![]() (in the "Control Panel"), and, then, the
(in the "Control Panel"), and, then, the ![]() sub-module to open the "Dashboard Management" page.
sub-module to open the "Dashboard Management" page.
2. Check the ![]() of the dashboard you want to duplicate.
of the dashboard you want to duplicate.
3. Click the ![]() button (which ONLY becomes available if you select ONE dashboard).
button (which ONLY becomes available if you select ONE dashboard).
This opens a details page for the duplicate dashboard, directly set to edit mode.
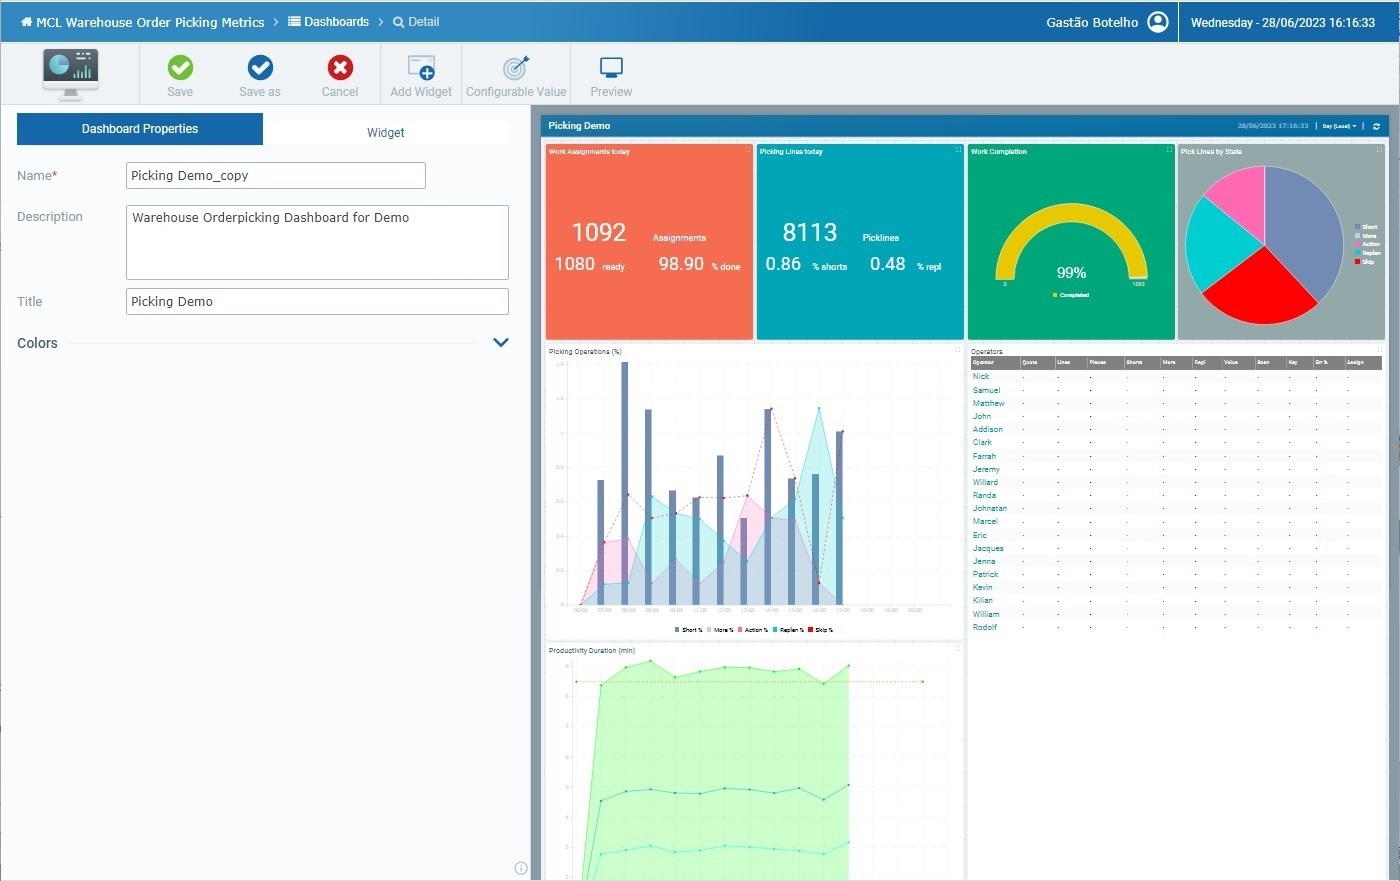
This details page already provides the following:
•The "Name" field is filled in - there is a name suggestion based on the duplicated dashboard's name plus "_copy".
We recommend you rename the copy according to the context/data it is supposed to display.
•If the original dashboard had information in the "Description" field, it will also be available here. Either keep the original information, remove it or add content related to the duplicate.
•The "Title" is the same as the original dashboard's title. For organizational reasons, we recommend you adopt a different title.
•The original dashboard's widgets are also duplicated. You can edit, remove or replace them, as needed. See Adding, Editing and Deleting a Widget.
4. Once you are done with your edition of the dashboard duplicate, click ![]() OR
OR ![]() to apply. See The Dashboard's Save Feature.
to apply. See The Dashboard's Save Feature.
If instead, you want to abort the duplicate operation, click ![]() and, then,
and, then, ![]() to confirm.
to confirm.

The duplicate is displayed alongside the original dashboard/any other existing dashboards in the "Dashboard Management" page.
Available Operations
The details page of a new dashboard is always, automatically, set to edit mode and it provides direct access to the following specific operations:

To save the newly added/duplicate dashboard, click ![]() .
.
To save the newly added/duplicate dashboard with a non-default version/a different name, use the ![]() option. See Using the "Save as" Option below.
option. See Using the "Save as" Option below.
a. Click
b. Edit the "Name" and/or the"Version" field, as required. These fields are mandatory so they MUST have content to proceed with the save operation.
I. If required, click the "Name" field and enter another name for the dashboard;
II. If necessary, click the "Version" field and use the activated
c. Click
|
To delete the new/unsaved dashboard,click ![]() and, then, confirm the deletion by clicking
and, then, confirm the deletion by clicking ![]() .
.
To add widgets to the dashboard, use the ![]() option. See Adding, Editing and Deleting a Widget.
option. See Adding, Editing and Deleting a Widget.
To create "configurable values" to be used in the current dashboard (ex: as a widget's data source or within a widget's formula), click  and proceed as described in How to Create a Configurable Value.
To access a preview of the current dashboard in Live Mode, click ![]() . See Dashboard in "Live Mode".
. See Dashboard in "Live Mode".