|
Creating a Configuration |
  
|
Creating a Configuration
|
Creating a Configuration |
|
Overview
Account Configurations are containers with specific software elements (applications, MCL-software, files) directed, or not, to specific devices which are grouped according to manufacturer, model and/or OS (Device Groups).
A configuration that is created in a particular site is restricted to that site but a configuration created, at account level, can be shared with all qualification compatible sites.
The creation of a configuration is divided into 4 main steps/tabs - "Properties"; "Firmwares"; "Applications" and "Others". Depending on the configuration's objective, it may NOT be necessary to fill in all the steps/tabs.
Ex: If you just want to install firmware into your device(s), you can skip the "Applications" and Others" steps/tabs and just fill in the "Properties" and "Firmwares" steps/tabs OR When delivering an application to a device, the corresponding configuration requires you to fill in the "Properties" and "Applications" tabs.
Check our Configuration Examples below.
Step-by-step
1. In the Admin Dashboard's "Control Panel", click  , and, in the resulting row, select
  to view the list of configurations created within the account.

![]() It is recommended that the
It is recommended that the ![]() option is checked. This ensures the viewing of all existing versions for each configuration instead of just the latest configuration version prior to adding a new configuration.
option is checked. This ensures the viewing of all existing versions for each configuration instead of just the latest configuration version prior to adding a new configuration.
2. Click ![]() to open the "New Configuration step 1 (Properties tab)" wizard page.
to open the "New Configuration step 1 (Properties tab)" wizard page.
Regardless of the configuration's purpose, this step/tab CANNOT be skipped.
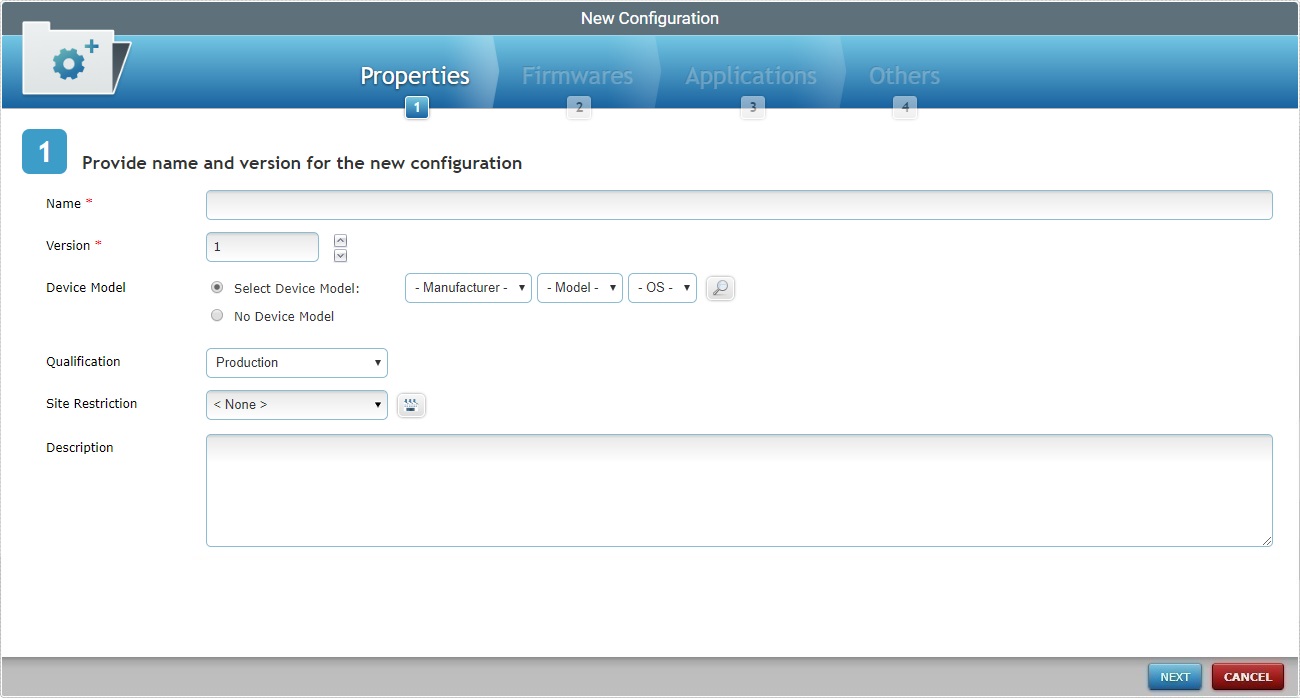
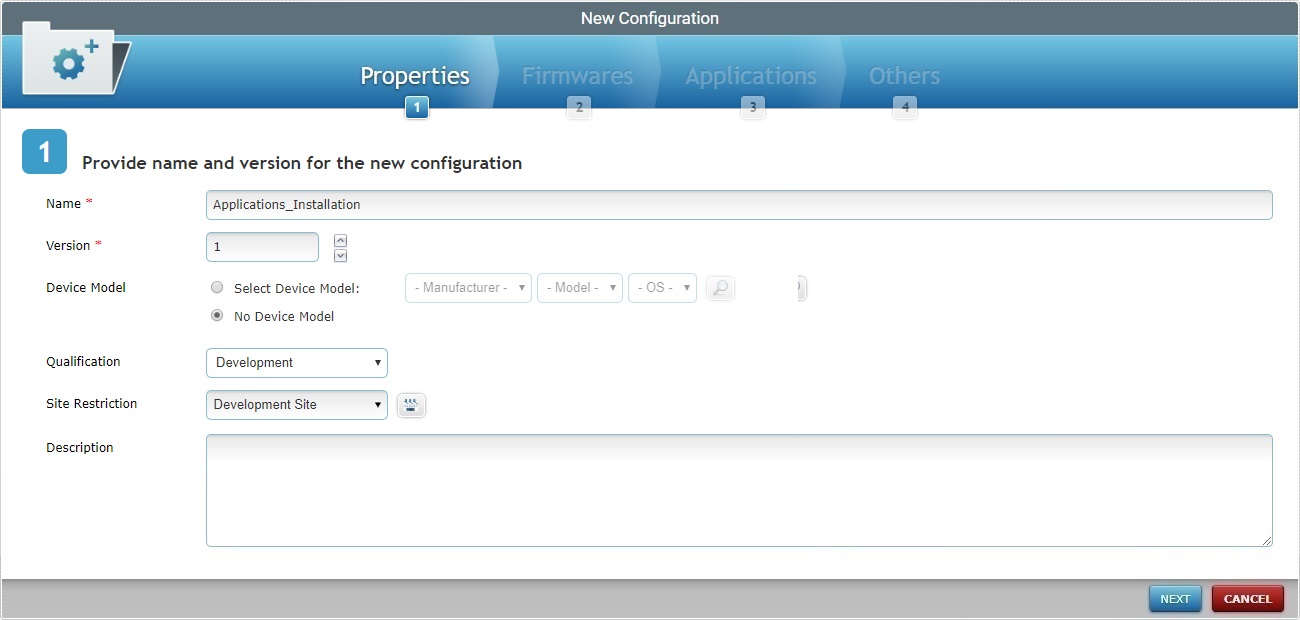
3. Fill in the information for the new configuration (the fields marked with an asterisk are mandatory):
Name * |
Enter the name for the new configuration.
•Use alphabetic/numeric characters (a-z; A-Z; 0-9) •Underscore character is allowed •Always start the entity's name with an alphabetic character |
Version * |
Define the configuration's version. |
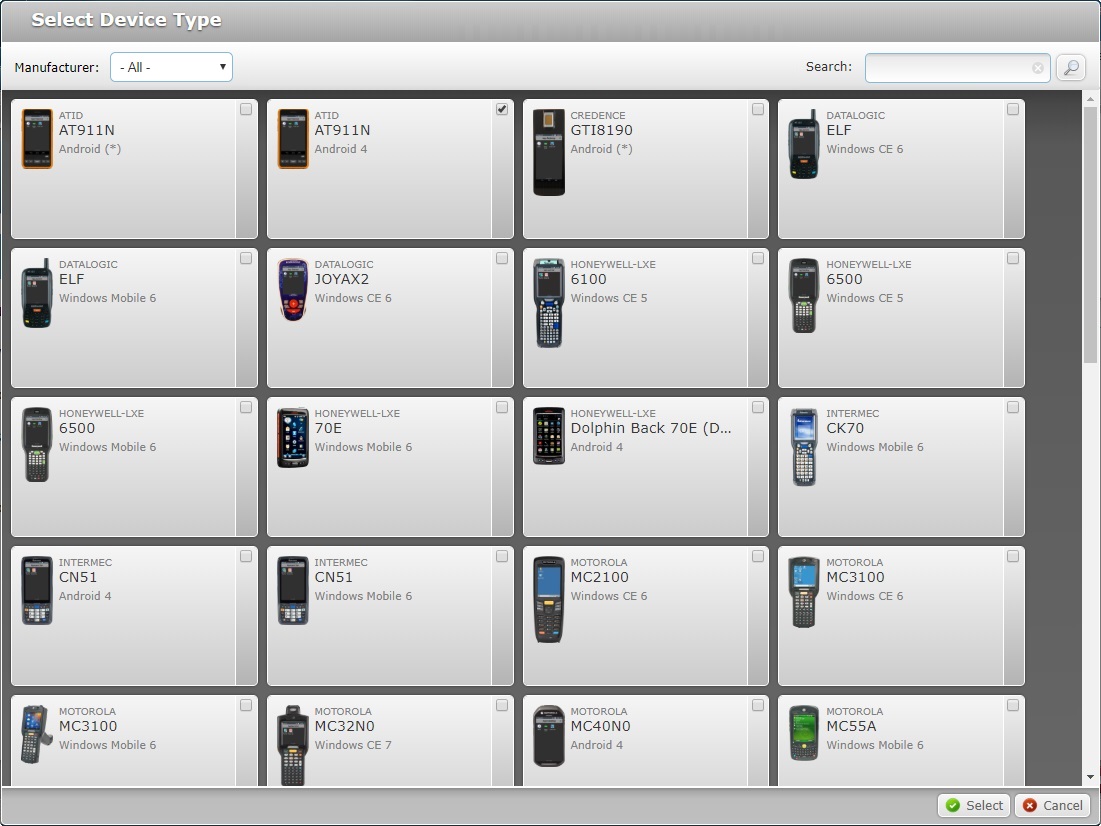
Device Model |
Check "Select Device Manufacturer" to define the manufacturer, the model and OS of the configuration's target device from the corresponding drop-downs. As an alternative, click
The Samsung manufacturer provides a "Generic Device Android" option - this generic "device model" is compatible with all Samsung Android devices. This means you can create a device group for "Generic Device Android" devices (it can contain different Samsung models) and deploy configurations to it. In this case, the configuration's target MUST be "Samsung Generic Device Android". It will NOT be available for other device groups with a specific Samsung device model, it can ONLY be deployed for this device group.
If required, the MCL-Mobility Platform provides a "Generic Android" software. This software should ONLY be used if there is NO specific MCL-Agent V4 software available for your Android devices because it has some limitations compared to the specific MCL firmware. Choosing "[Others]" + "Generic" + "Android" in the corresponding drop-down means that the configuration can ONLY be deployed to a device group with a "Generic Android" target device
Check "No Device Model" if no target device is to be specified (ex: Useful, if you intend to deploy the configuration to all the device groups of a site regardless of device type). |
Qualification |
Select the configuration's qualification from the drop-down - "Production", "Acceptance", "Test" or "Development". See Qualification . |
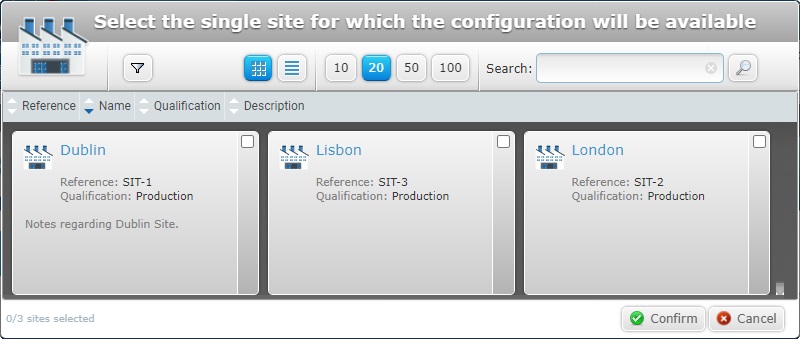
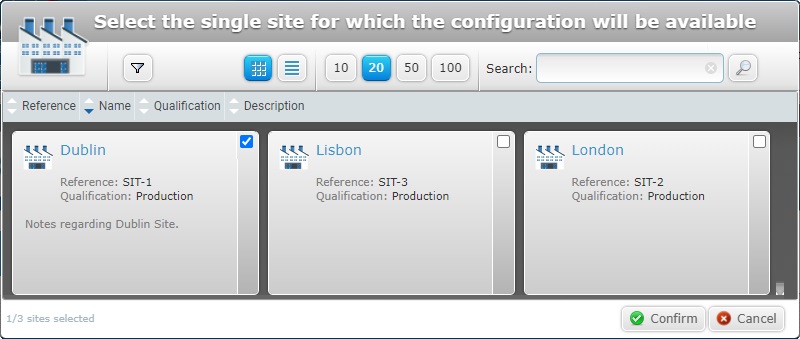
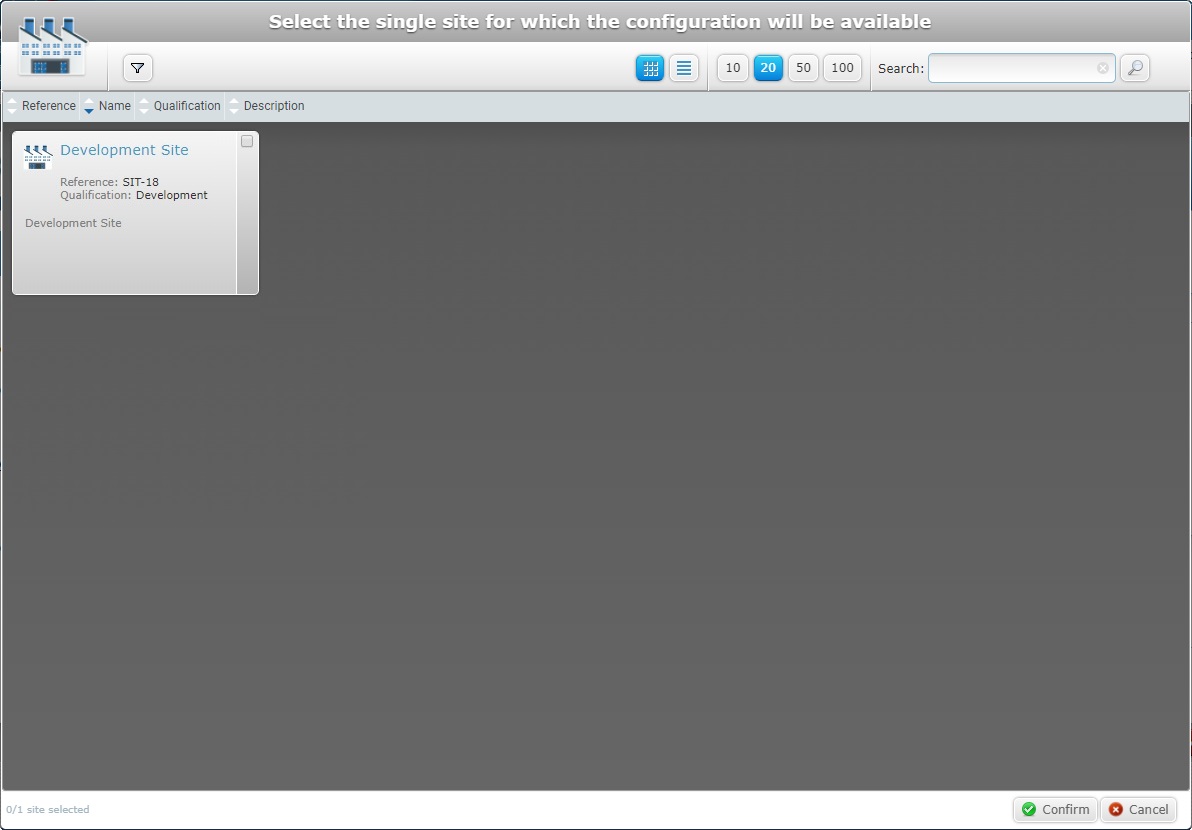
Site Restriction |
If the configuration is to be used only in a specific site, select the intended site from the drop-down or by clicking |
Description |
If relevant, add notes regarding the new configuration. |
a. Clicking
b. Select the intended device type by checking the corresponding
c. Click
Use the following options to control the display of listed items:
•
I. Enter what you want to search for. II. Click III. End the search operation by emptying the search box and clicking
•
|
![]() Click Here for Details on the "Single Site Selection" window
Click Here for Details on the "Single Site Selection" window
Sites are displayed according to the "Qualification" selected in the configuration's "Qualification" field.
a. Click v
b. Select the desired site by checking the corresponding
c. Click
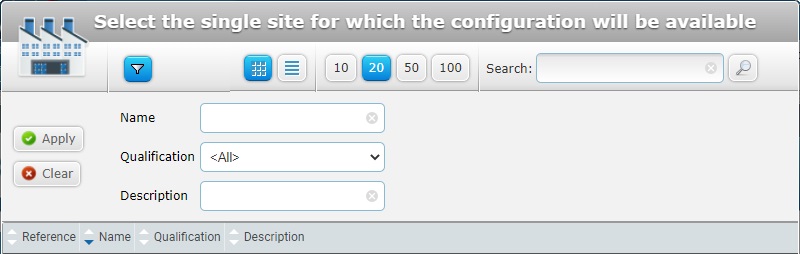
Use the following options to control the display of listed items:
•Select the most appropriate view by either clicking •Define how many items are displayed, at a time, by clicking one of the buttons • Use
•
I. Enter what you want to search for. II. Click III. End the search operation by emptying the search box and clicking
• ▪ ▪
|
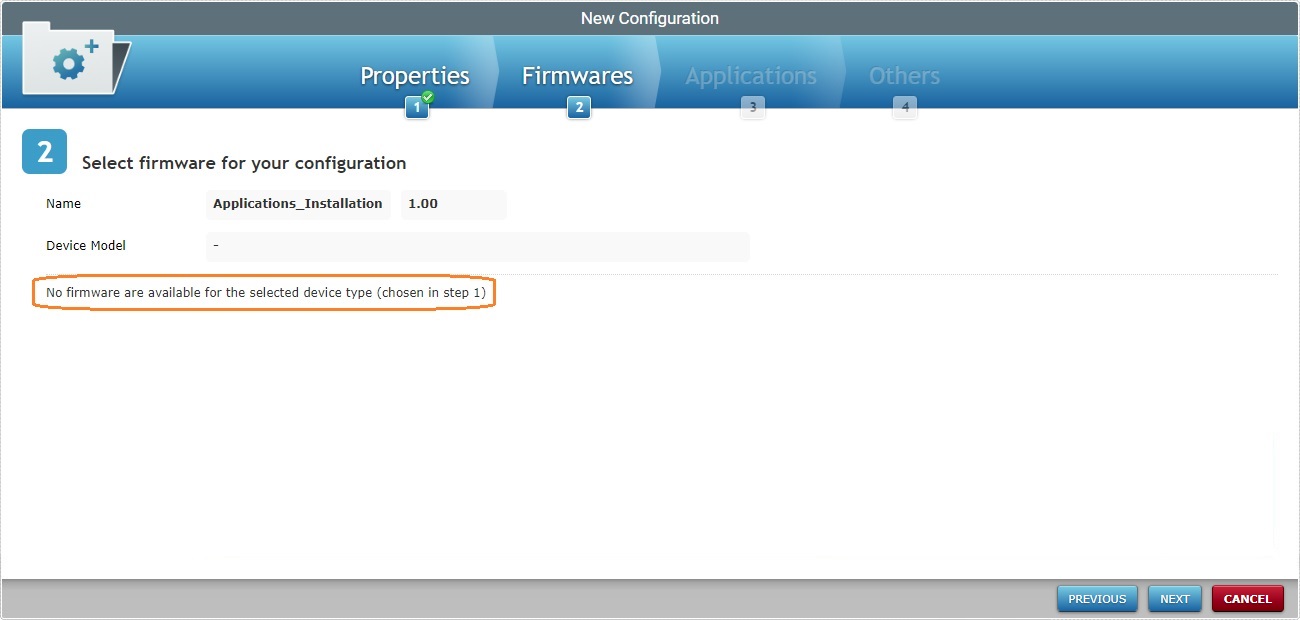
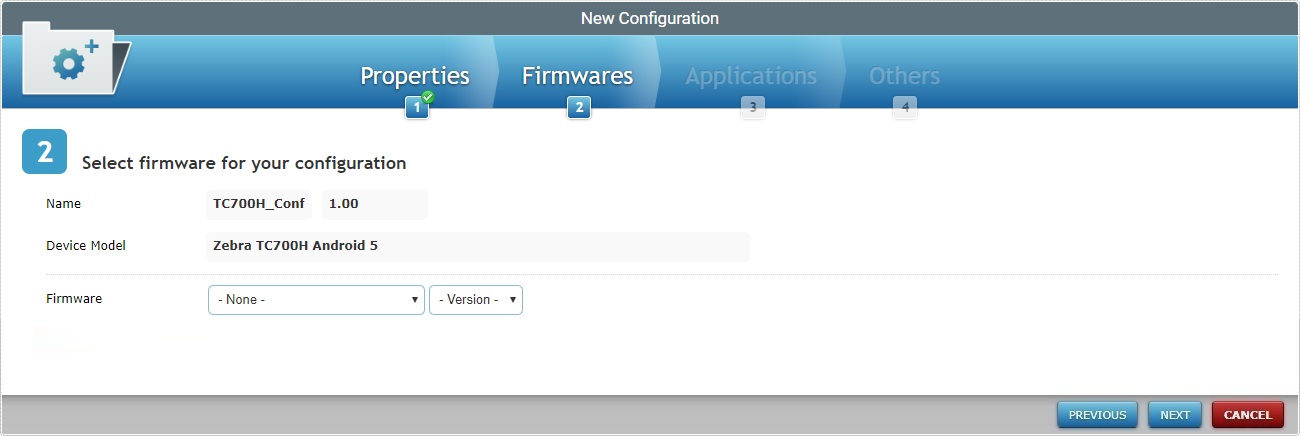
4. Click ![]() to proceed to the "New Configuration step 2 (Firmwares tab)" wizard page.
to proceed to the "New Configuration step 2 (Firmwares tab)" wizard page.
If an error message appears, check Possible Error Message(s).
You are ONLY required to fill in this step/tab, if you intend to deliver a firmware package to your device(s).
To return to the "New Configuration step 1 (Properties tab)" wizard page, click ![]() OR
OR ![]() .
.
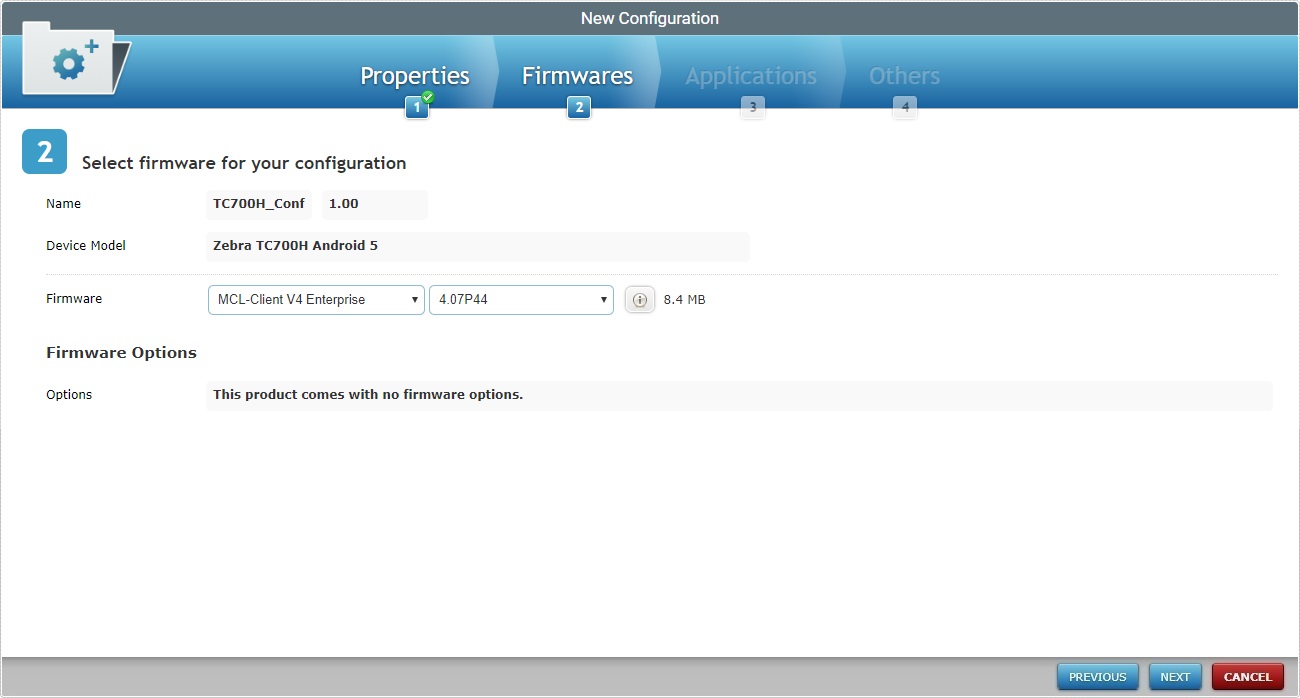
5. Select the MCL product and corresponding firmware package version for your configuration from the respective drop-down.
Depending on the selected product/firmware package version, you may have firmware options to select.
If there are no firmware options (message display: "This product comes with no firmware options."), proceed to step 7.
If there are, continue to step 6.
6. Make your selection according to the imposed rules/available options:
a. Click ![]() and/or
and/or ![]() to access the corresponding languages list.
to access the corresponding languages list.
b. In the resulting pop-up window, check the ![]() of the languages you need.
of the languages you need.
![]()
The TTS languages list includes 2 possible speech models for a given language:
•The Standard TTS speech model – Uses a large speech base (encoded speech units based on natural speech recordings that are selected/concatenated as necessary). The resulting TTS is closer to a natural sounding speech.
Example of a Standard TTS languages file: “MCL-Client Voice V4 TTS French (FR) Female Speaker Audrey".
•The Compact TTS speech model – Uses a smaller speech base (the speech units are a result of a limited number of recordings which are, then, compiled together). The resulting TTS is more synthetic.
Example of a Compact TTS languages file: “MCL-Client Voice V4 TTS French (FR) - Compact - Female Speaker Audrey".
Select a Compact TTS language file OR a Standard TTS language file. There is NO simultaneous use, the device will ONLY use the file that was downloaded last.
c. Click ![]() to apply your choices.
to apply your choices.
d. If required, use the ![]() option to add MCL's "Login Application" to the configuration. (There is a speech and a non-speech version of this application. Depending on the selected MCL product, you will be provided with the compatible version.
option to add MCL's "Login Application" to the configuration. (There is a speech and a non-speech version of this application. Depending on the selected MCL product, you will be provided with the compatible version.
I. Click ![]() .
.
II. Check the Login Application available.
III. Click ![]() to apply.
to apply.
e. If required, click ![]() to add MCL's "MCL Speech Control Panel" to the configuration.
to add MCL's "MCL Speech Control Panel" to the configuration.
I. Click ![]() .
.
II. Check the "MCL Speech Control Panel" entry.
III. Click ![]() to apply.
to apply.
[MCL-Voice Blind is an MCL product intended for specific speech environments where a screen is NOT necessary to the operator handling the MCL speech application(s) - the operator’s interaction with the speech application is, mainly, via speech input/output.
For more details, check our MCL Knowledge Base for the corresponding article. (You must register/log in to access this article.)]
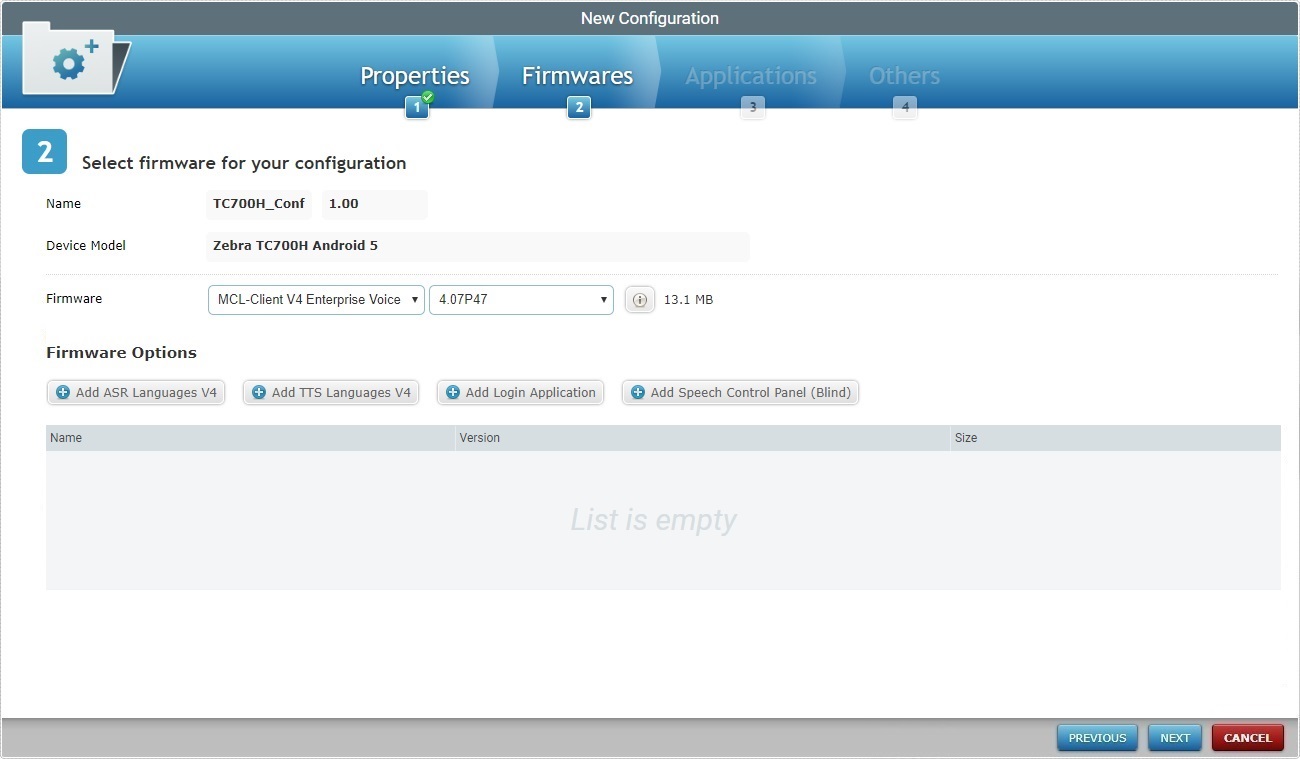
If required, click ![]() to open a "Packages" window and view the name of the selected firmware package version.
to open a "Packages" window and view the name of the selected firmware package version.
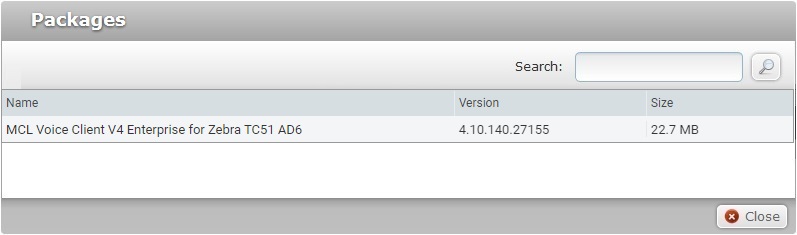
Click ![]() to close the "Packages" window and return to the Firmwares tab.
to close the "Packages" window and return to the Firmwares tab.
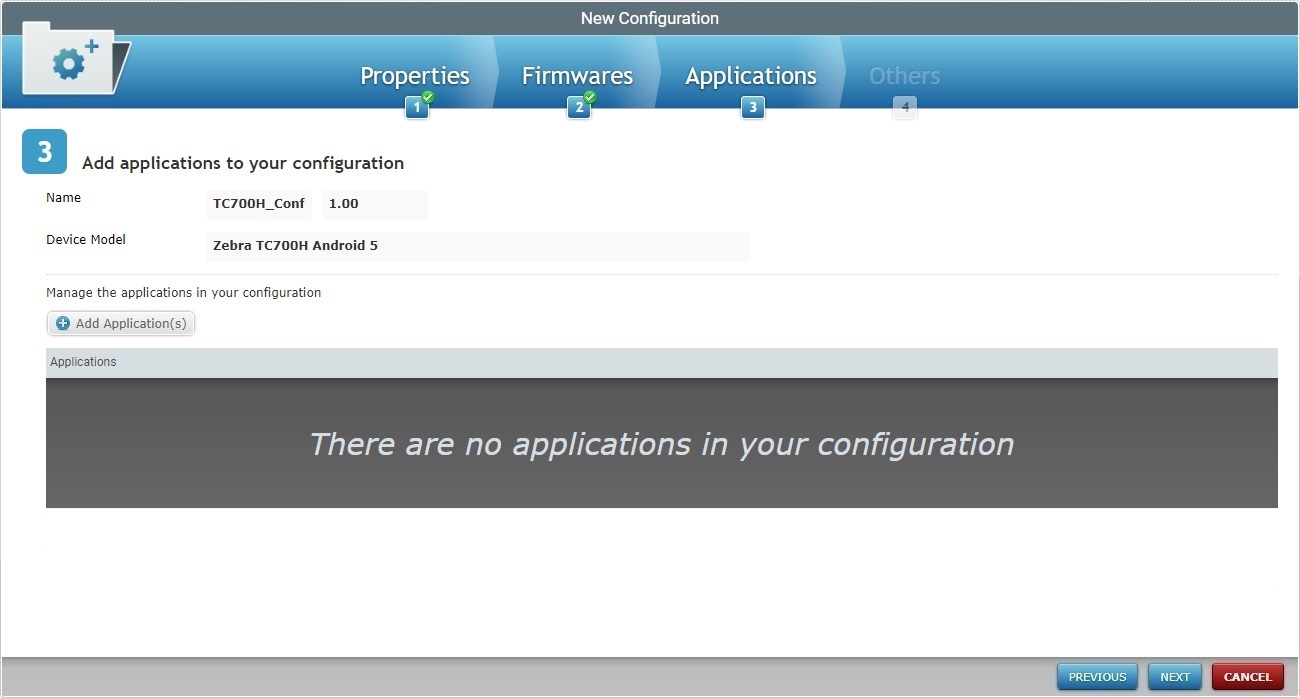
7. Click ![]() to continue to the "New Configuration step 3 (Applications tab)" wizard page.
to continue to the "New Configuration step 3 (Applications tab)" wizard page.
Unless you intend to deliver an application to your device(s), you do NOT need to fill in this step/tab.
To return to the "New Configuration step 2 (Firmwares tab)" wizard page, click ![]() OR
OR ![]() .
.
![]() Before creating a configuration, make sure you have applications available. If that is not the case, add them. For more information, see Adding an Application.
Before creating a configuration, make sure you have applications available. If that is not the case, add them. For more information, see Adding an Application.
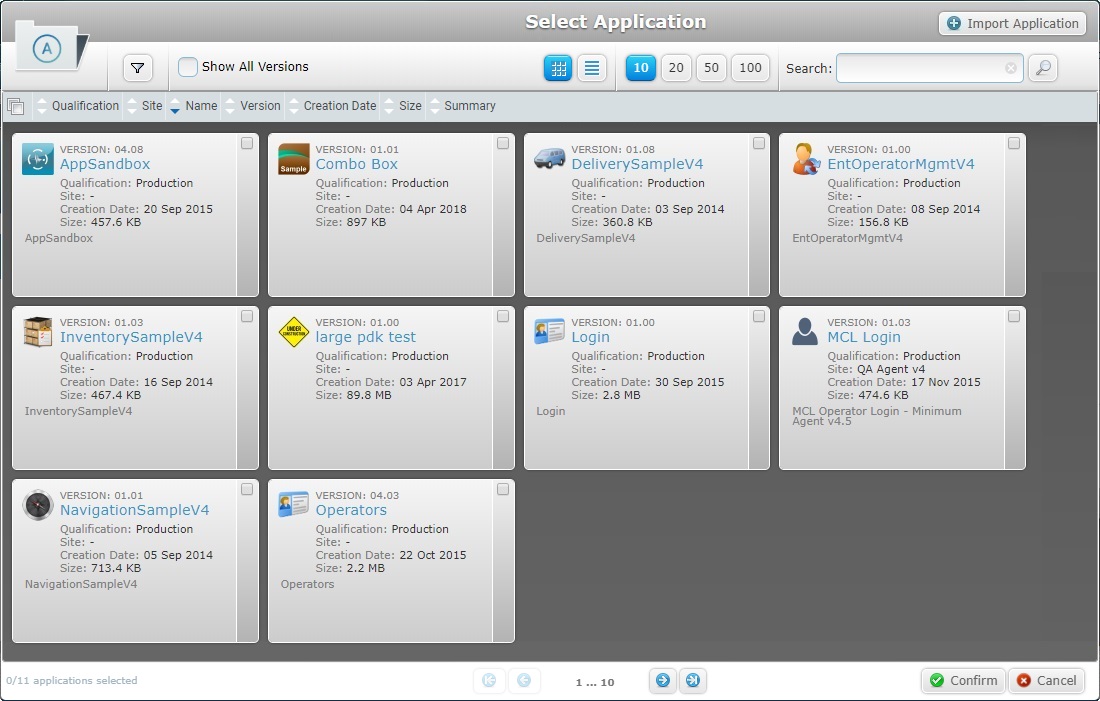
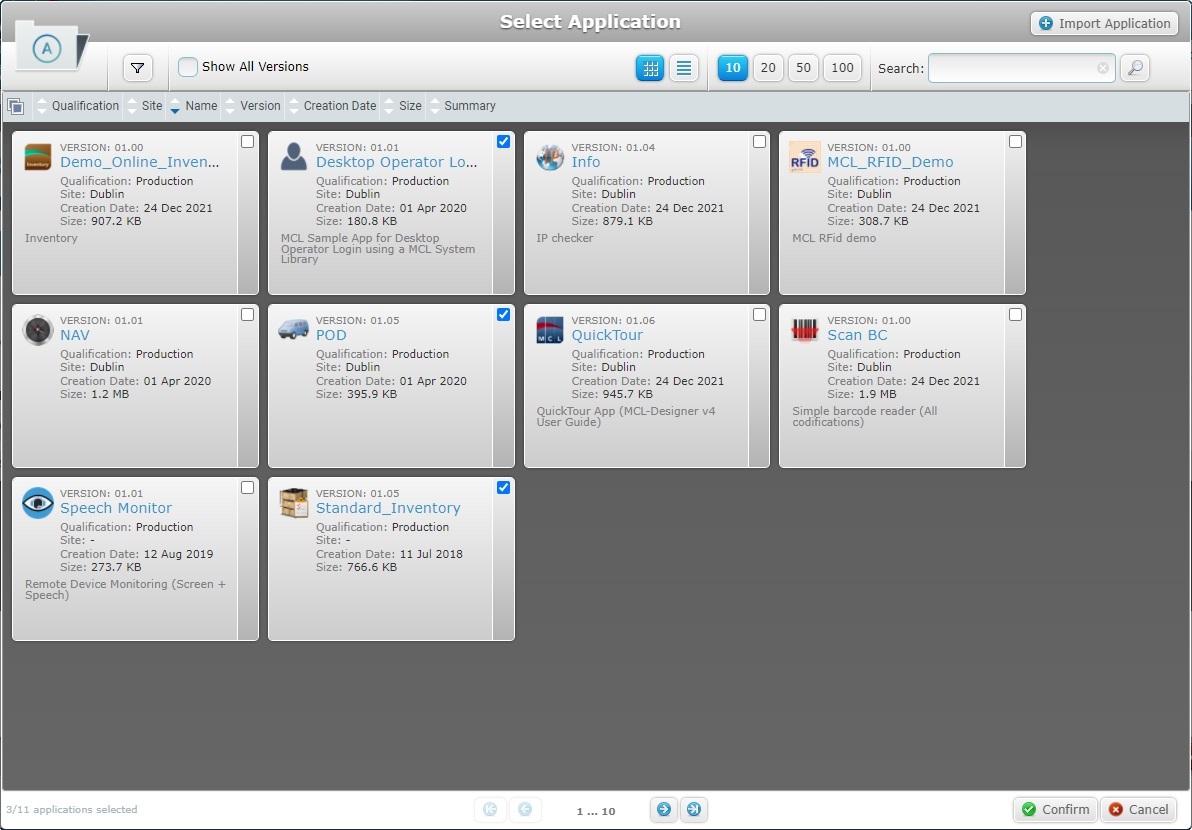
8. If required, add applications to your configuration. Click ![]() to open a "Select Application" window.
to open a "Select Application" window.
This window displays the available applications/application versions in the account that are compatible with the configuration's qualification.
![]() Remember that the selected qualification affects the application's usage in configurations:
Remember that the selected qualification affects the application's usage in configurations:
•A "Production" application can be used in "Production", "Acceptance", "Test" and "Development" qualified configurations.
•An "Acceptance" application can be used in "Acceptance", "Test" and "Development" qualified configurations.
•A "Test" application can be used in "Test" and "Development" qualified configurations.
•A "Development" application can only be used in "Development" qualified configuration.

If required, use:
•the ![]() button to enable the "Name", "Qualification", "Upload Date", "Author" and/or "Company" filters to limit the display:
button to enable the "Name", "Qualification", "Upload Date", "Author" and/or "Company" filters to limit the display:
I. Enter data in the required fields/select from the drop-down. You can use as many filters, simultaneously, as necessary.
II. Click ![]() to filter the list according to the data you added in the "Name", "Qualification", "Upload date", "Author" and/or "Company" fields/drop-downs.
to filter the list according to the data you added in the "Name", "Qualification", "Upload date", "Author" and/or "Company" fields/drop-downs.
III. Click ![]() to empty all the filters simultaneously OR click the
to empty all the filters simultaneously OR click the ![]() button of the field you want to clear OR select the "All" option in the corresponding drop-down.
button of the field you want to clear OR select the "All" option in the corresponding drop-down.
•the ![]() option. Check this option to view all configuration versions and not just the latest version of each configuration.
option. Check this option to view all configuration versions and not just the latest version of each configuration.
•the ![]() to filter the information:
to filter the information:
a. Enter what you want to search for.
b. Click ![]() or press <ENTER> in your PC keyboard to initiate the search.
or press <ENTER> in your PC keyboard to initiate the search.
c. End the search operation by emptying the search box and clicking ![]() OR emptying the search box and pressing <ENTER> in your PC keyboard OR clicking the
OR emptying the search box and pressing <ENTER> in your PC keyboard OR clicking the ![]() icon.
icon.
•the ![]() option for a grid view and
option for a grid view and ![]() for a list view.
for a list view.
• the ![]() option. Define how many items are displayed at a time by selecting one of the available options (10 items per page/20 items per page/50 items per page/100 items per page).
option. Define how many items are displayed at a time by selecting one of the available options (10 items per page/20 items per page/50 items per page/100 items per page).
•the ![]() buttons, located in the page's footer, to navigate the listed applications:
buttons, located in the page's footer, to navigate the listed applications:
•![]() These buttons allow you to navigate between the next/previous grouped items per page.
These buttons allow you to navigate between the next/previous grouped items per page.
•![]() These buttons are used to navigate to the first/last grouped items per page.
These buttons are used to navigate to the first/last grouped items per page.
![]()
The application name (in light blue) is a shortcut to the application's details page. See Application Details.
9. Select the appropriate application version(s) by checking the corresponding ![]() and proceed to step 10.
and proceed to step 10.
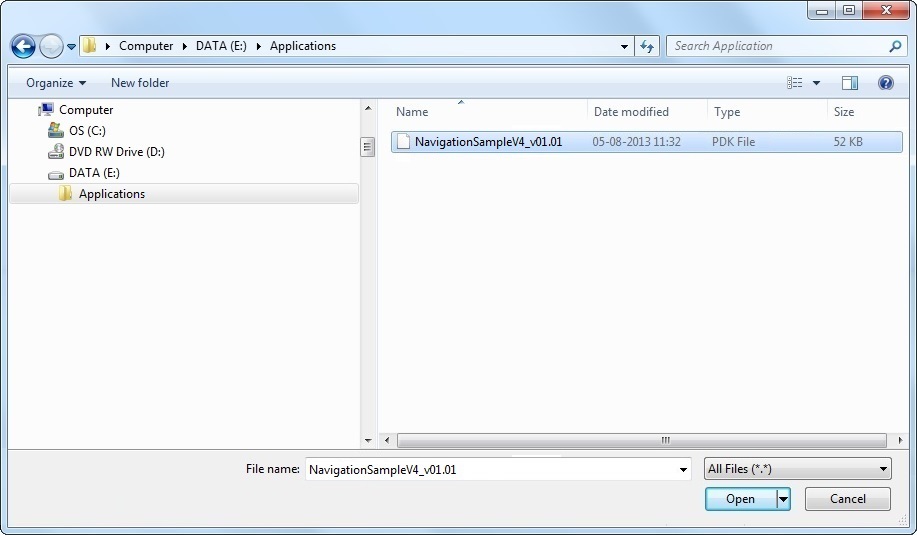
As an alternative, you can import an application:
I. In the "Select Application" pop-up window, click This opens an "Import Application" window and an overlapping OS File Explorer window.
II. Browse for/select the application you intend to import and click
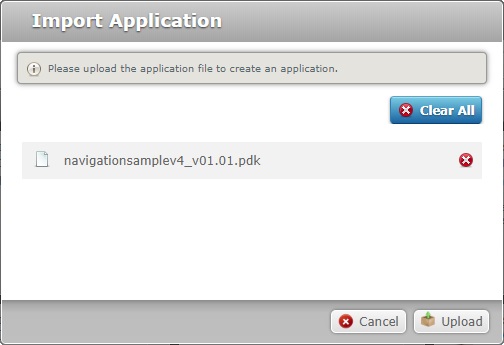
Any other file extension results in an error message and an aborted import. If there are any error messages, check Possible Error Message(s) to know how to proceed.
The OS File Explorer window closes and the "Import Application" window displays the selected application file.
If necessary, you can delete added files. To delete one file, click the corresponding
III. Once you have imported the required application, click If an error message appears, check Possible Error Message(s) to know how to proceed.
The imported file is, now, displayed in the "Select Application" window.
IV. Check the
|
10. Click ![]() and return to the "New Configuration step 3 (Applications tab)" wizard page.
and return to the "New Configuration step 3 (Applications tab)" wizard page.
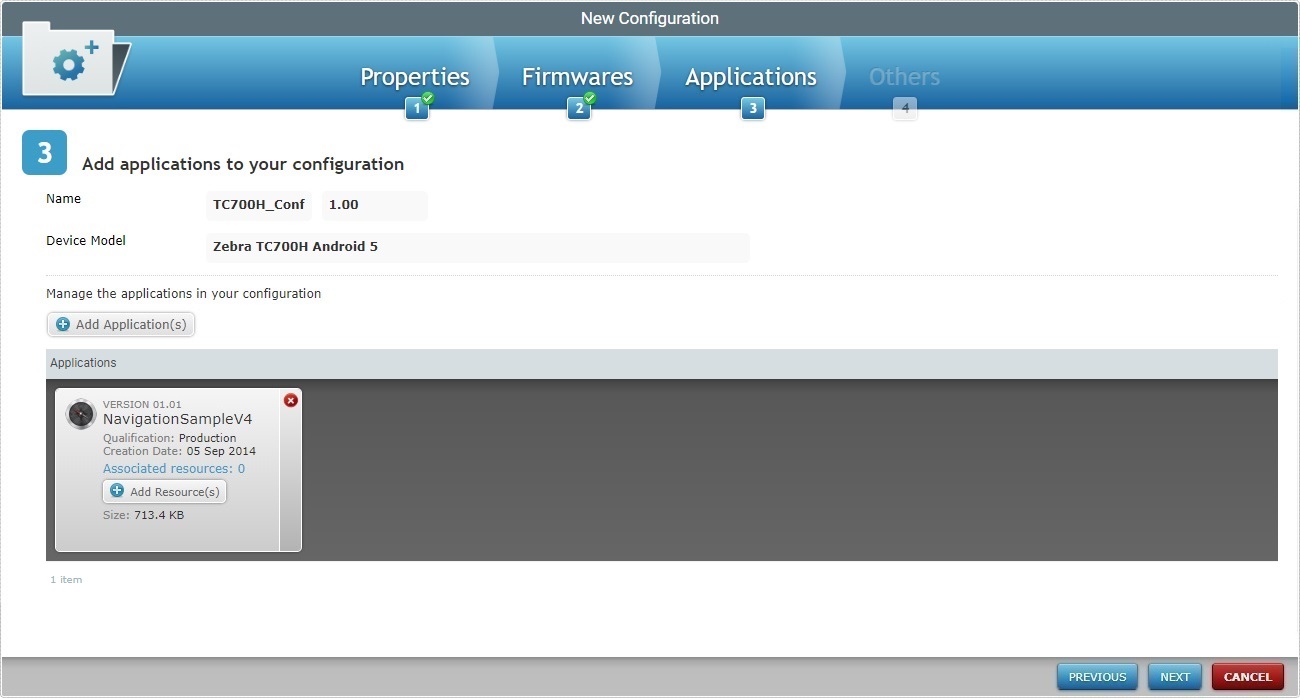
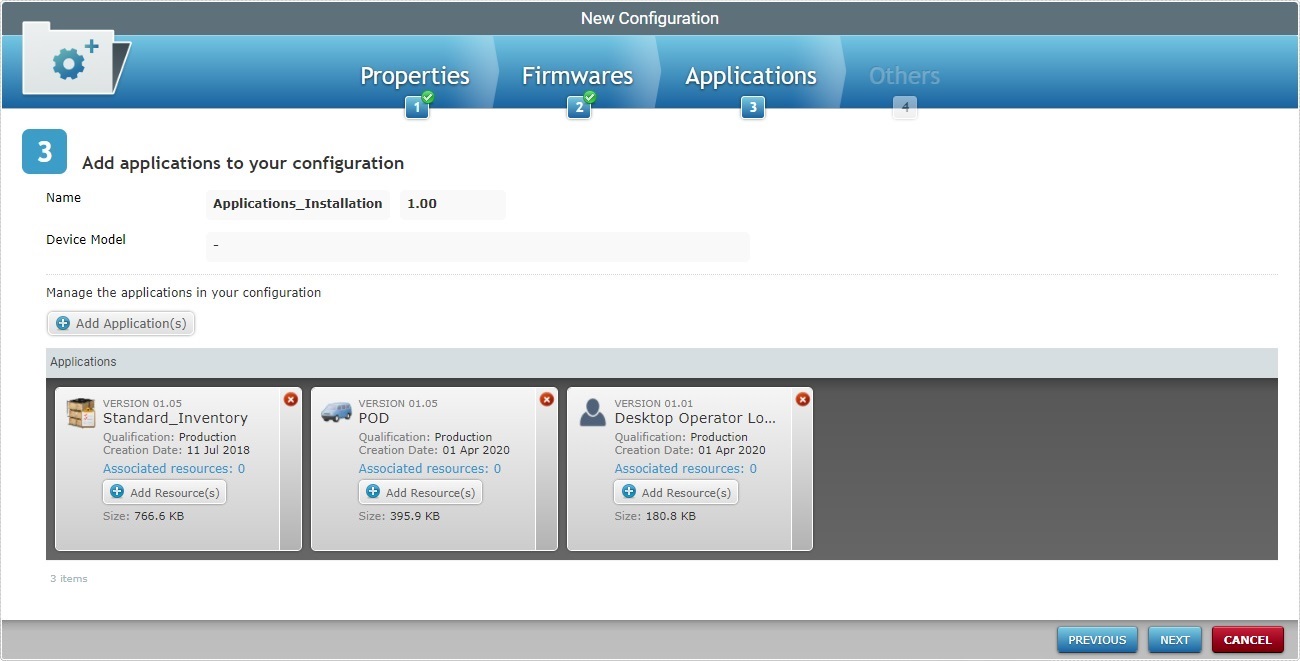
11. If you want to add more applications, click ![]() and repeat steps 9 and 10.
and repeat steps 9 and 10.
12. If required, add resources to an application.
If you do not want to add any resources, proceed to step 13.
I. Click the
If, for some reason, you close the OS File Explorer window, you can reopen it with the use of the "Upload Resource" window (it opens at the same time as the OS File Explorer window, in the background). Click that window's
II. Select the appropriate file and click
The OS File Explorer window closes and the resource file is displayed in the "Upload Resource" window.
If necessary, use the If necessary, you can delete added files. To delete one file, click the corresponding
III. If you are done adding resources, click
The resource is automatically uploaded and displayed in the "New Configuration step 3 (Applications tab)" wizard page.
IV. If required, click the corresponding "Associated resources" option of the intended application (displayed in light blue) to view or remove any resources included in the application.
Added resources can be removed from the application:
a. Select the resource(s) you want to delete by clicking the corresponding b. Click
|
13. If there are no more applications/resources to be added, click ![]() to continue to the "New Configuration step 4 (Others tab)" wizard page.
to continue to the "New Configuration step 4 (Others tab)" wizard page.
If an error message appears, check Possible Error Message(s) to know how to proceed.
This step/tab is used to deliver all sorts of files to your devices. The exceptions are MCL firmware (save some cases, you SHOULD use the "Firmwares" tab for that) and MCL applications (those are added to Step 3 "Applications" tab).
To return to the "New Configuration step 3 (Applications tab)" wizard page,click ![]() OR
OR ![]() .
.
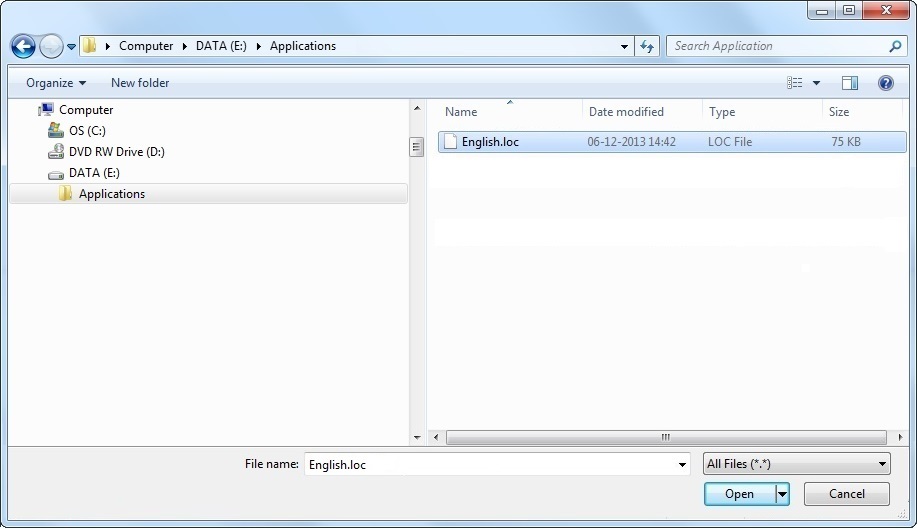
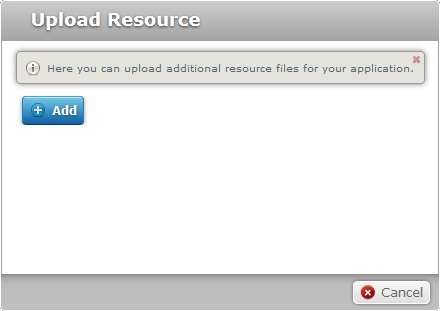
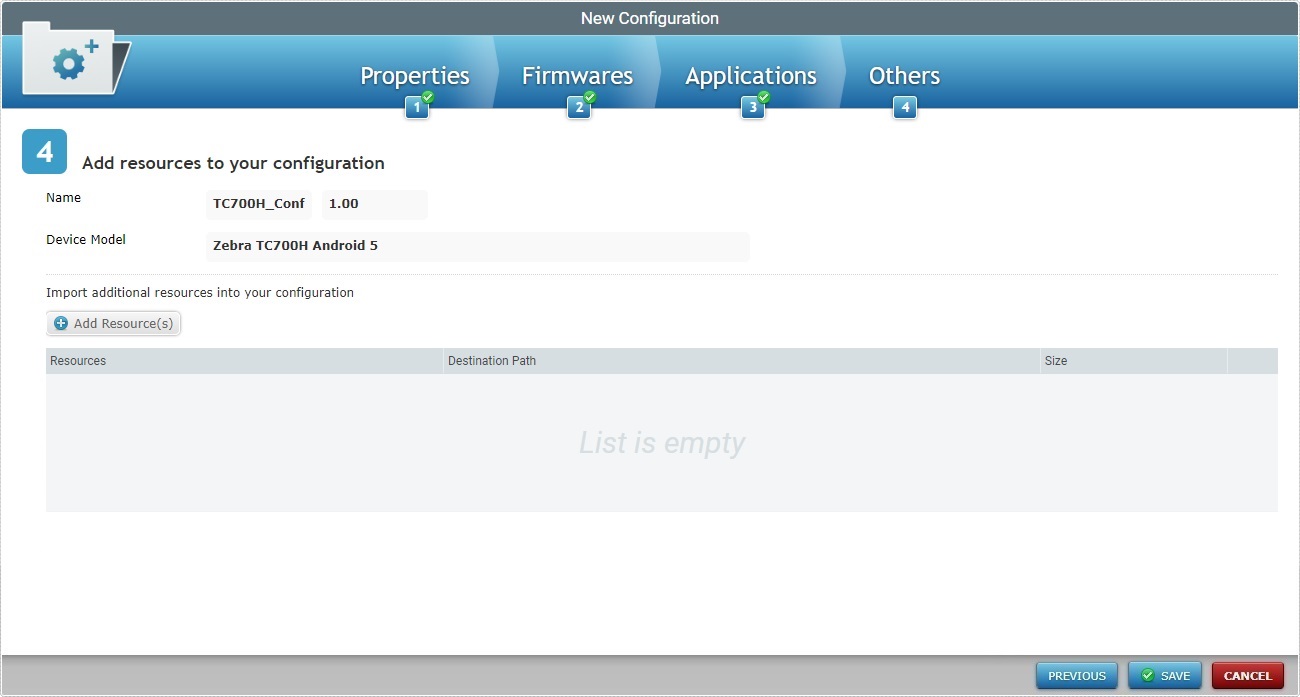
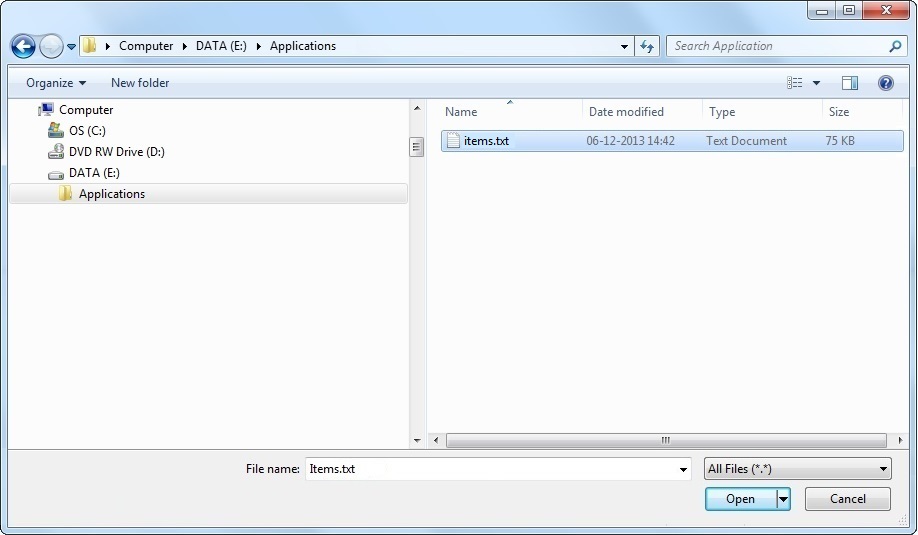
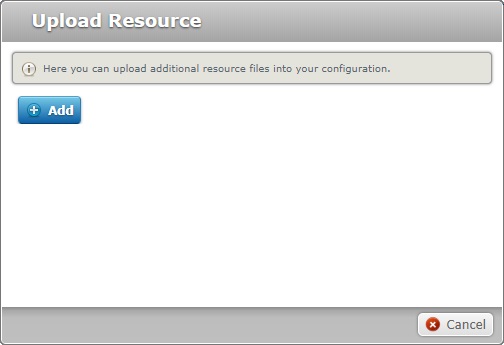
14. If required, click ![]() to add resources to your configuration. This opens an "Upload Resource" window and an overlapping OS File Explorer window.
to add resources to your configuration. This opens an "Upload Resource" window and an overlapping OS File Explorer window.
![]()
If, for some reason, you close the OS File Explorer window, reopen it by clicking ![]() in the "Upload Resource" window (it opens at the same time as the OS File Explorer window, in the background).
in the "Upload Resource" window (it opens at the same time as the OS File Explorer window, in the background).
15. Select the appropriate resource and click ![]() .
.
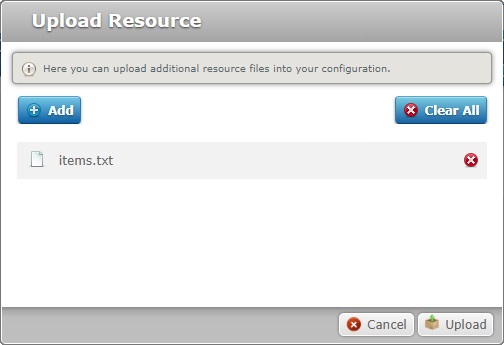
The OS File Explorer window closes and the resource file is displayed in the "Upload Resource" window.
If an error message appears, check Possible Error Message(s) to know how to proceed.
If necessary, you can delete added files. To delete one file, click the corresponding ![]() . To delete all the files at once, use the
. To delete all the files at once, use the ![]() option.
option.
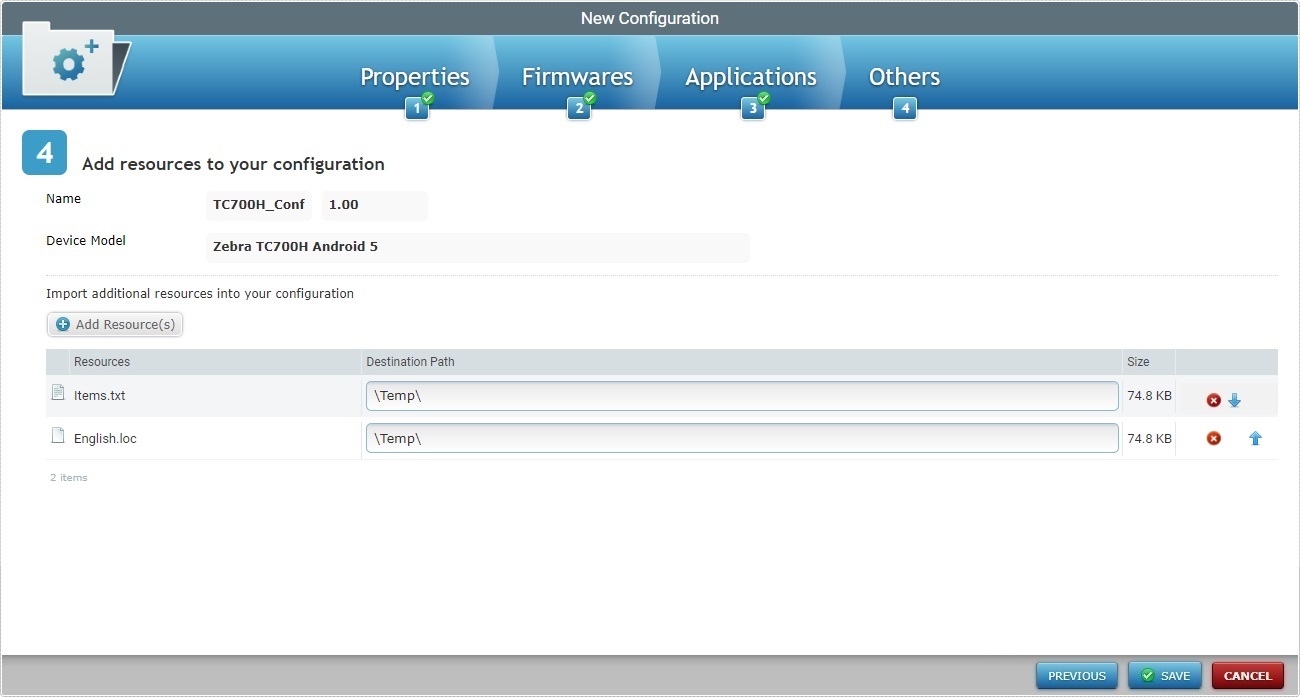
16. If there are no more resources to add, click ![]() .
.
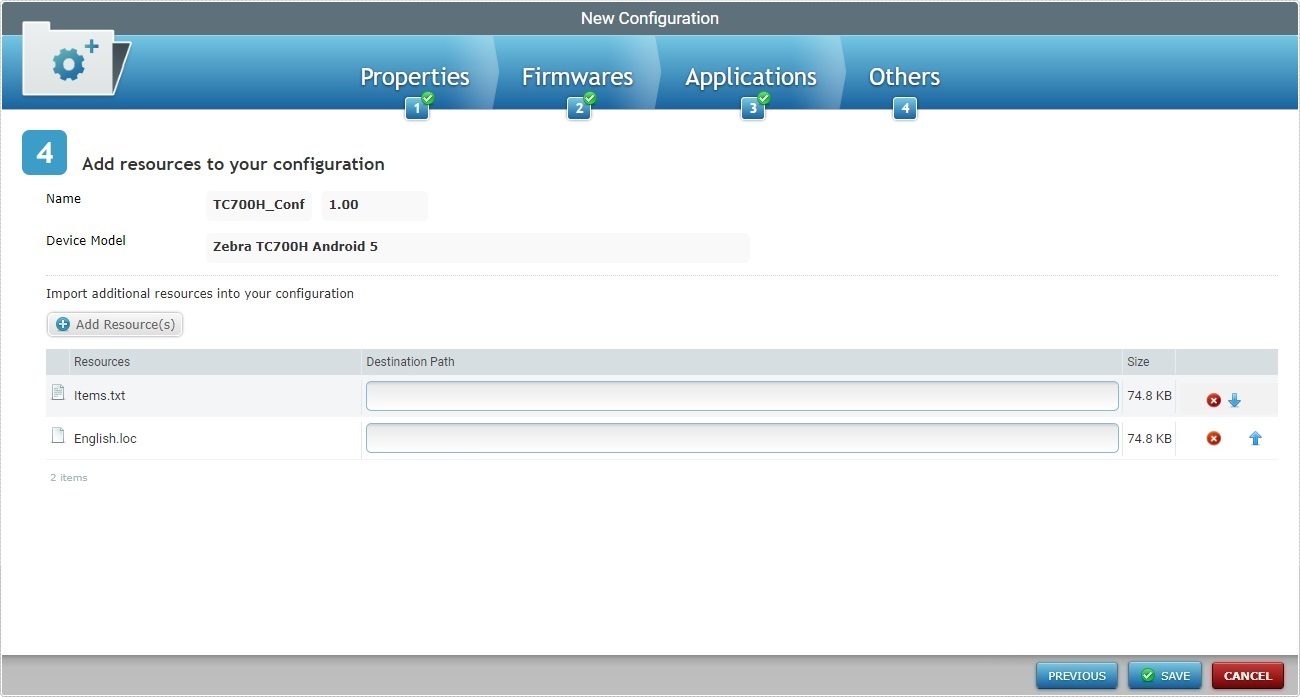
![]() If you upload files with a .pdk, an.apk or .cab extension, you do not need to enter a path. For any other file extensions, you must enter the path in the "Resources" box, in order to locate the file.
If you upload files with a .pdk, an.apk or .cab extension, you do not need to enter a path. For any other file extensions, you must enter the path in the "Resources" box, in order to locate the file.
To ensure compatibility with the Windows Mobile and Android operating systems, use a backlash at the beginning and end of the entered path (ex: \Temp\).
![]()
If you want to deploy files (with extensions other than ".pdk", an ".apk" or ".cab") to a known location, you can use the corresponding alias in the path.
"<APPS>", "<SHARED>", "<MCL>", "<INSTALL>" and/or "<SYSTEM>" are the available aliases you can enter. Ex: <APPS>\User_Guide\; <INSTALL>\Zebra manifest file ("*.mprf"); <INSTALL>\parameter services files ("*.dpf", "*.upf", "*apf", "*.cpf").
For more information about aliases, see Details on Aliases below.
MCL Alias List
For more detailed information on the "<SD>" and "<SDROOT>" aliases, register/log in to our MCL Community and access our MCL Knowledge Base (The Use of the <SD> and <SDROOT> MCL Aliases")
When entering a path, start with a backslash. This ensures project compatibility with the Windows Mobile/Windows CE and Android devices (ex: "\MCL\Apps\"running application" or "\MCL\Shared").
Below are some examples of manufacturer codes to be used when defining a path for a folder in an Android environment:
|
![]() Do NOT upload MCL .cabs into the "Others" tab - for instance, the .cab files available in the MCL Technologies sites meant for an initial installation. Deploying those installation packages as a resource will interfere with the established workflow between device and MCL-Mobility Platform (ex: files can be deleted/replaced in the device). Any necessary MCL-Agent upgrades/downgrades MUST be performed in the "Firmwares" tab.
Do NOT upload MCL .cabs into the "Others" tab - for instance, the .cab files available in the MCL Technologies sites meant for an initial installation. Deploying those installation packages as a resource will interfere with the established workflow between device and MCL-Mobility Platform (ex: files can be deleted/replaced in the device). Any necessary MCL-Agent upgrades/downgrades MUST be performed in the "Firmwares" tab.
![]() If your valid path is pointing towards a device folder that does not exist, one is created in the device.
If your valid path is pointing towards a device folder that does not exist, one is created in the device.
![]()
The size limit for file uploads into the "Others" tab of a configuration is 300 MB.
You can delete the newly added resource(s) by clicking the corresponding ![]() .
.
The configuration's resources will be delivered in the order they are presented in the table, from top to bottom.
Ex: The "items.txt" resource will be uploaded on to the device first and the "English.loc" file will follow.
You can change the installation order of the added resource(s) by clicking the corresponding ![]() arrow buttons. The resources will move up and/or down accordingly.
arrow buttons. The resources will move up and/or down accordingly.
18. Complete the configuration creation by clicking ![]() .
.
If an error message appears, check Possible Error Message(s) below to know how to proceed.
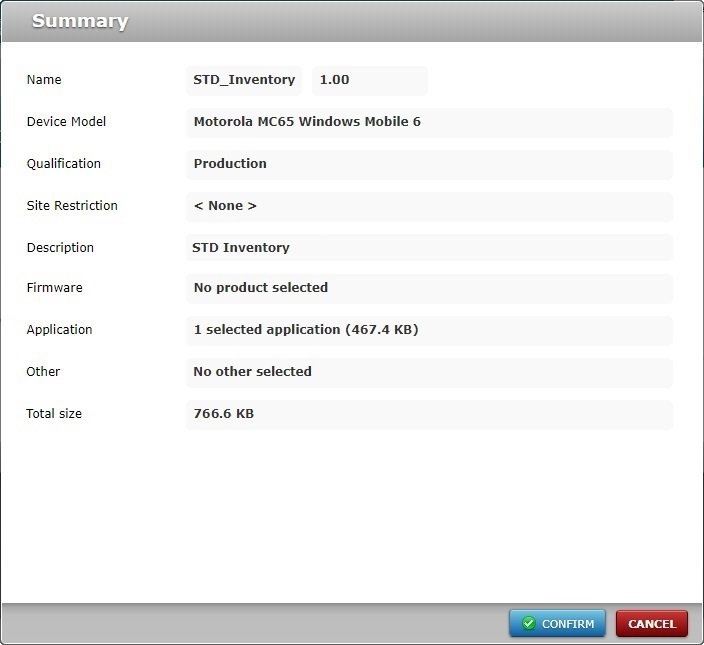
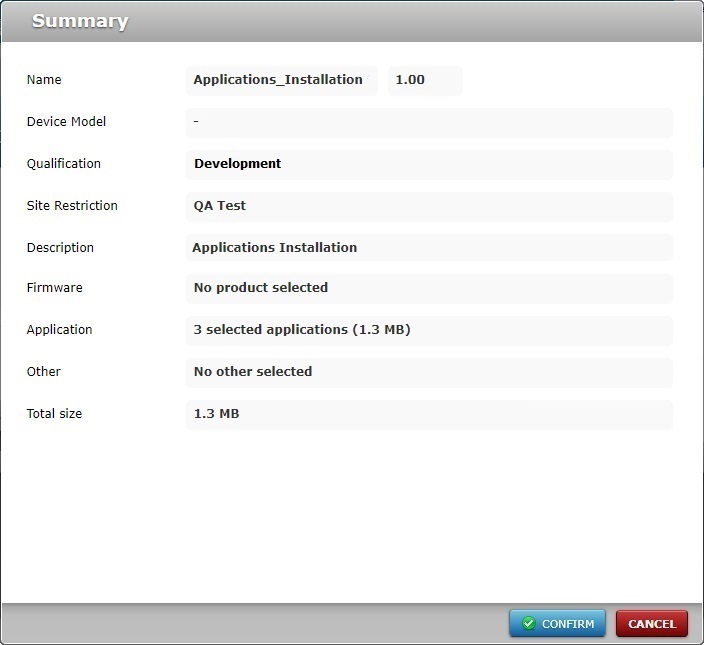
19. A summary window is displayed with the configuration's details.
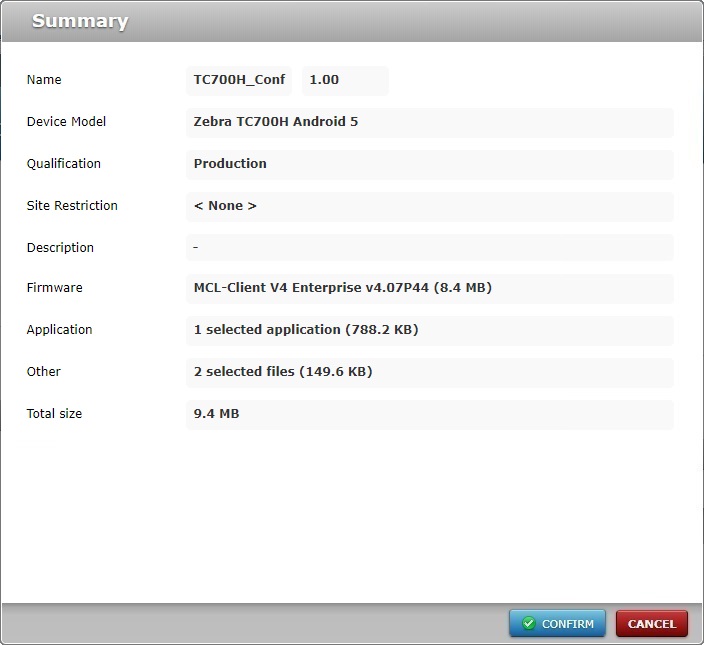
20. If all checks out, click ![]() .
.
The new configuration will be displayed in the "Configuration Details" page.
![]() To have a configuration deployed into devices, you must create a deployment plan. For more detailed information, see Creating a Deployment.
To have a configuration deployed into devices, you must create a deployment plan. For more detailed information, see Creating a Deployment.
![]() You can use the
You can use the ![]() buttons of the New Configuration wizard to navigate between steps.
buttons of the New Configuration wizard to navigate between steps.
![]() Do NOT forget to create a deployment for your configuration, otherwise the intended elements will NOT be delivered to the device(s).
Do NOT forget to create a deployment for your configuration, otherwise the intended elements will NOT be delivered to the device(s).
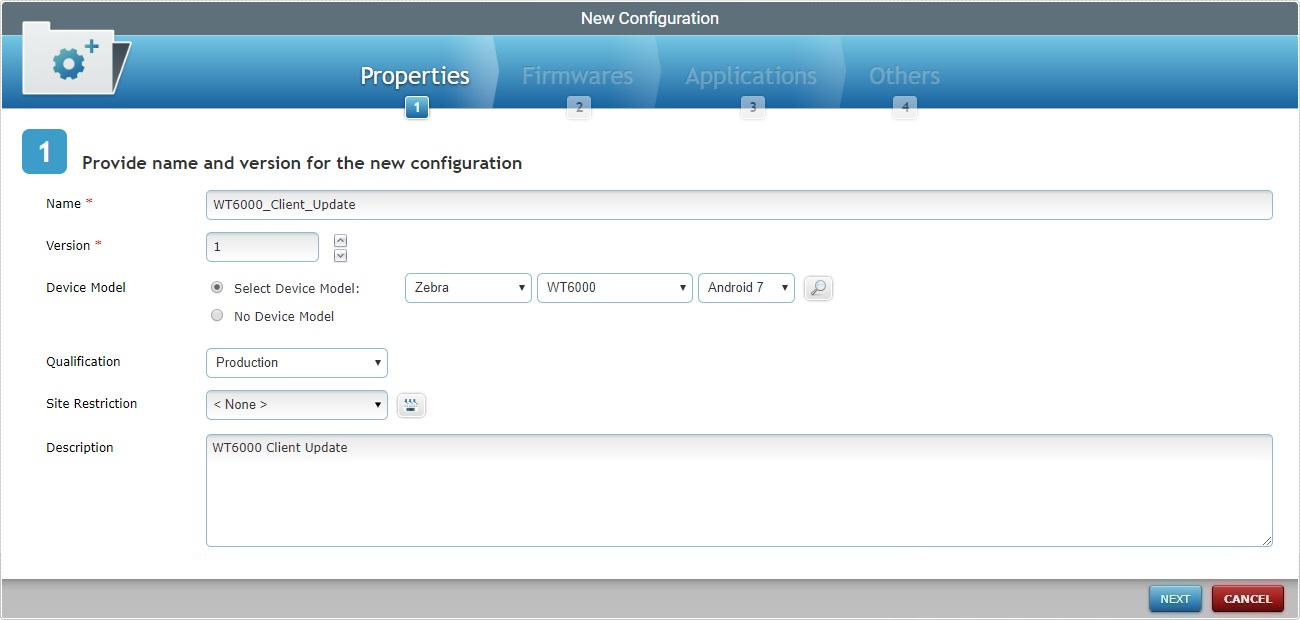
1. In the "Configurations" page, click
2. Fill in the "Properties" tab:
a. Define the name and version for the new configuration - "WT6000_Client_Update" + "1". b. Select the target device type's manufacturer and model - "Zebra / WT6000 / Android 7". c. Select the qualification - "Production". d. Add a description for the new configuration - "WT6000 Client Update".
3. Click
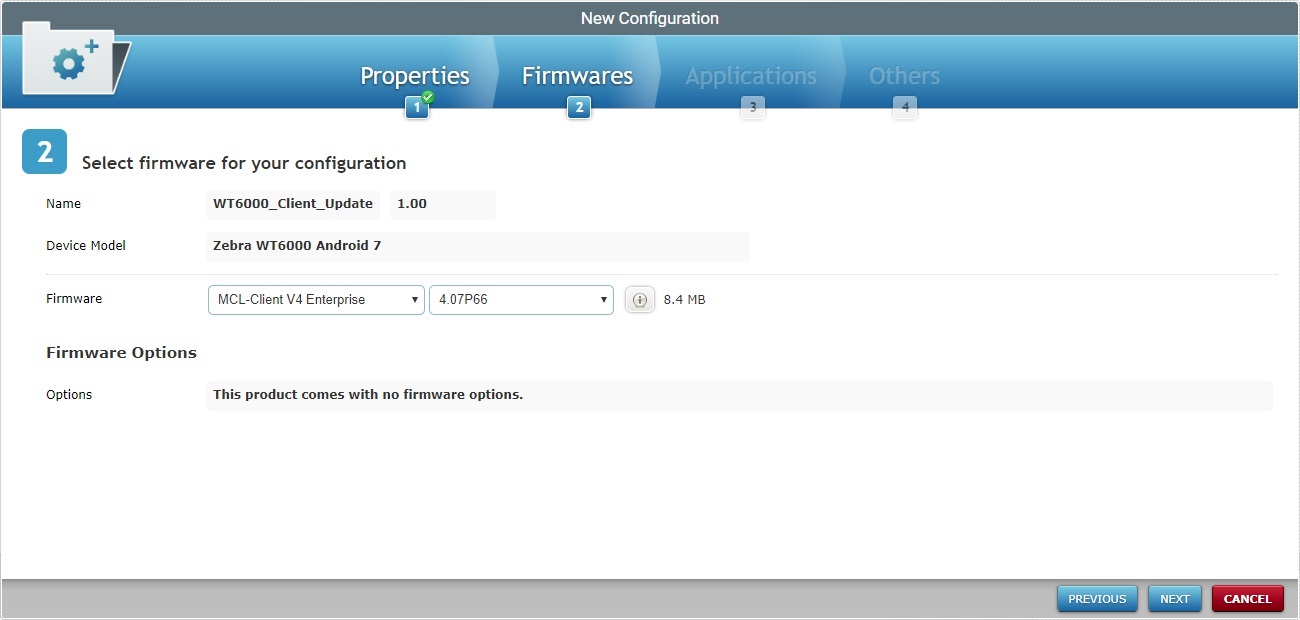
4. Select the appropriate product and version in the corresponding drop-downs:
a. Select the device compatible MCL-Client - "MCL-Client V4 Enterprise". b. Select the most recent firmware version available - "4.07P66".
5. Click
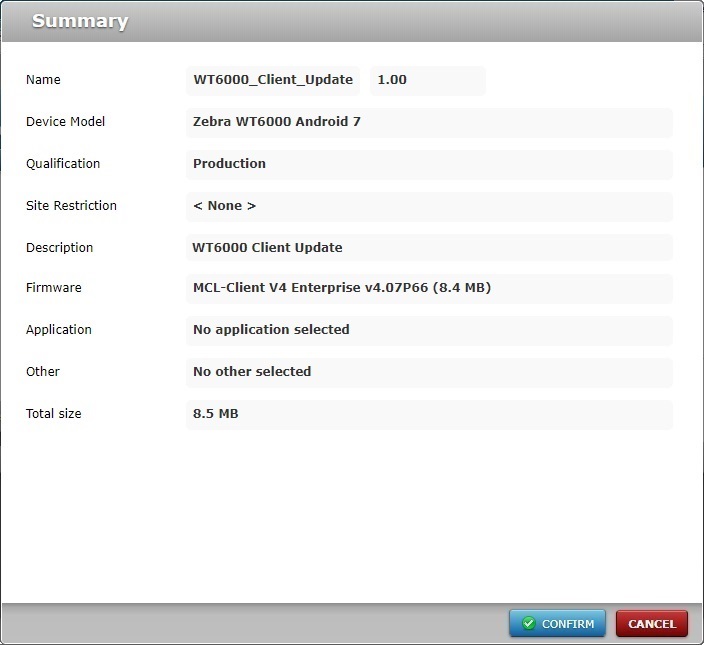
6. Click
7. Click
|
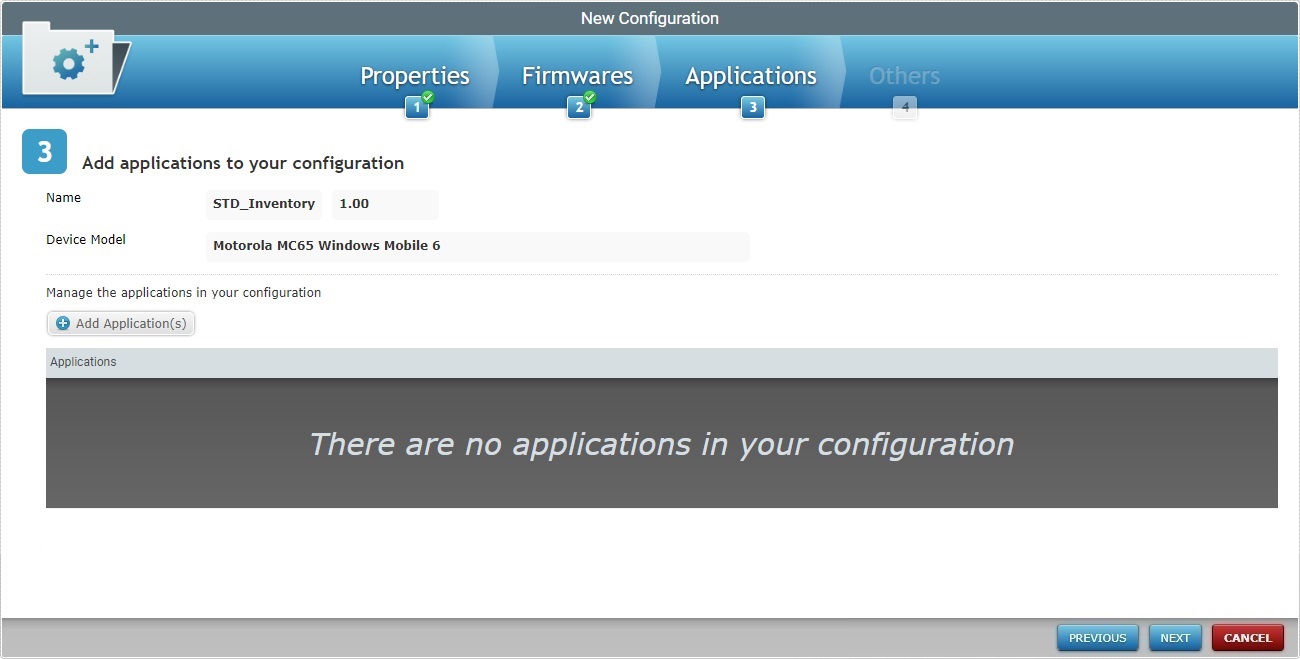
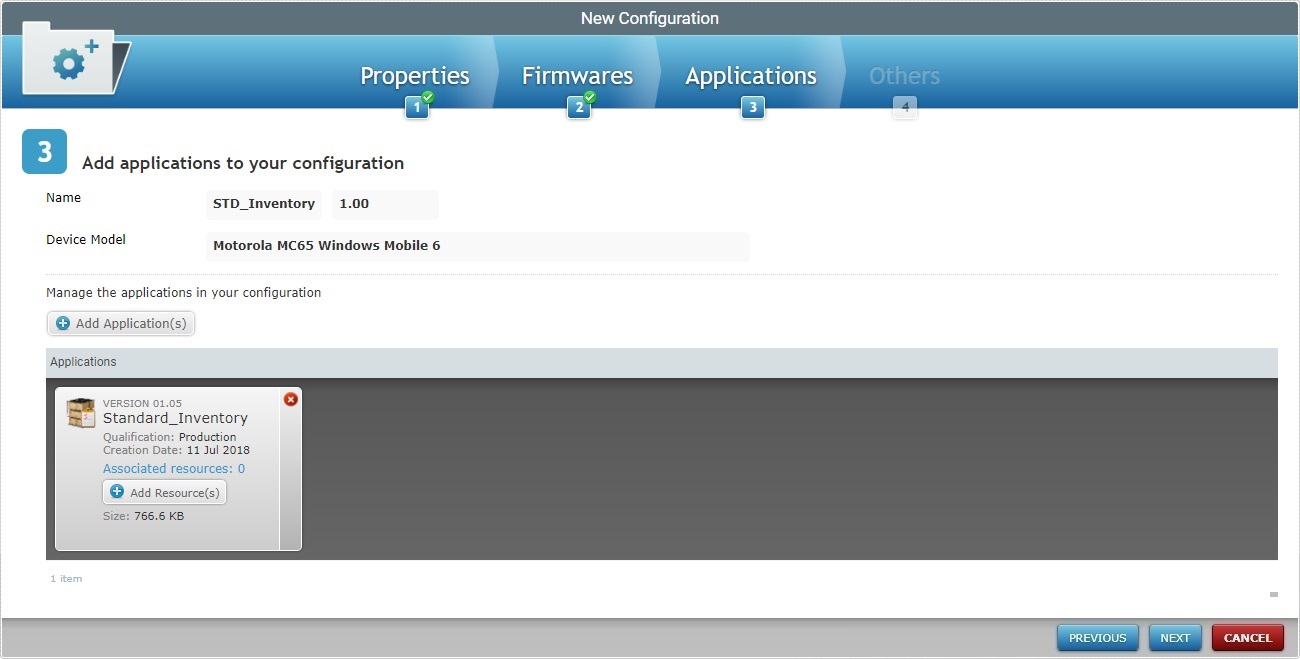
1. In the "Configurations" page, click
2. Fill in the "Properties" tab.
a. Define the name and version for the new configuration - "STD_Inventory" + "1" b. Select the target device type's manufacturer and model - "Motorola / MC65 / Windows Mobile 6". c. Select the qualification - "Production". d. Add a description for the new configuration - "STD Inventory"
3. Click
4. Click
5. Click
6. Click
7. Click
8. Click
|
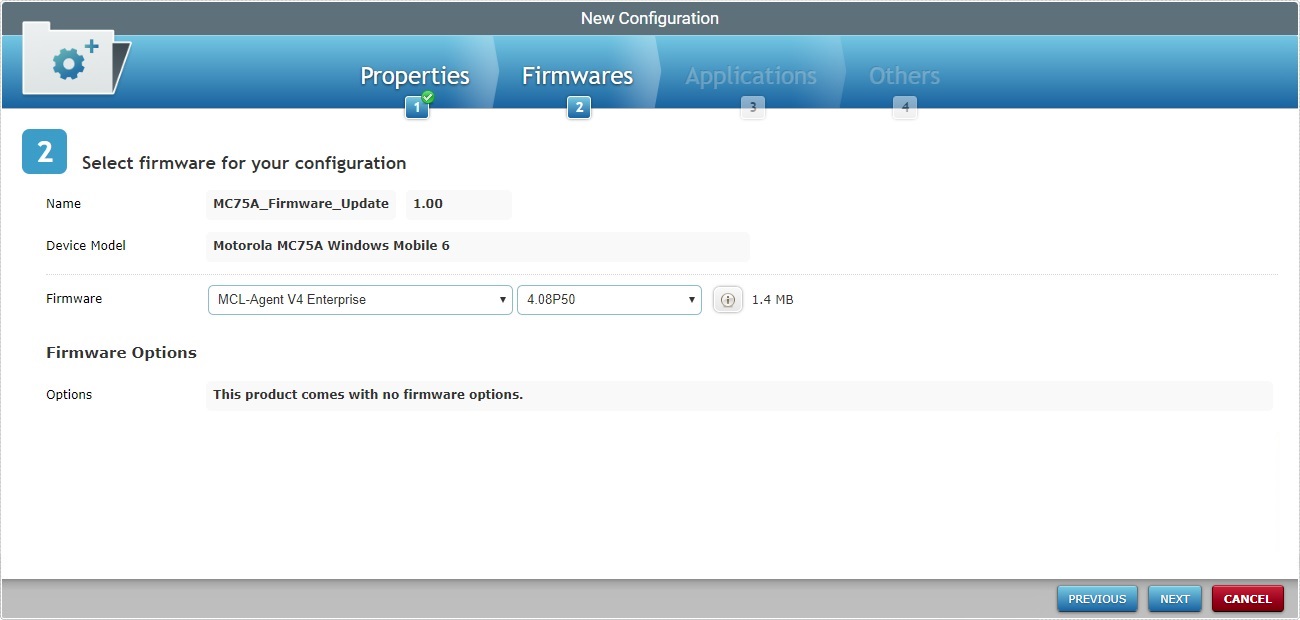
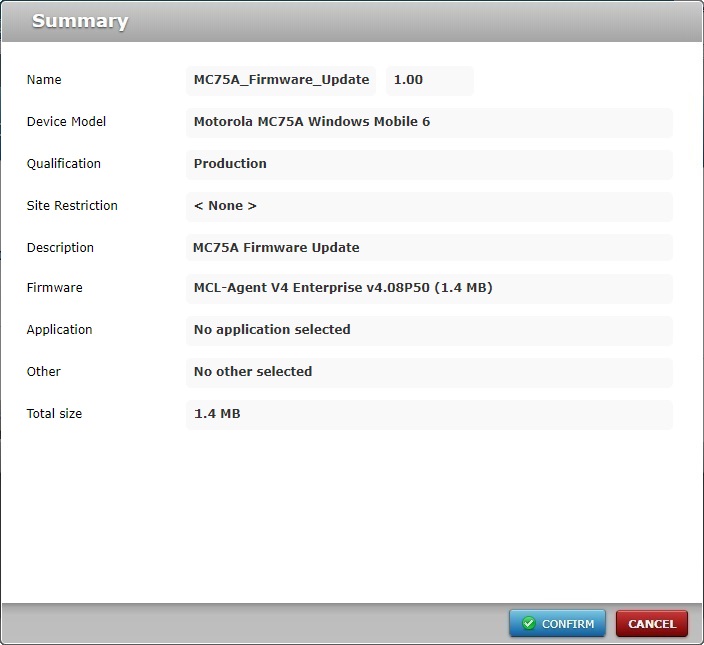
1. In the "Configurations" page, click
2. Fill in the "Properties" tab.
a. Define the name and version for the new configuration - "MC75A_Firmware_Update" + "1". b. Select the target device type's manufacturer and model - "Motorola / MC75A-Windows Mobile 6". c. Select the qualification - "Production". d. Add a description for the new configuration - "MC75A Firmware Update".
3. Click
4. Select the appropriate product and version in the corresponding drop-downs:
a. Select the device compatible MCL-Agent - "MCL-Agent V4 Enterprise". b. Select the most recent firmware version available - "4.08P50".
5. Click
6. There is nothing to add to the "Others" tab so, click
7. Click
|
1. In the "Configurations" page, click
2. Fill in the "Properties" tab.
a. Define the name and version for the new configuration - "Applications_Installation". b. Select the "No Device Model" option for Device Model. c. Select the qualification - "Development".
3. Click
4. Select the desired site and click
5. Add a description for the new configuration - "Applications Installation".
6. Click
7. Click
8. Click
9. Click
10. Click
11. Click
12. Click
|
![]()
Occurrence: When clicking ![]() in "New Configuration step 2 (Firmwares tab) wizard page.
in "New Configuration step 2 (Firmwares tab) wizard page.
Cause: The selected firmware option has options but none was selected.
Action: Select at least one option of the available firmware options.
![]()
Occurrence: When trying to upload an imported file.
Cause: Any imported application must have a .pdk extension.
Action: Repeat the import operation and select a file with the correct extension.
![]()
Occurrence: When clicking ![]() , on the "New Configuration step 4 (Others tab)" wizard page.
, on the "New Configuration step 4 (Others tab)" wizard page.
Cause: The added resource does not have a .pdk, an .apk or .cab extension and no path was provided.
Action: Enter a path to locate the file.
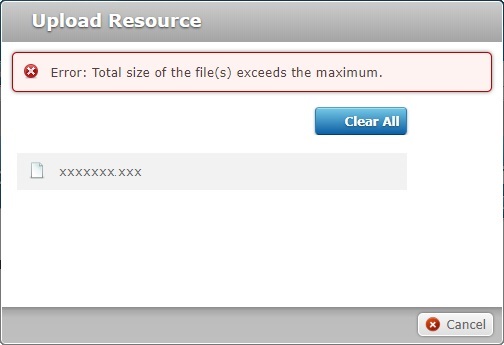
Occurrence: When trying to upload a resource and clicking ![]() , in the "New Configuration step 4 (Others tab)" wizard page.
, in the "New Configuration step 4 (Others tab)" wizard page.
Cause: The added resource exceeds the maximum file size of 300MB.
Action: The resource file must be under 300MB.
![]()
Occurrence: When clicking ![]() in the "New Configuration step 3 (Applications tab)" wizard page.
in the "New Configuration step 3 (Applications tab)" wizard page.
Cause: The selected application(s) qualification in incompatible with the selected configuration qualification.
Action: Review the configuration's qualification or the select application(s) qualification.
![]()
Occurrence: In Step 2: Firmwares when clicking ![]() to continue.
to continue.
Cause: The selected firmware option has options but none was selected.
Action: Select at least one option of the available firmware options.